1. Введение
This manual provides detailed instructions for the proper setup, operation, and maintenance of your HOTRC CT-4A 4-channel 2.4GHz RC Transmitter and Receiver system. Designed for use with RC cars, boats, and tanks, this system offers stable control and advanced features. Please read this manual thoroughly before use to ensure safe and optimal performance.
2. Что в коробке
- 1 x CT-400 Remote Controller
- 1 x CT-600 4+2channel Receiver
- 1 х Руководство пользователя
3. Продукт закончилсяview
The HOTRC CT-4A transmitter features an ergonomic pistol-grip design for comfortable one-handed operation. The control panel includes various buttons and trims for precise adjustments.

Рисунок 3.1: HOTRC CT-4A Transmitter with labeled components including antenna, operation panel, handwheel, trigger, and battery compartment.
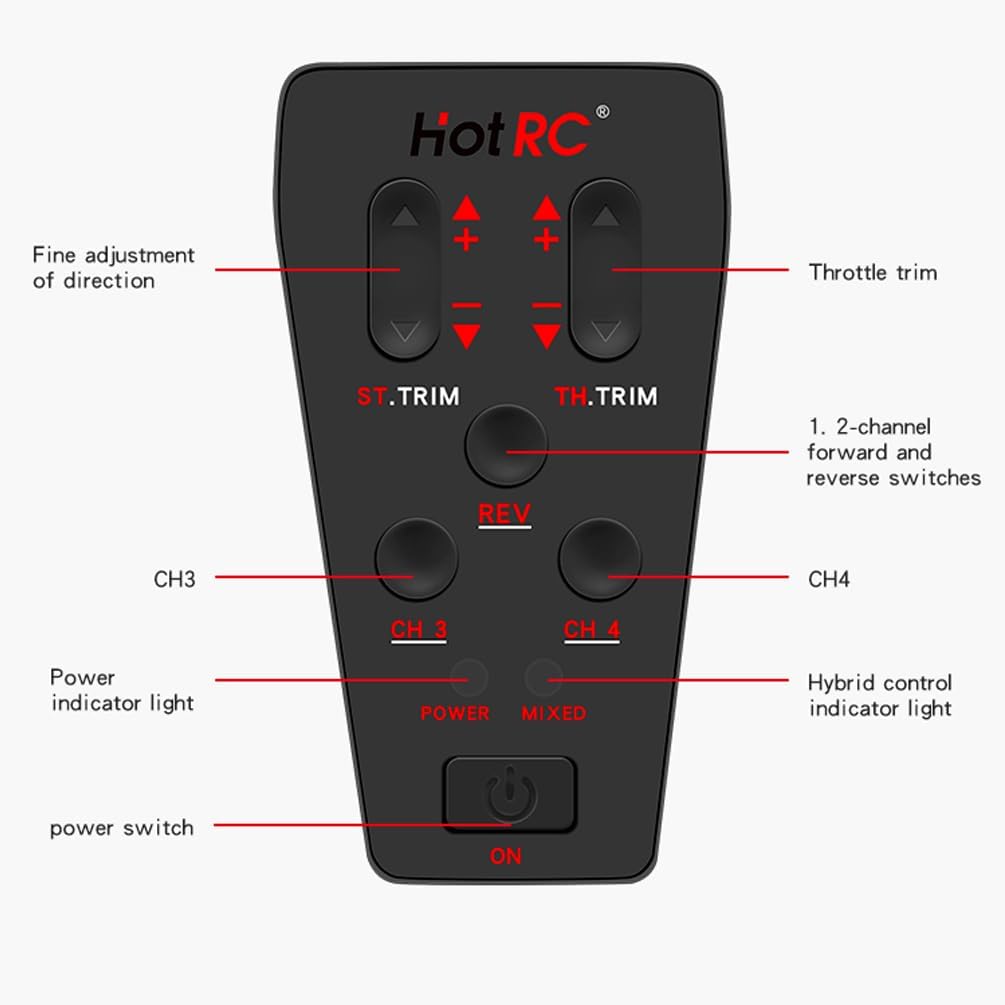
Рисунок 3.2: Подробный view of the CT-4A control panel, showing ST.TRIM, TH.TRIM, REV, CH3, CH4 buttons, Power indicator, Mixed control indicator, and Power switch.
4. Настройка
4.1 Установка аккумулятора
The transmitter supports two power supply methods: 2S lithium batteries or 4 AA batteries. The innovative detachable battery box allows direct insertion of a 2S lithium battery balance port.
- Откройте крышку батарейного отсека, расположенную в нижней части передатчика.
- Insert 4 AA batteries, observing correct polarity, or connect a 2S lithium battery to the designated port.
- Плотно закройте крышку батарейного отсека.
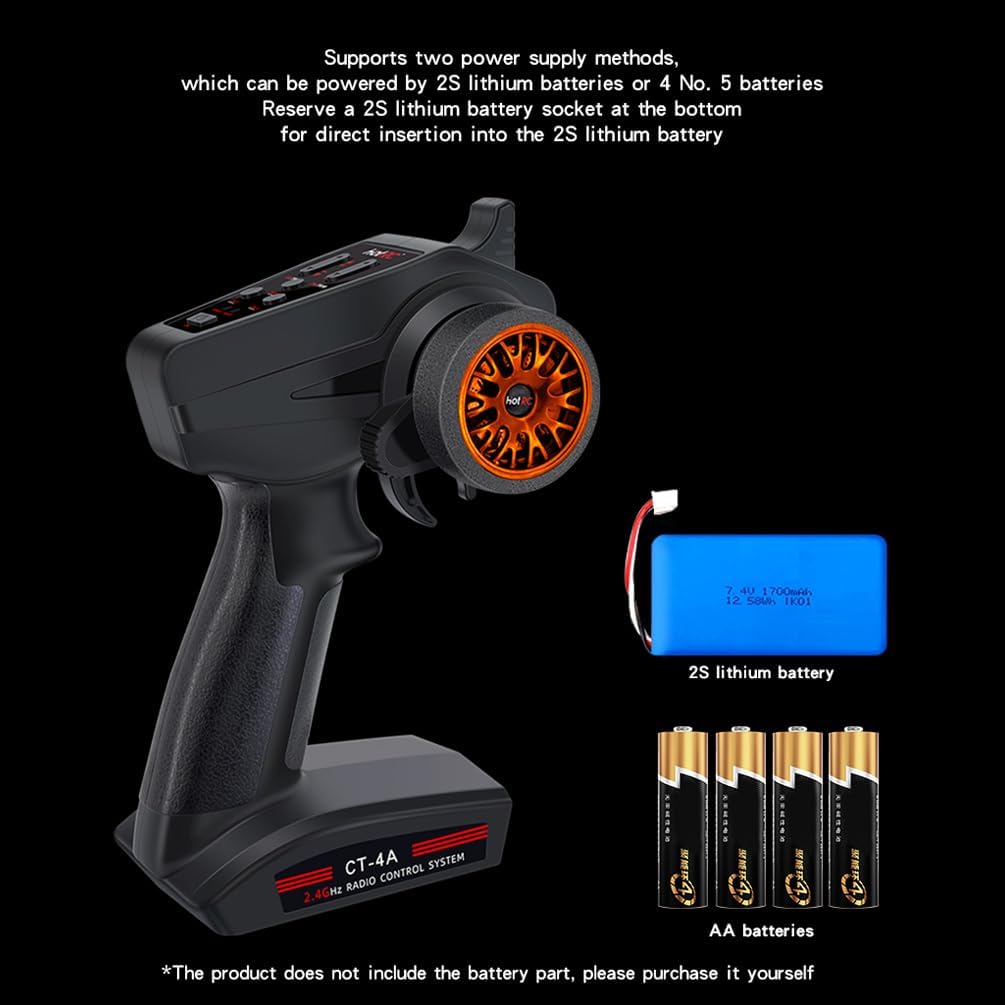
Рисунок 4.1: Illustration of battery installation options for the CT-4A transmitter, showing both 2S lithium battery and AA battery configurations.
4.2 Подключение приемника
The receiver supports a voltage supply of 4-9V and both numerical and analog servo modes. Connect your servos and other components to the appropriate channels on the receiver.
- Connect the receiver to your RC vehicle's components (servos, ESC, etc.).
- Убедитесь, что все соединения надежно закреплены и правильно ориентированы.
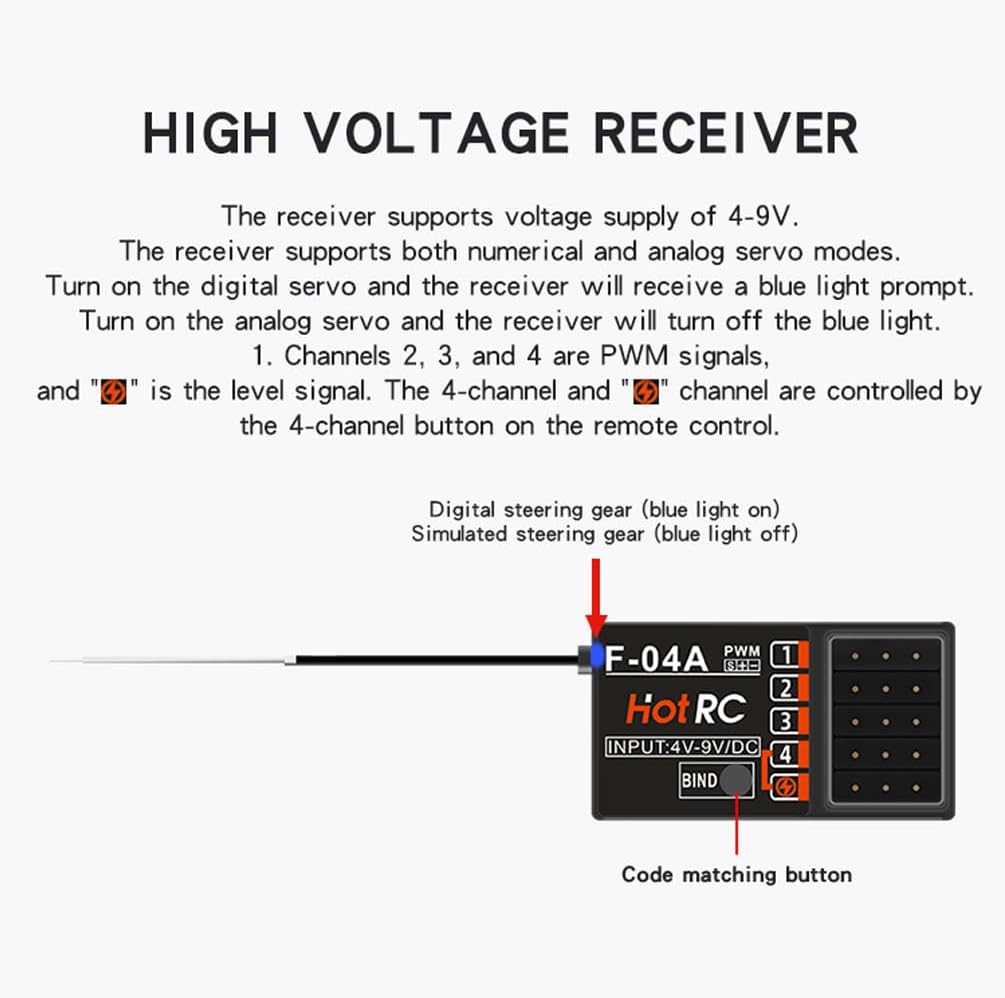
Рисунок 4.2: The CT-600 receiver showing the bind button and channel ports. Channels 2, 3, and 4 are PWM signals. The 4-channel and 'CH1' channel are controlled by the 4-channel button on the remote control.
4.3 Процесс связывания
Для установления связи между передатчиком и приемником выполните следующие действия:
- Убедитесь, что передатчик выключен.
- Insert the bind plug (codec) into the receiver's BIND/CH5 port.
- Power on the receiver. The LED on the receiver should start flashing.
- Press and hold the 'BIND' button on the transmitter while powering it on.
- Release the 'BIND' button once the transmitter powers on. The LED on the receiver should become solid, indicating successful binding.
- Выключите передатчик и приемник. Извлеките соединительный штекер из приемника.
- Power on the transmitter first, then the receiver. The system should now be bound and ready for operation.
5. Инструкция по эксплуатации
5.1 Основные элементы управления
The CT-4A features an ergonomic pistol-grip and steering wheel for intuitive control. The throttle speed limit can be adjusted, and it includes brake and fail-safe functions.
5.2 Positive and Negative Channel Settings
This setting allows you to reverse the direction of specific channels if needed for your model.
Видео 5.1: Instructions for setting positive and negative channels on the HOTRC CT-4A transmitter. This video demonstrates how to adjust channel direction by holding the REV key and manipulating the CH1 handwheel or CH2 trigger. A sound indicates successful setting.
5.3 Stroke Amount Adjustment
Adjusting the stroke amount allows you to fine-tune the range of movement for your servos.
Видео 5.2: Guide on setting the stroke amount for the HOTRC CT-4A. This video shows how to enter adjustment mode by powering on the transmitter while holding the REV key, then using the trim buttons to adjust CH1 and CH2 stroke. The stroke is divided into 5 levels, with the default being the largest.
5.4 Mixing Control Setting
The CT-4A allows for mixed control mode on channels 1-2. This feature can be useful for specific vehicle configurations.
Видео 5.3: Demonstration of how to activate mixing control on the HOTRC CT-4A. To enable, press and hold the CH3 and CH4 switches simultaneously while powering on the remote control. The mixing indicator light on the panel will illuminate, confirming successful activation. The same method is used to disable it.
5.5 Out of Control Protection (Fail-Safe) Setting
The fail-safe function protects your model by setting predefined servo positions in case of signal loss, preventing loss of control.
Видео 5.4: Instructions for setting the out-of-control protection (fail-safe) function. First, ensure the code is successfully matched. Then, control the transmitter's throttle channel to the desired braking or stalling state. Insert the encoder into the receiver's bind pairing hole. The LED light will flash, then remain solid when the fail-safe is set. Test by turning off the transmitter power and observing if the throttle servo moves to the set position.
6. Технические характеристики
| Спецификация | Ценить |
|---|---|
| Тип модели | Автомобиль, лодка, танк |
| Каналы | 4CH |
| Диапазон радиочастот | 2.4Ghz ISM (2.4005 - 2.483.5Ghz) |
| Мощность ВЧ | <100 мВт |
| Модуляция | GFSK |
| Расширенный спектр | FHSS |
| Скорость реакции | ШИМ≤20 мс |
| Расстояние радиочастотного сигнала (на земле) | 400м-500м |
| Чувствительность приема | <-97 дБм |
| Объем передатчикаtage | DC 4.5-9V |
| Объем приемникаtage | Постоянный ток 4В-14В |
| Вес брутто | 196 г |
| Размеры упаковки | 8.98 x 6.42 x 3.98 дюйма |
| Вес товара | 8 унции |
7. Техническое обслуживание
To ensure the longevity and reliable performance of your HOTRC CT-4A system, follow these maintenance guidelines:
- Уборка: Для очистки передатчика и приемника используйте мягкую сухую ткань. Избегайте использования агрессивных химикатов или растворителей.
- Хранилище: Store the system in a cool, dry place away from direct sunlight and extreme temperatures. Remove batteries from the transmitter if storing for extended periods to prevent leakage.
- Инспекция: Periodically check all cables and connectors for signs of wear or damage. Ensure the antenna is not bent or broken.
- Уход батареи: Always use recommended batteries and follow proper charging procedures for rechargeable types.
8. Поиск Неисправностей
If you encounter issues with your HOTRC CT-4A system, refer to the following common troubleshooting steps:
- Нет питания: Проверьте правильность установки батарей и убедитесь, что батареи полностью заряжены или новые. Убедитесь, что выключатель питания находится в положении «ВКЛ».
- Проблем с сигналом/привязкой нет: Re-perform the binding process as described in Section 4.3. Ensure the receiver is powered correctly and within range of the transmitter. Check for any interference from other 2.4GHz devices.
- Нестабильное движение сервопривода: Check all servo connections to the receiver. Ensure the receiver is receiving adequate power. Verify that the channel settings (positive/negative, stroke amount) are correctly configured.
- Ограниченный диапазон: Ensure the transmitter and receiver antennas are not obstructed or damaged. Avoid operating in areas with high radio interference.
- Элементы управления не отвечают: Confirm the system is properly bound. Check if the fail-safe function has been triggered due to signal loss.
9. Гарантия и поддержка
For warranty information or technical support, please refer to the contact details provided with your product packaging or visit the official HOTRC webСохраните чек о покупке в качестве подтверждения покупки для предъявления гарантийных претензий.