1. Введение
Thank you for choosing the Nipify YHM01C Outdoor Solar Lights. This manual provides essential information for the safe and efficient installation, operation, and maintenance of your new solar lighting system. Please read these instructions carefully before use and retain them for future reference.

This image displays the complete package, including two Nipify solar light units, two separate solar panels, and two remote controls, ready for installation.
2. Продукт закончилсяview
2.1 Компоненты
The Nipify YHM01C solar light system includes the following main components:
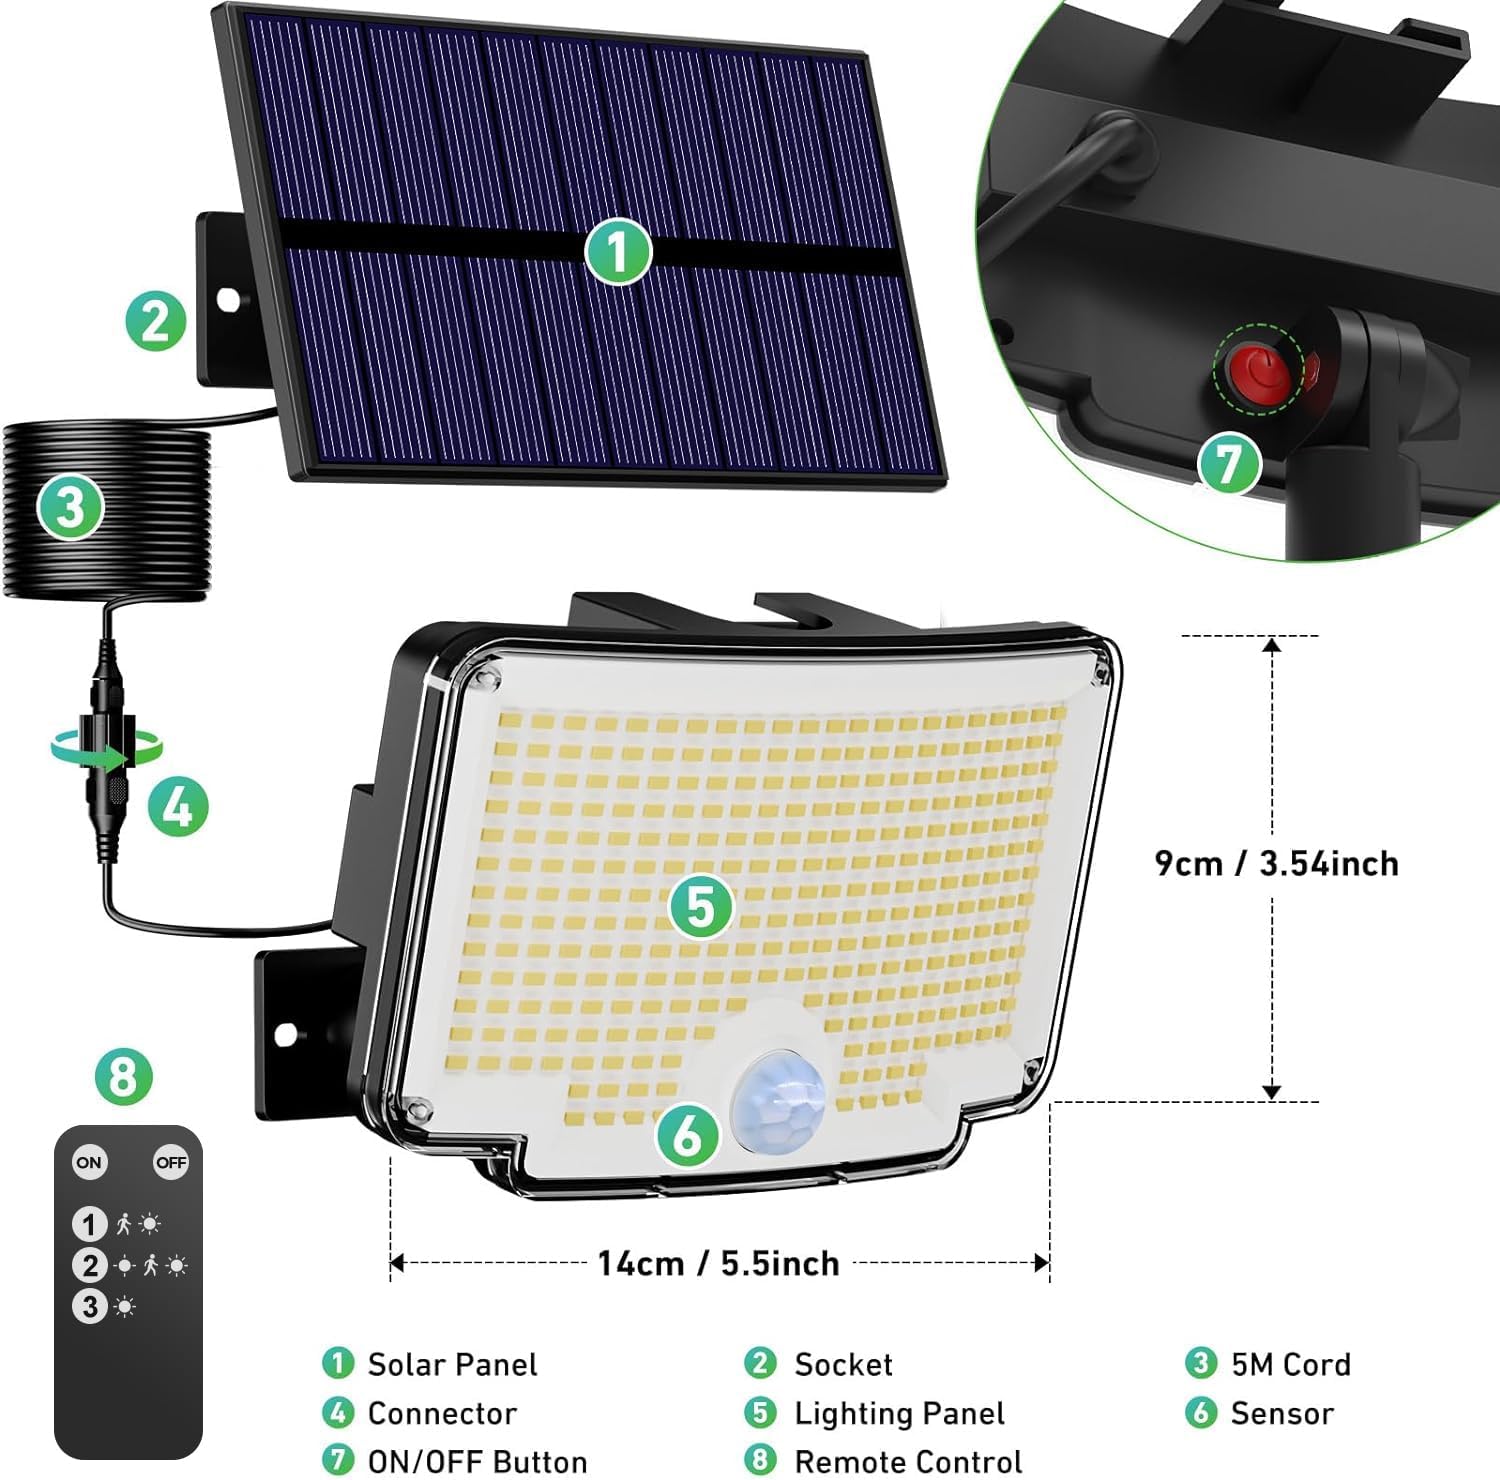
Взорванный view diagram identifying the main components of the solar light system: (1) Solar Panel, (2) Socket, (3) 5M Cord, (4) Connector, (5) Lighting Panel, (6) Sensor, (7) ON/OFF Button, and (8) Remote Control.
- Солнечная панель: Преобразует солнечный свет в электрическую энергию для зарядки внутренней батареи.
- Гнездо: Connection point for the solar panel cable.
- 5M Cord: Provides flexibility for separating the solar panel from the light unit.
- Разъем: Secures the 5M cord to the light unit.
- Lighting Panel: Houses the 310 LED chips for illumination.
- Датчик: Detects motion to activate specific lighting modes.
- Кнопка ВКЛ/ВЫКЛ: Manual power control for the light unit.
- Дистанционное управление: Allows convenient selection of lighting modes and power control.
2.2 Основные характеристики
- Super Bright Wide-Angle Lighting: Equipped with 310 high-quality LEDs, these lights offer super bright illumination. The arched design provides a 270° wide-angle light distribution, effectively covering a broad area.
- Отдельная солнечная панель: The solar panel is separate from the light unit, connected by a 5-meter cable. This allows flexible placement of the solar panel in optimal sunlight, even if the light unit needs to be installed in a shaded area for effective illumination.
- Three Lighting Modes with Remote Control: The lights feature three distinct operating modes, easily selectable via the included remote control. These modes are designed to optimize energy usage and lighting performance based on your needs.
- All-Weather Durability (IP65): Constructed from high-quality ABS material, these lights are designed for durability and resistance to various weather conditions, including cold, heat, rain, and snow (IP65 rated). They are suitable for year-round outdoor use.
- Гибкая установка: Two installation methods are supported: integrated or separated. The separated option allows the solar panel to be mounted up to 5 meters away from the light unit. All necessary screws and mounting hardware are included for straightforward installation.
3. Настройка и установка
Proper installation ensures optimal performance of your solar lights. Consider the following steps:
3.1 Выбор места установки
- Размещение солнечной панели: The solar panel must be installed in a location that receives direct sunlight for at least 6-8 hours daily to ensure full battery charge. Avoid areas shaded by trees, buildings, or other obstructions.
- Light Unit Placement: Position the light unit where illumination is desired. The motion sensor has a 270° detection angle and a range of 78-118 inches (2-3 meters). An ideal installation height for the light unit is 2-3 meters (approximately 6.5-10 feet) from the ground to maximize detection range and light coverage.

This image highlights the motion detection capabilities, showing a 270° detection angle and a detection range of 78-118 inches. It also indicates an ideal installation height of 2-3 meters and a remote control range of 10-16.4 feet.
3.2 Методы установки
Your Nipify solar lights offer two installation options:

This image demonstrates the two flexible installation options: mounting the solar panel directly with the light unit (without extension cord) or separately with the 5-meter extension cord.
- Integrated Installation (Without Extension Cord):
- Mount the solar panel directly onto the light unit.
- Secure the combined unit to a wall or desired surface using the provided screws and anchors. Ensure the solar panel faces direct sunlight.
- Separated Installation (With Extension Cord):
- Mount the solar panel in a location with optimal sunlight exposure.
- Mount the light unit in the desired illumination area, which can be shaded.
- Connect the solar panel to the light unit using the 5-meter extension cable. Ensure the connection is secure.
Общие шаги установки:
- Mark the desired drilling points on the wall.
- Просверлите отверстия и вставьте дюбели в стену.
- Secure the mounting bracket (for the light unit and/or solar panel) with screws.
- Attach the light unit and/or solar panel to the bracket.
- If using separated installation, connect the solar panel to the light unit via the 5-meter cable.

An aesthetic image depicting two Nipify solar lights mounted on a modern house, providing bright illumination to a patio and swimming pool area during nighttime.
4. Инструкция по эксплуатации
Your Nipify solar lights are designed for automatic operation, but you can select different lighting modes using the included remote control.
4.1 Первоначальная активация
Before first use, ensure the solar panel has charged the light for at least 6-8 hours in direct sunlight. Press the ON/OFF button on the light unit or the remote control to activate the light.
4.2 режима освещения
The lights feature three distinct modes, selectable via the remote control:
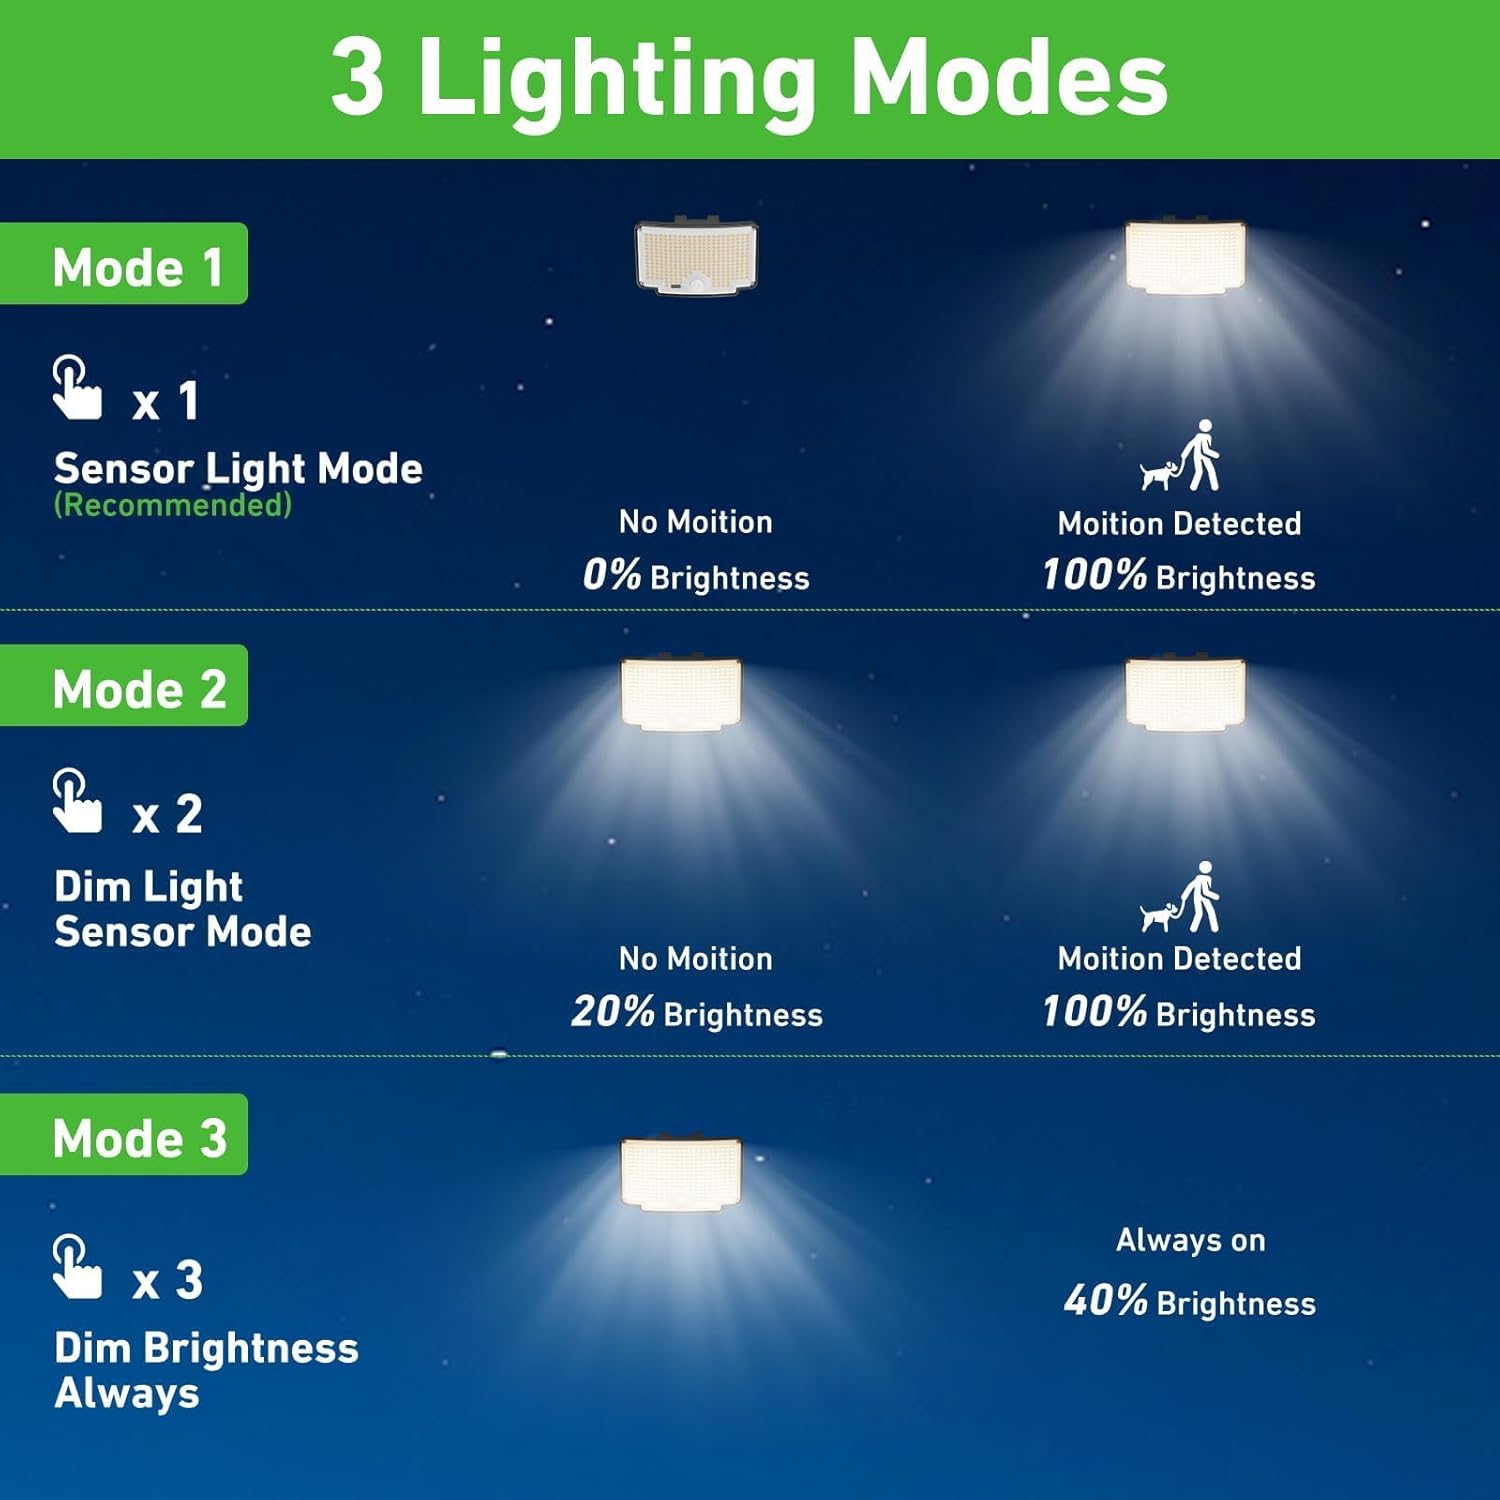
A visual guide detailing the three operational modes: Mode 1 (Sensor Light Mode), Mode 2 (Dim Light Sensor Mode), and Mode 3 (Constant Dim Brightness).
- Mode 1 (Sensor Light Mode - Recommended): The light remains off in the absence of motion. When motion is detected, the light illuminates at 100% brightness. After approximately 15-30 seconds of no motion, it turns off. This mode is energy-efficient and ideal for security lighting.
- Mode 2 (Dim Light Sensor Mode): The light stays on at a dim brightness (e.g., 20%) continuously. When motion is detected, it brightens to 100%. After approximately 15-30 seconds of no motion, it returns to dim brightness. This mode provides ambient lighting with a boost for activity.
- Mode 3 (Constant Dim Brightness): The light remains on at a constant dim brightness (e.g., 40%) throughout the night, regardless of motion. This mode is suitable for continuous ambient lighting.
4.3 Использование дистанционного управления
Пульт дистанционного управления позволяет:
- Включите/выключите свет.
- Select Mode 1, Mode 2, or Mode 3.
Ensure the remote control is pointed towards the light unit for effective communication. The remote range is approximately 10-16.4 feet (3-5 meters).
5. Техническое обслуживание
Regular maintenance helps ensure the longevity and optimal performance of your solar lights.
- Чистая солнечная панель: Периодически протирайте солнечную панель мягкой тряпкой.amp Ткань для удаления пыли, грязи, листьев и снега. Чистая панель обеспечивает максимальное поглощение солнечного света и эффективность зарядки.
- Clean Light Unit: Clean the light's surface and motion sensor regularly to ensure proper operation and light output.
- Проверьте соединения: Ensure all cable connections, especially the 5-meter cord if used, remain secure and free from damage.
- Аккумулятор: The internal battery is designed for long-term use. If the light's performance significantly degrades over time, it may indicate the battery is reaching the end of its lifespan. Battery replacement should be performed by qualified personnel if possible, or consider replacing the unit.
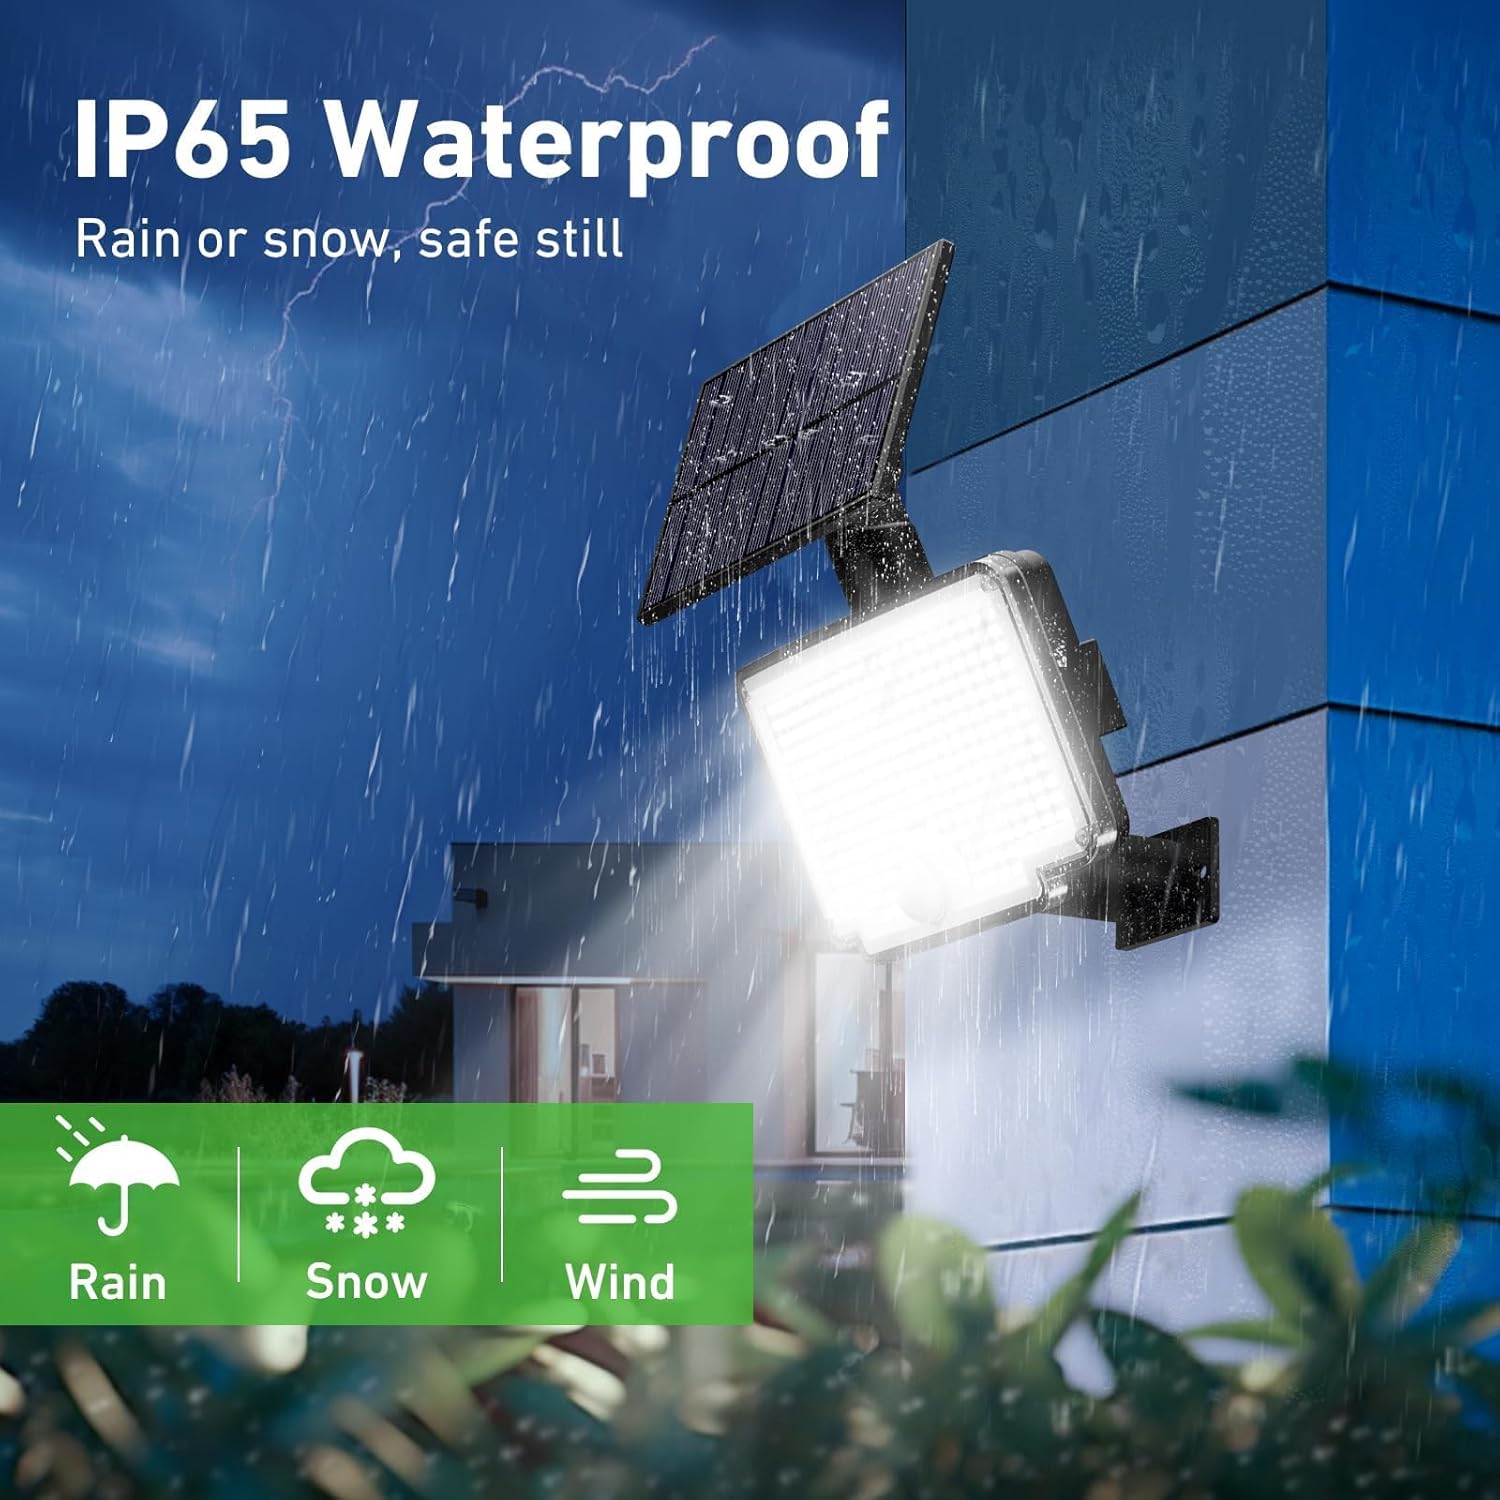
Иллюстрация шоуasing the light's IP65 waterproof rating, indicating its resilience against rain, snow, and wind, ensuring safe operation in various weather conditions.
6. Поиск Неисправностей
If your solar light is not functioning as expected, try the following troubleshooting steps:
| Проблема | Возможная причина | Решение |
|---|---|---|
| Ночью свет не включается. | Недостаточный солнечный заряд. | Обеспечьте, чтобы солнечная панель находилась под прямыми солнечными лучами 6–8 часов в день. Очистите солнечную панель. |
| Свет тусклый или горит только короткое время. | Аккумулятор заряжен не полностью или стареет. | Relocate the solar panel for better sun exposure. Ensure no obstructions. If the battery is old, its capacity may have decreased. |
| Датчик движения не работает или слишком чувствителен. | Датчик заблокирован или работает в неправильном режиме. | Ensure the sensor lens is clean and unobstructed. Verify the light is in Mode 1 or Mode 2 using the remote control. |
| Пульт дистанционного управления не работает. | Батарея разряжена или имеется препятствие. | Replace the remote control battery. Ensure no objects are blocking the signal path between the remote and the light. |
| Water inside the light unit. | Seal compromise or extreme weather. | While rated IP65, extreme conditions can sometimes affect seals. If water ingress occurs, discontinue use and contact customer support. |
7. Технические характеристики
Below are the technical specifications for the Nipify YHM01C Outdoor Solar Lights:
| Особенность | Спецификация |
|---|---|
| Бренд | Nipify |
| Номер модели | YHM01C |
| Размеры продукта (Д x Ш x В) | 20 х 15 х 5 см |
| Масса | 900 грамм |
| Рейтинг IP | IP65 |
| Количество светодиодов | 310 |
| Стиль | Современный |
| Цветовая температура | 6500 Кельвинов (холодный белый) |
| Материал | Акрилонитрилбутадиенстирол (АБС) |
| Включенные компоненты | Solar Panel, Remote Control, 5m Cable |
| Макс Вт | 1800 миллиampere-hour (mAh) (Battery Capacity) |
| Томtage | 12 Вольт (постоянный ток) |
| Особые возможности | Motion Detector, Separate Solar Panel, 210° Wide Angle Lighting |
| Источник питания | На солнечной энергии |
| Световой поток | 1000 Люмен |
8. Гарантия и поддержка
Specific warranty information for the Nipify YHM01C Outdoor Solar Lights is not provided in the product data. For any support inquiries, warranty claims, or technical assistance, please contact the seller or manufacturer directly through your purchase platform.