
Технакс TX-219
Technaxx TX-219 4-in-1 Multifunction Jump Starter, Air Compressor, Power Bank, and LED Light User Manual
Модель: TX-219 | Бренд: Technaxx
1. Введение
This manual provides detailed instructions for the safe and effective use of your Technaxx TX-219 4-in-1 Multifunction Device. This versatile unit combines a jump starter, an air compressor, a power bank, and an LED light, designed for automotive and portable power needs. Please read this manual thoroughly before operation and retain it for future reference.
2. Инструкции по технике безопасности
Всегда соблюдайте следующие меры предосторожности, чтобы предотвратить травмы или повреждение устройства или транспортного средства:
- Перед использованием прочтите все инструкции.
- Хранить в недоступном для детей месте.
- При использовании пускового устройства обязательно надевайте защитные очки.
- Не подвергайте устройство воздействию дождя или влаги.
- Do not operate if the device or cables are damaged.
- Обеспечьте надлежащую вентиляцию во время использования.
- Подключите пусковое устройство clamps correctly: positive to positive, negative to negative. Avoid short-circuiting.
- Не пытайтесь запустить замерзшую батарею.
- Disconnect the jump starter from the vehicle battery within 30 seconds after the engine starts.
- Do not use the air compressor continuously for more than 10 minutes to prevent overheating. Allow it to cool down.
- Храните устройство в прохладном сухом месте, когда оно не используется.
3. Содержимое упаковки
Проверьте наличие всех предметов в упаковке:
- Technaxx Jump Starter TX-219 Unit
- Adapter Cable with Battery Clamps
- Адаптер переменного тока
- Compressed Air Hose
- USB-кабель
- Кабель автомобильного адаптера
- Руководство пользователя

Рисунок 3.1: Надview of the Technaxx TX-219 package contents, showing the main unit, battery clamps, various charging cables, and the air hose.
4. Продукт закончилсяview
Familiarize yourself with the components of your Technaxx TX-219 device.

Рисунок 4.1: Угловой view of the Technaxx TX-219 unit, showing the digital display, control buttons, USB ports, and LED light.
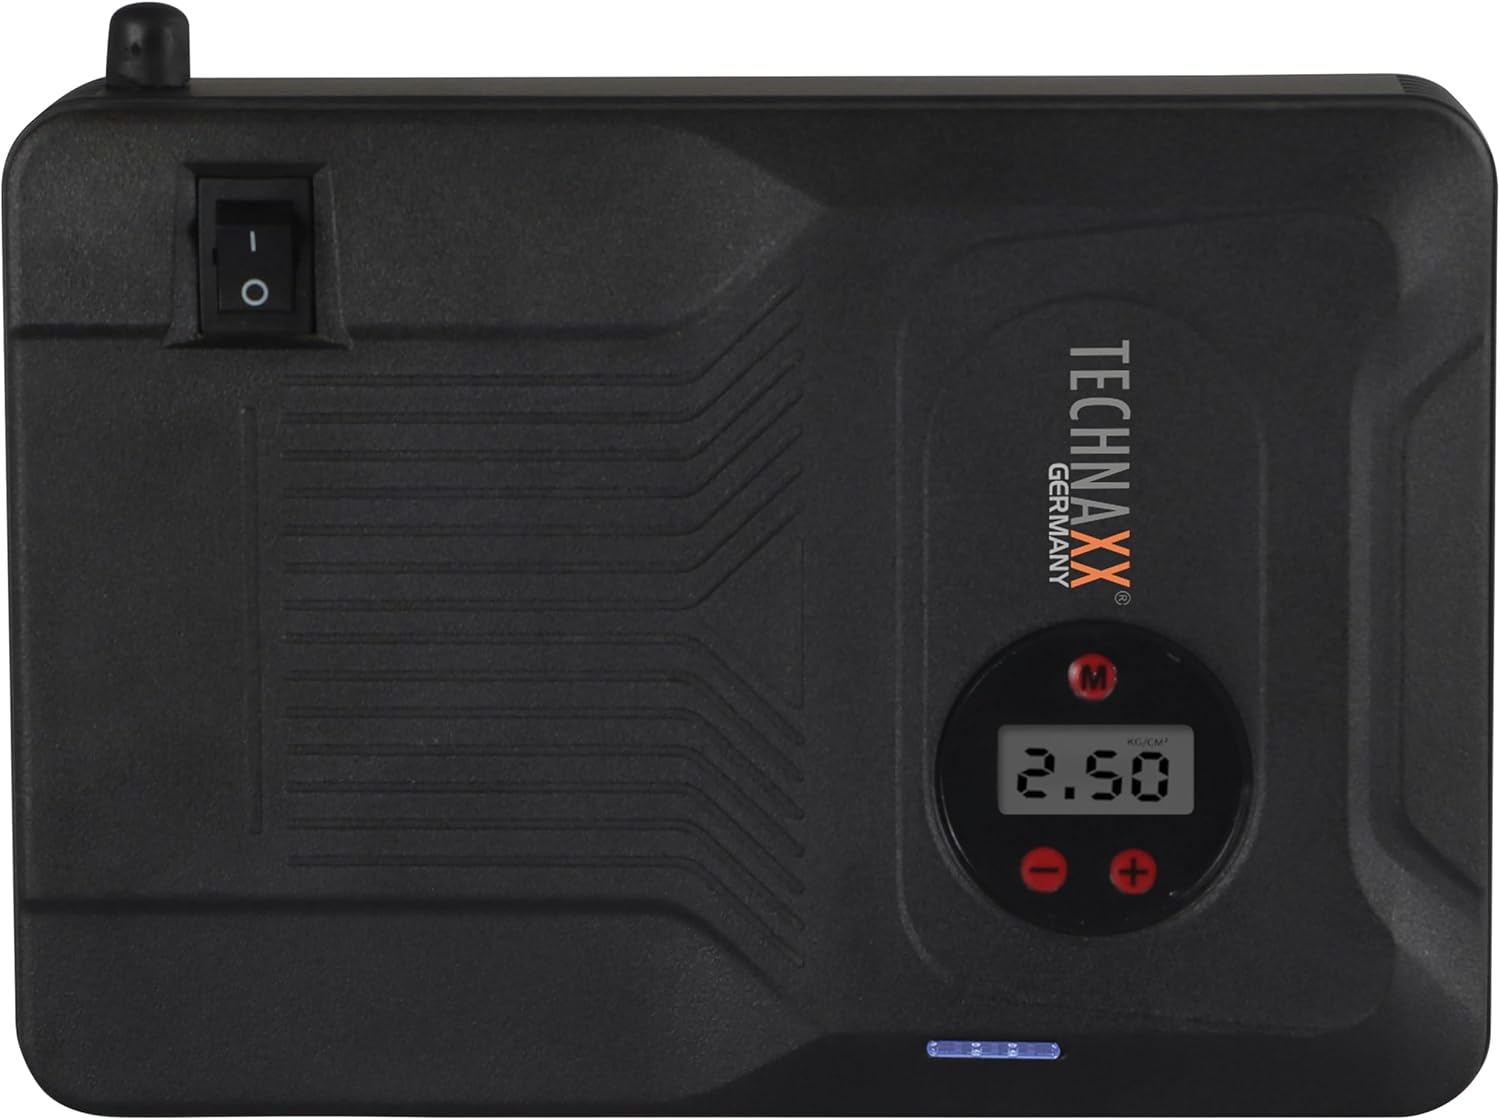
Рисунок 4.2: Вершина view of the device, highlighting the power switch and the digital display for pressure readings.

Рисунок 4.3: Передний view of the device, showing the digital display, pressure adjustment buttons, and the power indicator lights.
Ключевые компоненты:
- Цифровой дисплей: Shows air pressure for the compressor and battery status.
- Кнопки управления: For adjusting pressure settings and operating the device.
- USB-A Output Ports (5V/1A, 5V/2A): Для зарядки внешних электронных устройств.
- 15V/0.4A Input Port: For charging the internal battery of the TX-219.
- Jump Start Output Port: Connects to the battery clamp кабель.
- Светодиодный свет: Обеспечивает освещение.
- Выключатель: On/Off control for the device.
- Соединение воздушного шланга: For the air compressor function.
5. Setup and Charging the Device
Before first use, fully charge the Technaxx TX-219 unit. It is recommended to recharge the device every 3 months to maintain battery health.
- Connect the AC adapter to the 15V/0.4A input port on the TX-219.
- Подключите адаптер переменного тока к стандартной розетке.
- The battery indicator lights on the device will illuminate to show charging progress. All lights will be solid when fully charged.
- Alternatively, use the car adapter cable to charge the device from a vehicle's 12V accessory socket.

Рисунок 5.1: The Technaxx TX-219 unit being charged or used as a power bank to charge a smartphone.
6. Инструкция по эксплуатации
6.1. Запуск двигателя автомобиля
The TX-219 can jump start gasoline engines up to 4.0L and diesel engines up to 3.0L.
- Ensure the TX-219 is sufficiently charged (at least 75% battery indicated).
- Выключите зажигание автомобиля и все дополнительное оборудование.
- Соедините красный (+) кл.amp к положительному (+) выводу аккумуляторной батареи транспортного средства.
- Соедините черный (-) кл.amp to a clean, unpainted metal part of the vehicle's engine block or chassis, away from the battery. Do not connect to the negative (-) battery terminal directly unless specified by vehicle manufacturer.
- Connect the adapter cable to the jump start output port on the TX-219.
- Запустите двигатель автомобиля. Если он не заводится сразу, подождите 30 секунд, прежде чем повторить попытку. Не крутите стартер более 3 секунд за одну попытку.
- Once the engine starts, immediately disconnect the adapter cable from the TX-219.
- Затем отсоедините черный (-) контактamp, за которым следует красный (+) знакamp от аккумуляторной батареи транспортного средства.

Рисунок 6.1: The Technaxx TX-219 connected to a vehicle battery using the provided clampдля запуска двигателя от внешнего источника питания.

Рисунок 6.2: A close-up of the jump starter connected to a car battery, illustrating the process of jump starting.
6.2. Использование воздушного компрессора
The integrated air compressor can inflate tires up to 3.5 Bar (approximately 50 PSI) and features an automatic shut-off.
- Connect the compressed air hose to the air hose connection port on the TX-219.
- Присоедините другой конец шланга к вентилю шины.
- Turn on the TX-219. The digital display will show the current tire pressure.
- Use the '+' and '-' buttons to set the desired pressure. The display supports Bar, KPA, kg/cm², and PSI units.
- Press the compressor start button to begin inflation.
- Компрессор автоматически остановится, как только будет достигнуто заданное давление.
- Disconnect the air hose from the tire valve and the TX-219.

Рисунок 6.3: The Technaxx TX-219 being used to inflate a car tire, demonstrating the air compressor function.

Рисунок 6.4: A user inflating a tire with the TX-219, showing the digital display and the air hose connection.
6.3. Использование в качестве внешнего аккумулятора
The 14000 mAh battery can charge various USB-powered devices.
- Connect your device's USB charging cable to one of the USB-A output ports (5V/1A or 5V/2A) on the TX-219.
- The TX-219 will automatically begin charging your device.
- Monitor your device's charging status. Disconnect once fully charged.

Рисунок 6.5: The Technaxx TX-219 connected to a smartphone via USB, illustrating its power bank functionality.

Рисунок 6.6: The TX-219 acting as a portable power bank, charging a mobile device.
6.4. Использование светодиодной подсветки
The integrated LED light can be used for illumination in dark environments.
- Locate the LED light button on the device.
- Нажмите кнопку один раз, чтобы включить светодиодную подсветку.
- Press again to cycle through different light modes (e.g., steady, strobe, SOS, if available).
- Нажмите и удерживайте кнопку, чтобы выключить светодиодную подсветку.

Рисунок 6.7: The TX-219's LED light providing illumination in a vehicle's engine compartment.
7. Технические характеристики
| Особенность | Спецификация |
|---|---|
| Модель | ТХ-219 |
| Тип батареи | Литий железо фосфат |
| Емкость аккумулятора | 14000 мАч |
| Пусковой ток | 350 A (Max. 600 A) |
| Быстрый старт, томtage | 12 Вольт |
| Совместимость с двигателями (бензиновыми) | до 4.0 л |
| Совместимость с двигателями (дизель) | до 3.0 л |
| Выход USB-A 1 | 5 В, 2 А |
| Выход USB-A 2 | 5 В, 1 А |
| Воздушный компрессор | 12 V / 100 W, Max 3.5 Bar (approx. 50 PSI) |
| Вход для зарядки | 15 В, 0.4 А (макс.) |
| Светодиодный свет | Множественные функции |
| Размеры (Д x Ш x В) | 19 х 13 х 5.5 см |
| Масса | 1.16 кг |
| Сертификаты | CE |
8. Техническое обслуживание
- Уборка: Протирайте устройство мягкой сухой тканью. Не используйте едкие химикаты или абразивные чистящие средства.
- Хранилище: Store the TX-219 in a cool, dry place, away from direct sunlight and extreme temperatures.
- Перезарядка: Recharge the unit every three months, even if not in use, to prolong battery life.
- Проверка кабеля: Regularly inspect all cables and clampПроверьте наличие повреждений, износа или коррозии. При необходимости замените.
9. Поиск Неисправностей
| Проблема | Возможная причина | Решение |
|---|---|---|
| Устройство не включается. | Батарея разряжена. | Charge the TX-219 fully. |
| Автомобиль не заводится. | Неверный кл.amp connection; TX-219 battery too low; vehicle battery severely damaged. | Убедитесь, что clamps are connected correctly (+ to +, - to chassis). Recharge TX-219. Consult a mechanic if vehicle battery is faulty. |
| Компрессор не накачивает воздух. | Hose not securely connected; desired pressure already reached; device battery low. | Check hose connections. Verify desired pressure setting. Recharge TX-219. |
| USB-зарядка не работает. | USB cable faulty; device not compatible; TX-219 battery low. | Try a different USB cable. Ensure your device is compatible. Recharge TX-219. |
| Светодиодная подсветка не работает. | Battery depleted; light button not pressed correctly. | Recharge TX-219. Press the LED button firmly. |
10. Гарантия и поддержка
Для получения информации о гарантии и технической поддержке, пожалуйста, обратитесь к гарантийному талону, прилагаемому к вашему продукту, или посетите официальный сайт Technaxx. webСохраните чек в качестве подтверждения покупки.
Производитель: Технакс
Номер модели: 5031
Ask a question about this manual
Ask about setup, troubleshooting, compatibility, parts, safety, or missing instructions. Manuals+ will review the question and use this page’s manual context to help answer it.