
1. Продукт закончилсяview
The KETOTEK KT3100 is a versatile digital thermostat designed for precise temperature control in various applications. It features both heating and cooling functions, along with advanced timing modes, making it suitable for household use, heating/cooling equipment, incubators, greenhouses, and terrariums.
Основные характеристики:
- Диапазон контроля температуры: от -40°С до 120°С.
- Потребляемая мощность: 100-250В, 50/60Гц.
- Максимальная нагрузка: 16А, 3680Вт.
- Функции синхронизации: F01 Cycle Timer, F02 Countdown ON, F03 Countdown OFF, F04 Countdown ON/OFF (0-99 hours, 59 minutes).
- Калибровка температуры: -9.9°C to 9.9°C adjustment.
- Функция памяти: Сохраняет настройки после отключения питания.
- Функция сброса: Allows restoration of factory settings.
- Датчик: NTC10K/B3950 temperature probe with a 3-meter cable.

Image 1.1: The KT3100 thermostat displaying its main features including heating/cooling, timing, calibration, memory, and reset functions.
2. Информация по технике безопасности
Please read all safety instructions before operating the device. Failure to follow these instructions may result in electric shock, fire, or personal injury.
- Убедитесь, что источник питания vol.tage matches the device's specifications (100-250V).
- Не превышайте максимальную нагрузочную способность 16 А / 3680 Вт.
- Keep the device and sensor away from water or excessive moisture.
- Не разбирайте и не модифицируйте устройство. По всем вопросам обслуживания обращайтесь к квалифицированному персоналу.
- Обеспечьте надлежащую вентиляцию вокруг устройства.
- Перед чисткой или при длительном неиспользовании отключайте устройство от розетки.
3. Компоненты продукта
The KETOTEK KT3100 package includes the following items:
- 1 x KETOTEK KT3100 Digital Thermostat
- 1 x 3-meter NTC10K/B3950 Temperature Sensor
- 1 x Руководство пользователя (этот документ)

Image 3.1: The KETOTEK KT3100 Digital Thermostat with its included 3-meter temperature sensor.
4. Расположение элементов и дисплей устройства
Familiarize yourself with the thermostat's buttons and display indicators for effective operation.

Изображение 4.1: Спереди view of the KT3100 thermostat with labeled components.
- Кнопка РЕЖИМ: Used to switch between temperature control and timing modes, and to confirm settings.
- Кнопка SET: Used to enter setting mode for parameters.
- Кнопка ВВЕРХ: Увеличивает значения или перемещается вверх.
- Кнопка ВНИЗ: Уменьшает значения или перемещается вниз.
- Кнопка сброса: Small button for factory reset (requires a pin).
- Измеренная температура: Displays the current temperature detected by the sensor.
- Start Temperature (ON): The temperature at which the connected device turns ON.
- Stop Temperature (OFF): The temperature at which the connected device turns OFF.
- Индикатор отопления/охлаждения: Icon indicating active heating or cooling mode.
- Индикатор выполнения работы: Light indicating when the output socket is active.

Изображение 4.2: Подробно view of the digital display showing temperature readings and set points.
5. Технические характеристики
| Спецификация | Ценить |
|---|---|
| Бренд | КЕТОТЕК |
| Номер модели | КТ3100 |
| Vol входtage | 100-250В |
| Частота | 50/60Гц |
| Максимальный ток | 16А |
| Максимальная мощность | 3680 Вт |
| Диапазон регулирования температуры | -40°С ~ 120°С |
| Датчик температуры | NTC10K/B3950, 3m cable |
| Тип дисплея | ЖК-дисплей |
| Метод контроля | Сенсорные кнопки |
| Особые возможности | Timing Function, Temperature Calibration, Memory, Reset |

Image 5.1: Physical dimensions of the KT3100 thermostat and its temperature sensor.
6. Настройка
- Распаковать: Carefully remove the KT3100 thermostat and its temperature sensor from the packaging.
- Подключите датчик: Plug the 3-meter temperature sensor into the designated port on the side of the thermostat.
- Датчик положения: Place the sensor in the area where you wish to measure and control the temperature. Ensure it is not directly exposed to heat sources or drafts that could affect readings.
- Встраиваемый термостат: Insert the KT3100 thermostat into a standard 230V wall outlet. The LCD display will illuminate, showing the current measured temperature.
- Подключить устройство: Plug the appliance you wish to control (e.g., heater, fan, refrigerator) into the socket on the front of the KT3100 thermostat.
7. Инструкция по эксплуатации
7.1. Режим регулирования температуры
Этот режим позволяет установить желаемый диапазон температур для обогрева или охлаждения.
- Включение питания: Plug in the thermostat. The display will show the current measured temperature.
- Set Start Temperature (ON): Press the 'MODE' button once. The 'Start Temperature' (ON) value will flash. Use the 'UP' and 'DOWN' buttons to adjust the desired temperature at which your appliance should turn ON.
- Set Stop Temperature (OFF): Press the 'MODE' button again. The 'Stop Temperature' (OFF) value will flash. Use the 'UP' and 'DOWN' buttons to adjust the desired temperature at which your appliance should turn OFF.
- Подтвердите настройки: Press the 'MODE' button a third time to exit the setting mode and save your changes. The thermostat will now operate according to your set temperatures.
- Heating/Cooling Selection: The thermostat automatically detects whether to operate in heating or cooling mode based on the relationship between the Start and Stop temperatures. If Start Temp < Stop Temp, it's heating mode. If Start Temp > Stop Temp, it's cooling mode.
7.2. Timing Functions (F01-F04)
The KT3100 offers four timing modes for advanced control. To access these modes, press and hold the 'SET' button for approximately 3 seconds until 'F01' appears.
- F01: Режим циклического таймера
This mode allows the device to cycle ON and OFF for set durations. Press 'SET' to enter F01 settings. Use 'UP'/'DOWN' to set ON hours/minutes, then 'SET' to move to OFF hours/minutes, then 'SET' to confirm. Press 'MODE' to exit.

Image 7.1: Display showing F01 Cycle Timer settings.
- F02: Режим обратного отсчета включен
The device will remain OFF for a set countdown period, then turn ON and stay ON. Press 'UP'/'DOWN' to select F02, then 'SET' to enter settings. Set countdown hours/minutes. Press 'SET' to confirm. Press 'MODE' to exit.

Image 7.2: Display showing F02 Countdown ON settings.
- F03: Режим обратного отсчета выключен
The device will remain ON for a set countdown period, then turn OFF and stay OFF. Press 'UP'/'DOWN' to select F03, then 'SET' to enter settings. Set countdown hours/minutes. Press 'SET' to confirm. Press 'MODE' to exit.
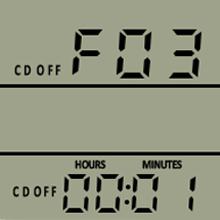
Image 7.3: Display showing F03 Countdown OFF settings.
- F04: Countdown ON/OFF Mode
The device will turn ON for a set period, then OFF for another set period, and then repeat. Press 'UP'/'DOWN' to select F04, then 'SET' to enter settings. Set ON hours/minutes, then 'SET' to move to OFF hours/minutes, then 'SET' to confirm. Press 'MODE' to exit.

Image 7.4: Display showing F04 Countdown ON/OFF settings.
7.3. Калибровка температуры
If you notice a discrepancy between the thermostat's reading and a known accurate thermometer, you can calibrate the sensor. Press and hold 'SET' for 3 seconds, then use 'UP'/'DOWN' to navigate to the calibration setting (usually indicated by 'CAL' or a similar symbol). Adjust the value between -9.9°C and 9.9°C to match the reference thermometer. Press 'SET' to confirm, then 'MODE' to exit.
7.4. Функция памяти
The KT3100 automatically saves your settings. In case of a power outage, the device will retain its last programmed settings once power is restored.
7.5. Функция сброса
To restore the thermostat to its factory default settings, locate the small reset button (usually a pinhole) on the device. Use a thin object (like a paperclip) to press and hold the reset button for a few seconds until the display indicates a reset has occurred.
8. Приложения
The KETOTEK KT3100 Digital Thermostat is suitable for a wide range of temperature control applications:
- Отопление/охлаждение дома: Control electric heaters, fans, or portable air conditioners.
- Охлаждение: Maintain specific temperatures for refrigerators or freezers.
- Инкубаторы: Ensure stable temperatures for hatching eggs.
- Теплицы: Regulate temperature for optimal plant growth.
- Террариумы для рептилий: Create a stable environment for reptiles and ampхибианы.
- Аквакультура: Control water temperature in aquariums or fish tanks.

Изображение 8.1: Примерamples of common applications for the KT3100 thermostat.
9. Техническое обслуживание
Proper maintenance ensures the longevity and accuracy of your KT3100 thermostat.
- Уборка: Протирайте устройство мягкой сухой тканью. Не используйте абразивные чистящие средства и не погружайте устройство в воду.
- Уход за датчиком: Keep the temperature sensor clean and free from debris. Avoid bending or damaging the sensor cable.
- Хранилище: When not in use, store the thermostat in a cool, dry place away from direct sunlight and extreme temperatures.
10. Поиск Неисправностей
If you encounter issues with your KT3100 thermostat, refer to the following common problems and solutions:
| Проблема | Возможная причина | Решение |
|---|---|---|
| Дисплей пустой | Отсутствует питание; Неисправность устройства | Check power outlet; Ensure thermostat is properly plugged in; Try a different outlet. If still blank, contact support. |
| Неверное показание температуры | Sensor dirty or damaged; Calibration needed; Sensor placed incorrectly | Clean sensor; Perform temperature calibration (Section 7.3); Reposition sensor away from direct heat/cold sources. |
| Прибор не включается/выключается | Incorrect temperature settings; Timing mode active; Appliance not plugged in or faulty | Verify Start/Stop temperature settings (Section 7.1); Check if a timing mode (F01-F04) is active (Section 7.2); Ensure appliance is functional and correctly plugged into the thermostat. |
| Кнопки не отвечают | Временный сбой программного обеспечения | Unplug and replug the thermostat; Perform a factory reset (Section 7.5). |
11. Гарантия и поддержка
KETOTEK products are manufactured to high-quality standards. This product comes with a standard manufacturer's warranty against defects in materials and workmanship. For warranty claims, technical support, or service inquiries, please refer to the contact information provided with your purchase or visit the official KETOTEK webсайт. Сохраните чек о покупке для подтверждения гарантии.