1. Продукт закончилсяview
The Phanteks Eclipse G500A DRGB is a high-performance mid-tower chassis designed to accommodate modern PC components with excellent airflow and integrated D-RGB lighting. It features an Ultra-fine Performance Mesh on both the front and top panels, ensuring optimal cooling and dust filtration.

Figure 1: Phanteks Eclipse G500A DRGB Mid Tower Case, Matte White.
Основные характеристики:
- Конструкция с высокой пропускной способностью: Ultra-fine Performance Mesh on front and top panels for superior cooling and dust filtration.
- Встроенная D-RGB подсветка: Built-in D-RGB lighting on the front and side, controllable via manual buttons or motherboard synchronization.
- Предустановленные вентиляторы: Includes three high-performance M25-140 D-RGB fans.
- Расширенные возможности охлаждения: Supports up to 420mm radiators in the front and 360mm in the top.
- Просторный салон: Accommodates full-length GPUs and offers vertical GPU mounting options (with optional bracket).
- Гибкое хранилище: Multiple HDD and SSD locations, including dedicated SSD brackets and stackable HDD bays.
- Современный интерфейс ввода/вывода: Features 10Gbps USB-C, 2x USB 3.0, Microphone/Headphone Combo, Power button, and D-RGB controls.
2. Настройка и установка
This section provides general guidelines for installing components into your Phanteks Eclipse G500A DRGB chassis. Always refer to your component manuals for specific installation instructions.
2.1 Подготовка шасси
Before installing components, ensure the chassis is placed on a stable, flat surface. Remove the side panels by gently pulling them open (they are hinged) to access the interior.
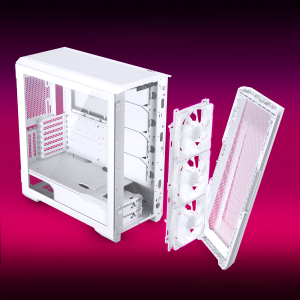
Figure 2: The removable front panel allows for easy installation of fans and radiators.
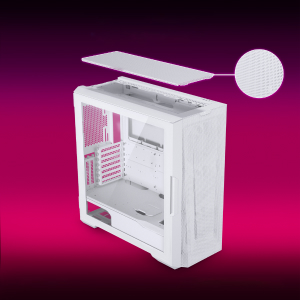
Figure 3: The removable top mesh panel facilitates fan and radiator installation.
2.2 Установка материнской платы
The G500A supports ATX, micro-ATX, mini-ITX, and E-ATX motherboards (up to 280mm wide). Install the necessary standoffs for your motherboard form factor, then secure the motherboard with screws.
2.3 Установка блока питания (БП)
Install the PSU at the bottom rear of the chassis. The G500A supports PSUs up to 250mm in length (195mm if all 4 bottom HDD positions are used).
2.4 Установка запоминающего устройства
The case offers extensive storage options:
- 2.5-дюймовые твердотельные накопители: Up to 9 dedicated 2.5" drive bays are included.
- 3.5-дюймовые жесткие диски: Two stackable 3.5" HDD bays are included, expandable up to a total of 10 HDD bays.

Figure 4: Multiple storage options for 2.5" and 3.5" drives.
2.5 Установка видеокарты (GPU)
The G500A supports graphics cards up to 435mm in length. For vertical GPU mounting, an optional bracket (PH-VGPUKT4.0_03) or riser cable is required.
2.6 Установка системы охлаждения
The chassis supports various fan and radiator configurations:
- Поддержка фанатов:
- Front: 3x 120mm or 3x 140mm (3x 140mm pre-installed)
- Верхняя часть: 3 x 120 мм или 3 x 140 мм
- Сзади: 1x 120 мм или 1x 140 мм
- Liquid Cooling Radiator Support:
- Front: Up to 360mm (120mm radiator) or 420mm (140mm radiator)
- Top: Up to 360mm (120mm radiator) or 280mm (140mm radiator)
- Задняя часть: 120 мм
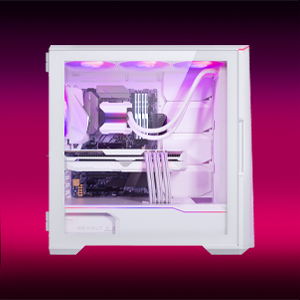
Figure 5: High-end cooling compatibility with various fan and radiator sizes.
2.7 Управление кабелями
The G500A provides ample space and Velcro ties for efficient cable management, ensuring a clean interior and optimal airflow. Cover doors help to conceal cables on the backside of the motherboard tray.
2.8 Видеоинструкции по установке
Video 1: Detailed PC Build Guide in the Phanteks Eclipse G500A (13:33).
Video 2: Another comprehensive PC assembly guide featuring the Phanteks Eclipse G500A (14:01).
3. Инструкция по эксплуатации
3.1 Передняя панель ввода/вывода
Передняя панель ввода-вывода обеспечивает удобный доступ к основным портам и органам управления:
- Кнопка питания: Для включения/выключения вашей системы.
- Порты USB 3.0 (x2): Для подключения устройств USB 3.0.
- USB-C Gen2 Port (x1): For high-speed USB-C connectivity.
- Комбинированный разъем для микрофона/наушников: Для аудиовхода и аудиовыхода.
- D-RGB Mode Button: Cycles through pre-programmed D-RGB lighting effects.
- D-RGB Color Button: Changes the color of the D-RGB lighting.

Figure 6: Front I/O panel with USB-C, USB 3.0, audio, and D-RGB controls.
3.2 Управление D-RGB подсветкой
The integrated D-RGB lighting can be controlled in two ways:
- Ручное управление: Use the D-RGB Mode and Color buttons on the front I/O panel to cycle through effects and colors without software.
- Синхронизация материнской платы: Connect the D-RGB controller to a compatible motherboard's D-RGB header to enable software control and synchronization with other D-RGB components.

Figure 7: Integrated D-RGB lighting with included M25-140 D-RGB fans.
4. Техническое обслуживание
Регулярное обслуживание помогает обеспечить оптимальную производительность и долговечность компонентов вашего ПК.
- Фильтрация пыли: The Ultra-fine Performance Mesh on the front and top panels acts as a dust filter. Periodically remove these panels and clean the mesh to maintain optimal airflow.
- Чистка салона: Use compressed air to remove dust from inside the chassis, especially from fans, heatsinks, and other components. Ensure the system is powered off and unplugged before cleaning.
- Внешняя очистка: Протрите внешние поверхности мягкой, damp Ткань. Избегайте использования абразивных чистящих средств и растворителей.
5. Поиск Неисправностей
В этом разделе рассматриваются распространенные проблемы, с которыми вы можете столкнуться при работе с корпусом вашего ПК.
5.1 Проблемы с питанием
- Система не включается:
- Ensure all power cables (24-pin ATX, 8-pin CPU, GPU power) are securely connected to the motherboard and components.
- Убедитесь, что переключатель блока питания находится в положении «ВКЛ».
- Убедитесь, что кабель выключателя питания передней панели правильно подключен к разъему F_PANEL на материнской плате.
5.2 D-RGB Lighting Issues
- D-RGB not lighting up or incorrect colors:
- Ensure the D-RGB cables from the fans and LED strips are correctly connected to the integrated D-RGB controller.
- If using motherboard synchronization, ensure the D-RGB controller is connected to the motherboard's D-RGB header and that the motherboard's lighting software is configured correctly.
- Verify the D-RGB controller is receiving power (e.g., via SATA power connector).
- Try cycling through modes and colors using the front I/O buttons to rule out software issues.
5.3 Шум или неисправность вентилятора
- Чрезмерный шум вентилятора:
- Проверьте лопасти вентилятора на наличие скопления пыли и при необходимости очистите их.
- Ensure fans are securely mounted and not vibrating against the chassis.
- Verify fan speeds are controlled appropriately by the motherboard or fan controller.
- Вентилятор не вращается:
- Check fan power connections to the motherboard or fan hub.
- Ensure fan headers are enabled in the BIOS/UEFI settings.
6. Технические характеристики
Detailed technical specifications for the Phanteks Eclipse G500A DRGB Mid Tower Case.
| Особенность | Спецификация |
|---|---|
| Название модели | Eclipse G500A DRGB, White |
| Номер модели товара | PH-EC500GA_DMW01A |
| Форм-фактор | Средняя башня |
| Размеры (ДxШxВ) | 19.69 x 9.45 x 20.28 дюйма (500 x 240 x 515 мм) |
| Вес товара | 23.2 фунта |
| Материал | Steel Chassis, Tempered Glass |
| Поддержка материнских плат | ATX, micro-ATX, mini-ITX, E-ATX (up to 280mm wide) |
| Слоты расширения | 7 |
| Поддержка вертикального графического процессора | Yes (with optional bracket PH-VGPUKT4.0_03 or riser cable) |
| Внутренние отсеки для 3.5-дюймовых дисков | 10 (2x included, expandable) |
| Внутренние отсеки для 2.5-дюймовых дисков | 9 (9x included) |
| Передний ввод/вывод | 2x USB 3.0, USB-C Gen2, Microphone/Headphone Combo, Power Button, D-RGB Mode, D-RGB Color |
| Предустановленные вентиляторы | 3x M25-140 D-RGB (Front) |
| Максимальная длина графического процессора | 435 мм / 17.2 дюйма |
| Макс. высота кулера ЦП | 185 мм |
| Максимальная длина блока питания | 195mm (if all 4 bottom HDD positions used) / 250mm (if 2 bottom HDD used) |
| Метод охлаждения | Вентилятор, Вода |
7. Гарантия и поддержка
Phanteks products are manufactured with high-quality standards. For warranty information and technical support, please refer to the official Phanteks webсайт или свяжитесь с их службой поддержки.
Контактная информация:
- Webсайт: www.phanteks.com
- Phanteks Taiwan Inc.: 11F., № 150, Jian 1st Rd., район Чжунхэ, город Нью-Тайбэй 235
- Importer EU (Axpertec Int B.V.): Sydneystraat 33, 3047 BP Rotterdam, The Netherlands
- Importer US (Axpertec Inc.): 20465 E Walnut Dr. N, City of Industry, California 91789, United States

Figure 8: Phanteks company and importer details, along with compliance markings (CE, UKCA, RoHS).