1. Введение
Welcome to your new Genmitsu LC-50 PLUS 10W Laser Engraver. This manual provides essential information for the safe and efficient operation, assembly, usage, and maintenance of your device. Please read this manual thoroughly before operating the machine to ensure proper function and safety.
2. Информация по технике безопасности
Operating a laser engraver involves potential hazards. Adhere strictly to the following safety guidelines to prevent injury or damage.
- Защита глаз: Always wear appropriate laser safety goggles (OD4+ or higher) when the laser is active. Never look directly at the laser beam.
- Вентиляция: Для удаления дыма и испарений, образующихся в процессе гравировки/резки, эксплуатируйте станок в хорошо проветриваемом помещении.
- Опасность пожара: Лазерная обработка может воспламенить легковоспламеняющиеся материалы. Держите огнетушитель под рукой и никогда не оставляйте станок без присмотра во время работы.
- Совместимость материалов: Only engrave or cut materials approved for laser processing. Avoid reflective, transparent, or unknown materials.
- Дети и домашние животные: Не допускайте детей и домашних животных в зону проведения операции.
- Экстренная остановка: Familiarize yourself with the location and function of the Emergency Stop button.
- Laser Shield Protection: The device includes a laser shield for added safety. Ensure it is properly installed before use.

3. Продукт закончилсяview
The Genmitsu LC-50 PLUS is a high-performance 10W compressed spot laser engraver and cutter, designed for precision and efficiency. Key features include:
- 10W Compressed Spot Laser Head: Provides high power and a fine laser spot for detailed engraving and efficient cutting.
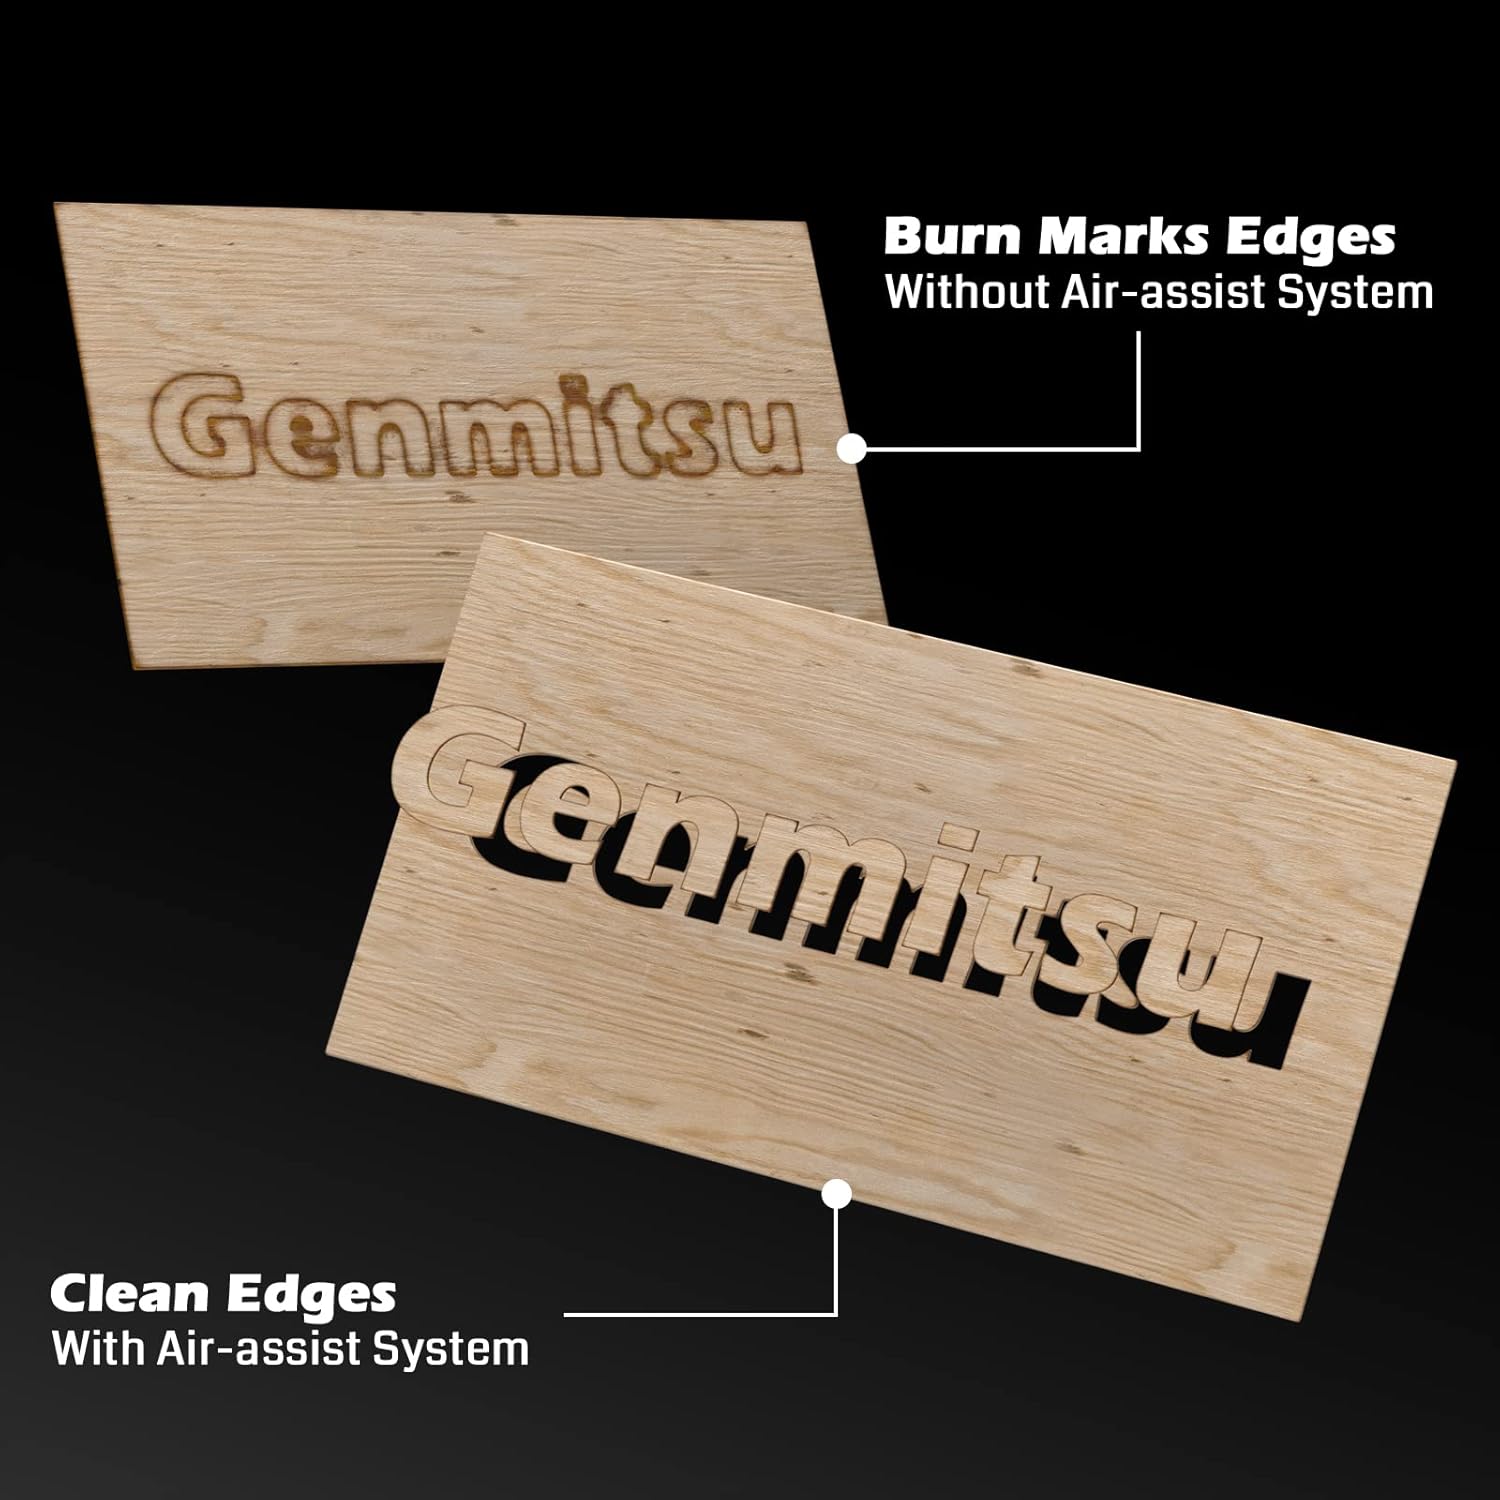
- Интегрированная система воздушной поддержки: Enhances cutting performance by blowing away smoke and debris, resulting in cleaner cuts and increased efficiency.
- Линейные рельсы: Ensures higher stability and precision for consistent engraving and cutting results.
- X & Y-axis Tensioner: Allows for precise adjustment of timing belt tension, contributing to more accurate engraving.
- Концевые выключатели: Installed on both X and Y axes to prevent the laser module from colliding with boundaries, ensuring safe movement.
- Кнопка аварийной остановки: Provides an immediate shutdown mechanism for safety.
- Raised Footpads: Optional accessories to increase working height for larger or cylindrical objects.


4. Сборка и настройка
Follow these steps to assemble and set up your Genmitsu LC-50 PLUS laser engraver.
4.1 Распаковка и первоначальная сборка
- Аккуратно распакуйте все компоненты и сверьте их с упаковочным листом.
- Assemble the main frame according to the included quick start guide or detailed assembly instructions.
- Установите лазерный модуль на портал.
- Connect all cables securely, ensuring proper orientation.
4.2 X & Y-axis Tensioner Adjustment
The X & Y-axis tensioner design allows for precise adjustment of the timing belts, which is crucial for engraving accuracy. Refer to the detailed instructions video for visual guidance.
- Locate the M5 screws on the side of the X and Y axes.
- Loosen the No.1 screw slightly.
- Adjust the No.2 screw to achieve the desired belt tension. The belt should be taut but not overly tight.
- Tighten the No.1 screw to secure the tensioner.

4.3 Installing Raised Footpads (Optional)
If you need to engrave larger or cylindrical objects, install the Z-axis raised footpads to increase the working height by 35mm. The secure locking foot design allows for stable mounting.
5. Инструкция по эксплуатации
В этом разделе описываются основные этапы эксплуатации лазерного гравера.
5.1 Software and Connection
- Install compatible laser control software (e.g., LightBurn, LaserGRBL) on your computer.
- Подключите гравировальный станок к компьютеру через USB.
- Ensure the necessary drivers are installed and the software recognizes the device.
5.2 Подготовка и размещение материалов
- Place the material to be engraved or cut securely on the working surface.
- Убедитесь, что материал лежит ровно и правильно выровнен.
5.3 Фокусировка лазера
Proper laser focus is critical for optimal engraving and cutting results. Follow the manufacturer's specific instructions for focusing the laser module.
5.4 Using the Air Assist System
The integrated Air Assist System significantly improves cutting quality by clearing smoke and debris from the laser's path. Ensure the air pump is connected and activated for cutting operations, especially on materials like wood and acrylic.
5.5 Начало работы по гравировке/резке
- Загрузите свой дизайн file into the laser control software.
- Set appropriate parameters (power, speed, passes) for your material.
- Используйте Испытательный огонь feature to confirm the laser's exact position before starting the job.
- Initiate the job and monitor the process closely.
5.6 Совместимые материалы
The Genmitsu LC-50 PLUS is capable of engraving and cutting a wide range of materials, including but not limited to:
- Wood (e.g., basswood plywood up to 10mm)
- Acrylic (up to 5mm)
- Metal (for engraving/marking)
- Кожа
- Ткань
- Бумага/Картон
- Резина
- Стекло (для гравировки)

6. Техническое обслуживание
Регулярное техническое обслуживание обеспечит долговечность и оптимальную производительность вашего лазерного гравера.
- Очистите линзу лазера: Periodically clean the laser lens with a specialized lens cleaning solution and cloth to maintain laser power and focus.
- Clean Linear Rails: Keep the linear rails free from dust and debris. Lubricate them occasionally with appropriate lubricant as recommended by the manufacturer.
- Проверьте ремни: Inspect the timing belts for wear and tear. Ensure they are properly tensioned (refer to Section 4.2).
- Очистить мусор: Regularly remove any accumulated debris from the working area and around the laser module.
7. Поиск Неисправностей
В этом разделе рассматриваются распространенные проблемы, с которыми вы можете столкнуться, и их возможные решения.
| Проблема | Возможная причина | Решение |
|---|---|---|
| Лазер не стреляет | Ненадежное кабельное соединение, настройки программного обеспечения, проблема с лазерным модулем. | Check all connections, verify software settings (power, enable laser), inspect laser module. |
| Низкое качество гравировки/резки | Incorrect focus, wrong parameters, dirty lens, loose belts | Adjust laser focus, optimize power/speed settings, clean laser lens, check belt tension. |
| Машина не движется или движется с перебоями | Loose motor cables, software connection issue, limit switch triggered | Check motor connections, restart software/computer, ensure no obstructions are triggering limit switches. |
| Система пневматической поддержки не работает. | Air pump not connected, hose blocked, pump malfunction | Verify air pump connection and power, check air hose for kinks or blockages. |
8. Технические характеристики
| Особенность | Деталь |
|---|---|
| Номер модели | LC50 Plus |
| Мощность лазера | 10W Compressed Spot Optical Power |
| Область гравировки | 500мм х 400мм |
| Максимальная скорость гравировки | До 20000 мм/мин |
| Cutting Capacity (Basswood Plywood) | Up to 10mm (single pass) |
| Cutting Capacity (Acrylic) | Up to 5mm (single pass) |
| Материал рамы | Полностью алюминиевый сплав |
| Система движения | Linear Guide Design |
| Размеры продукта | 75 х 23.5 х 18.5 см |
| Вес товара | 8.37 кг |
9. Гарантия и поддержка
For warranty information, technical support, or service inquiries, please refer to the official Genmitsu webили обратитесь в службу поддержки напрямую. Сохраните чек в качестве подтверждения покупки.