
Введение
This manual provides comprehensive instructions for the setup, operation, maintenance, and troubleshooting of your Real HD ERI-K108-P8 8-Channel 4K PoE Network Video Recorder (NVR). Please read this manual carefully before using the product to ensure proper and safe operation.
The ERI-K108-P8 NVR is designed for surveillance systems, supporting up to 8 IP cameras with 4K (8MP) resolution. It features 8 independent Power over Ethernet (PoE) network interfaces for simplified camera connection and power supply. A 2TB hard drive is pre-installed for local storage, and the system supports remote access via compatible applications like Hik-Connect.
Настраивать
1. Распаковка и первоначальный осмотр
Carefully unpack all components and verify that all items are present and undamaged. The package should include the NVR unit, power adapter, mouse, and this instruction manual.
2. Подключение сетевого видеорегистратора (NVR)
- Подключение к монитору: Подключите сетевой видеорегистратор к монитору с помощью кабеля HDMI или VGA.
- Подключить мышь: Подключите входящую в комплект USB-мышь к одному из USB-портов на видеорегистраторе.
- Подключение к сети: Connect the NVR to your local network (router/switch) using an Ethernet cable via the LAN port.
- Включение питания: Подключите адаптер питания к сетевому видеорегистратору, а затем к розетке. Сетевой видеорегистратор включится автоматически.

Figure 1: Rear panel of the NVR, illustrating the LAN, HDMI, VGA, USB, Audio In/Out, and PoE ports.
3. Connecting PoE Cameras
The ERI-K108-P8 NVR features 8 independent PoE ports. Connect your IP cameras directly to these ports using Ethernet cables. The NVR will provide both power and data connection to the cameras.
Video 1: This video demonstrates the general process of connecting cameras to a PoE NVR. While it features a different brand, the connection principles are similar for the Real HD ERI-K108-P8.
Видео 2: Это видео дает общее представление о...view of setting up a 4K security camera system, including NVR connections. It can serve as a helpful guide for the initial setup of your ERI-K108-P8 NVR.
4. Remote Access Setup (Hik-Connect)
To access your NVR remotely, follow these steps:
- Убедитесь, что NVR подключен к Интернету.
- Download the Hik-Connect app from your smartphone's app store (available for Android and iOS).
- Зарегистрируйте учетную запись и войдите в систему.
- Add your NVR device by scanning the QR code on the NVR or manually entering its serial number.
- Follow the on-screen prompts to complete the device addition and begin viewУправляйте своими камерами удаленно.
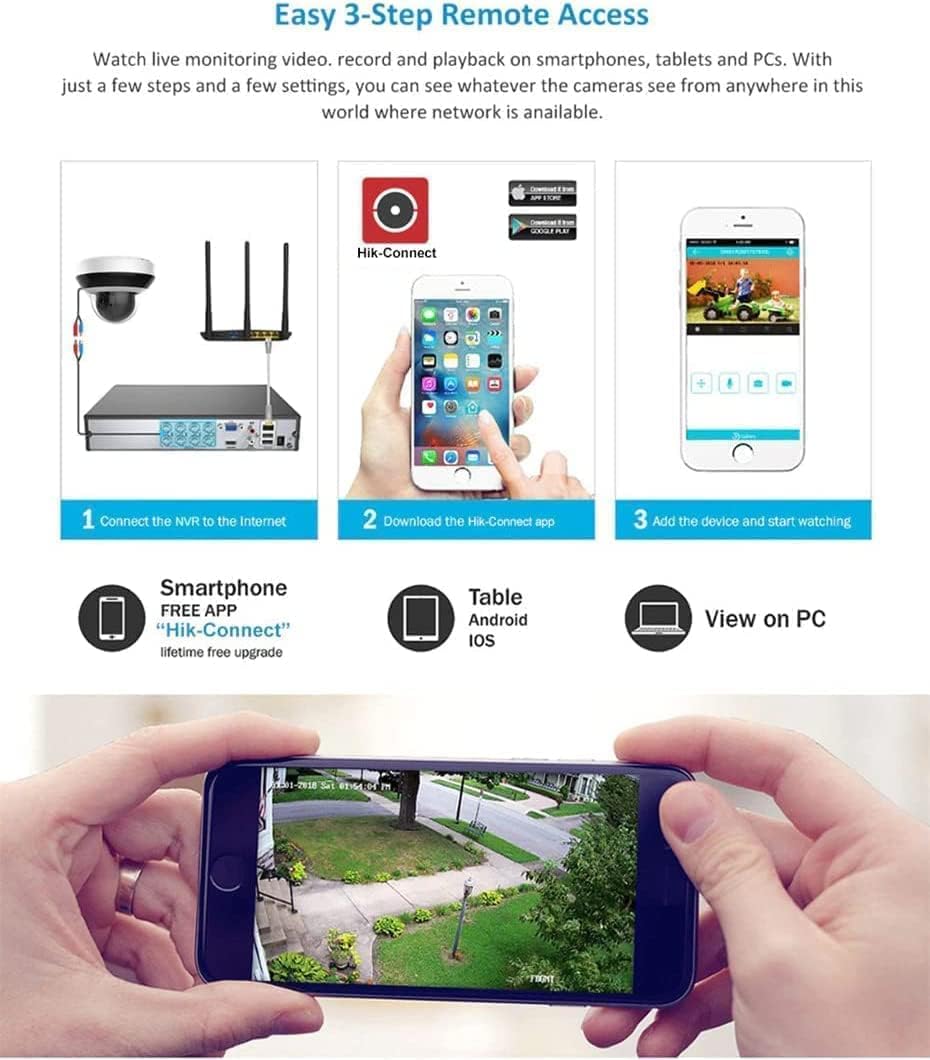
Figure 2: Three-step process for setting up remote access using the Hik-Connect application.

Рисунок 3: Example of the mobile application interface displaying live camera views.
Операционная
1. Жить View
After successful setup, the NVR will display live feeds from connected cameras on the monitor. You can switch between single-camera view и многокамерная сетка view using the NVR's interface controls or the connected mouse.

Figure 4: NVR display showing live feeds from multiple connected cameras.
2. Воспроизведение
Чтобы повторноview записано фуtage:
- Access the playback menu from the NVR interface.
- Выберите нужную камеру(ы) и диапазон даты/времени.
- Use the timeline to navigate through recordings. Events (like motion detection) may be highlighted on the timeline.

Figure 5: NVR interface for reviewing recorded video footage, including a timeline and calendar.
3. Запись
The NVR is pre-configured for continuous recording to the installed 2TB hard drive. You can adjust recording schedules, motion detection settings, and other parameters through the NVR's system settings menu.
4. Двусторонняя аудиосвязь
If your connected cameras support two-way audio and are configured correctly, you can use the NVR's audio input/output ports (RCA) or the remote access app to communicate through the cameras.
Обслуживание
1 Управление жестким диском
The NVR automatically manages hard drive space by overwriting the oldest recordings when the disk is full. Regularly check the hard drive status in the system settings to ensure optimal performance. You can expand storage up to 8TB by replacing the existing hard drive.
2. Обновления прошивки
Периодически проверяйте информацию производителя. website for firmware updates. Keeping your NVR's firmware up-to-date ensures access to the latest features, security patches, and performance improvements.
3. System Restore
In case of system issues or forgotten passwords, a system restore might be necessary. Refer to the following video for a general guide on resetting an NVR. Note that specific steps may vary slightly depending on the NVR's firmware version.
Video 3: This video provides instructions on how to reset an NVR. This can be useful for troubleshooting or restoring factory settings.
Поиск неисправностей
- Нет видеовыхода: Check HDMI/VGA cable connections. Ensure the monitor is on and set to the correct input. Verify NVR power status.
- Камеры не отображаются: Ensure cameras are properly connected to PoE ports. Check camera power and network status. Verify IP addresses and NVR camera management settings.
- Нет удаленного доступа: Confirm NVR has internet access. Check router settings (port forwarding if necessary). Verify Hik-Connect app login and device addition.
- Проблемы с записью: Check hard drive status and remaining capacity. Ensure recording schedules are correctly configured.
- Зависание/отставание системы: Restart the NVR. Ensure adequate ventilation to prevent overheating. Check network bandwidth if multiple cameras are streaming high-resolution video.
Технические характеристики
| Особенность | Спецификация |
|---|---|
| Номер модели | ERI-K108-P8 |
| IP-видео вход | 8-канальный |
| Двусторонний аудиовход | 1-канальный, RCA (2.0 Vp-p, 1 кОм) |
| Входящей полосы пропускания | 80 Мбит/с |
| Исходящая пропускная способность | 80 Мбит/с |
| Выходное разрешение HDMI | 4K(3840*2160)/60Hz, 4K(3840*2160)/30Hz, 1920*1080P/60Hz, 1600*1200/60Hz, 1280*1024/60Hz, 1280*720/60Hz, 1024*768/60Hz |
| Выходное разрешение VGA | 1920*1080P/60Hz, 1280*1024/60Hz, 1280*720/60Hz, 1024*768/60Hz |
| Разрешение записи | 8MP/6MP/5MP/4MP/3MP/1080p/UXGA/720p/VGA/4CIF/DCIF/2CIF/CIF/QCIF |
| Возможность декодирования | 8-ch@1080P |
| Интерфейс жесткого диска | 1 интерфейс SATA для 1 жесткого диска |
| Емкость жесткого диска | Up to 8TB (2TB pre-installed) |
| USB-интерфейс | 2, USB2.0 |
| PoE Ethernet Interfaces | 8 independent 10/100 Mbps |
| Источник питания | 100–200 В переменного тока |
| Power Consumption (without HDD and PoE) | ≤ 15 Вт |
| Рабочая температура | -10 °C ~ +55 °C (+14 °F ~ +131 °F) |
| Рабочая влажность | 10 % ~ 90 % |
| Размеры (Д x Ш x В) | 385 мм × 315 мм × 52 мм (15.2" × 12.4" × 2.0") |
| Вес (без HDD) | ≤ 3 кг (6.6 фунта) |
Гарантия и поддержка
The Real HD ERI-K108-P8 NVR comes with a Гарантия один год. Кроме того, Пожизненная техническая поддержка is provided by the seller. For any technical assistance or warranty claims, please contact the seller directly.