
MJJC GL-C-002P
MJJC GL-C-002P GLEDOPTO Zigbee 3.0 Mini 5-in-1 RGBCCT LED Strip Controller User Manual
Model: GL-C-002P | Brand: MJJC
Введение
This manual provides detailed instructions for the installation, operation, and maintenance of your MJJC GL-C-002P GLEDOPTO Zigbee 3.0 Mini 5-in-1 RGBCCT LED Strip Controller. This device is designed to control various types of LED strip lights, offering versatile lighting options through smart home integration.
Продукт болееview
The GL-C-002P is an ultra-thin, compact LED controller utilizing Zigbee 3.0 protocol for smart home integration. It supports five different LED strip configurations: RGBCCT, RGBW, RGB, CCT, and Dimmer. Key features include:
- Ультратонкий дизайн: Compact dimensions (70x37x10mm) for discreet installation.
- Совместимость с устройствами 5-в-1: Works with Single Color, CCT, RGB, RGBW, and RGBCCT LED strip lights.
- Протокол ZigBee 3.0: Ensures low power consumption, high stability, strong anti-interference ability, and enhanced security. Supports connection of over 50 devices.
- Интеграция с умными колонками: Compatible with popular smart speakers for voice control of brightness and other functions.
- Zigbee Gateway Compatibility: Works with various Zigbee gateways (e.g., SmartThings, Tuya) for app control on Android/iOS devices.
- 2.4G RF Remote Control Support: Can be controlled directly with a 2.4G RF remote or wall switch without a Zigbee hub.
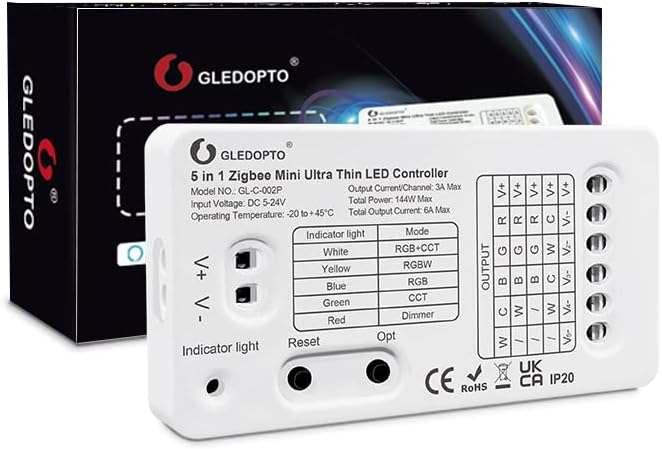
Image: The MJJC GL-C-002P Zigbee 3.0 Mini 5-in-1 RGBCCT LED Strip Controller, showcasing его компактная конструкция и клеммы для подключения.
Технические характеристики
| Параметр | Ценить |
|---|---|
| Название продукта | Zigbee Ultra Thin Mini 5 in 1 LED Controller |
| Модель № | GL-C-002P |
| Размер продукта | 70 x 36 x 10 мм (2.76 x 1.46 x 0.39 дюйма) |
| Vol входtage | DC 5-24V |
| Уровень защиты | IP20 |
| Общая мощность | 144W Max |
| Выходной ток/канал | 3А макс. |
| Общий выходной ток | 6А макс. |
| Рабочая температура | -20°С до +45°С |
| Материал | Пластик |
| Использование внутри и снаружи помещений | В помещении |
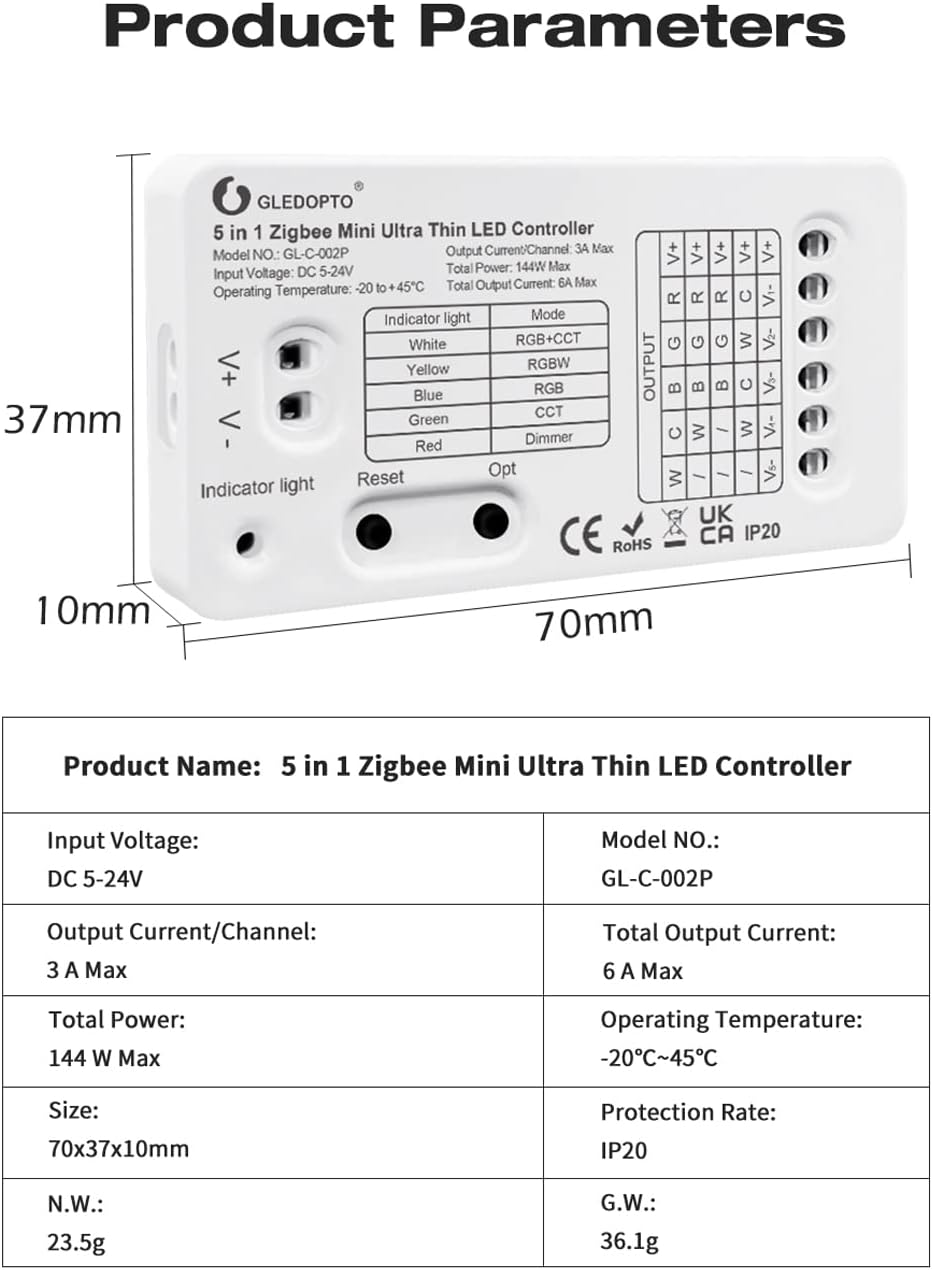
Image: Detailed product parameters including dimensions, input voltagе, и выходной ток.
Содержимое упаковки
- 1x MJJC GL-C-002P Zigbee Mini 5-in-1 LED Strip Controller
- 1x Руководство пользователя (этот документ)
- 1 наклейка 3 см
- 1x Инструмент для прокладки проводов
Настройка и установка
Follow these steps to set up your LED strip controller:
1. Wiring the LED Strip
The controller supports various LED strip types. Ensure correct wiring based on your LED strip configuration (RGBCCT, RGBW, RGB, CCT, or Dimmer). The controller features a press-type design for wire connections.
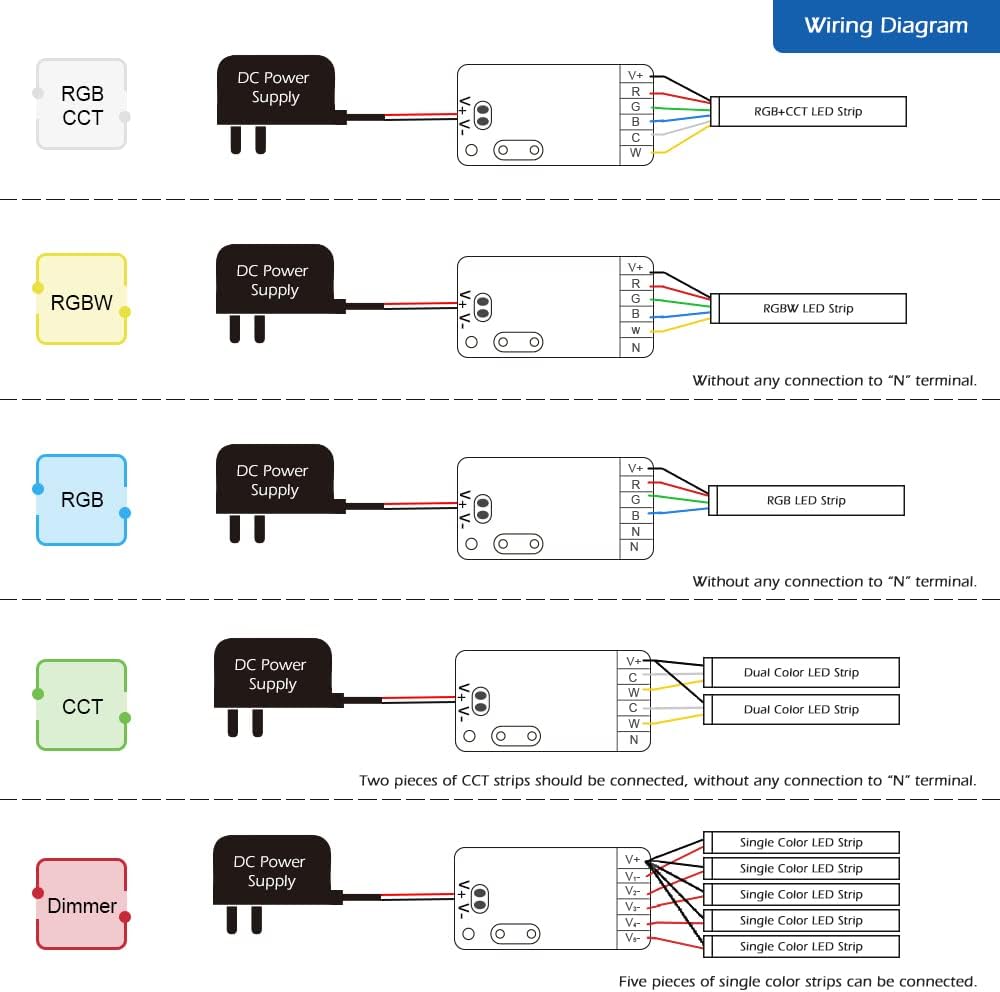
Image: Wiring diagrams illustrating connections for RGBCCT, RGBW, RGB, CCT, and Dimmer LED strips to the controller.
- РГБККТ: Connect R, G, B, CW, WW, and V+ terminals.
- РГБВ: Connect R, G, B, W, and V+ terminals.
- РГБ: Connect R, G, B, and V+ terminals.
- CCT (Dual Color): Connect C, W, and V+ terminals. Two CCT strips can be connected.
- Dimmer (Single Color): Connect V- and V+ terminals. Up to five single color strips can be connected.
Примечание: For RGBW, RGB, CCT, and Dimmer configurations, ensure no connection to the "N" terminal if present on your strip.
2. Powering the Light Source
Connect the LED strip, controller, and a compatible DC 5-24V power adapter. Plug the power adapter into an electrical outlet. The controller will automatically power up.
3. Setting Up the Zigbee Bridge (Gateway)
If using a Zigbee gateway (e.g., SmartThings, Tuya, Philips Hue), plug it into power and connect it to your Wi-Fi router using the provided network cable. Refer to your gateway's manual for initial setup.
4. Downloading the Gateway App
Download the corresponding app for your Zigbee gateway on your Android or iOS phone. Follow the app's instructions to start searching for new devices. This process may take some time. If the device is not found, try power cycling the controller (power off/on) or performing a reset.
5. Completing Setup and Control
После того как контроллер будет обнаружен и сопряжен с вашим шлюзом, вы сможете использовать приложение для управления цветом подсветки, цветовой температурой и яркостью светодиодных лент.

Image: Visual guide showing the four main steps for setup: powering the light source, setting up the bridge, downloading the gateway app, and controlling the lights.
Pairing with a 2.4G RF Remote Control
To pair the controller with a 2.4G RF remote control:
- Убедитесь, что контроллер включен.
- Immediately after powering on, press the "I" button on your 2.4G RF remote control.
- The LED strip will flash to indicate successful pairing.
Video: Demonstrates the setup and operation of the Mini Zigbee LED Strip Light Controller, including pairing and various control functions.
Инструкция по эксплуатации
Управление приложениями
Through your Zigbee gateway's mobile application, you can:
- Регулировка цвета: Select from 16 million colors to create desired ambiance.
- Регулировка яркости: Отрегулируйте яркость от 1% до 100%.
- Регулировка цветовой температуры: Fine-tune white light from warm to cool. Color lamp beads automatically turn off for more accurate white light adjustment.
- Группировка: Create rooms or groups to control multiple light strips simultaneously or individually.
- Настройка сцены: Configure custom lighting scenes to match different moods or activities.

Изображение: Бывшийample of a smartphone application interface used to control LED strip lights, showing color and brightness selection.
Голосовое управление
The controller supports voice control via Amazon Alexa, Google Home, and HomeKit when connected through a compatible Zigbee hub. Use voice commands to turn lights on/off, adjust brightness, and change colors or color temperature.

Image: Illustration of voice control functionality with Amazon Echo Plus, demonstrating commands like "Alexa, turn on the light" or "Alexa, set to warm white."
Переключение режимов
The controller has an "Opt" key for switching between different LED strip modes (RGBCCT, RGBW, RGB, CCT, Dimmer). Short press the "Opt" key once to cycle through the modes. The indicator light on the controller will change color to reflect the current mode:
- Белый: РГБККТ
- Желтый: RGBW
- Синий: РГБ
- Зеленый: ККТ
- Красный: Диммер
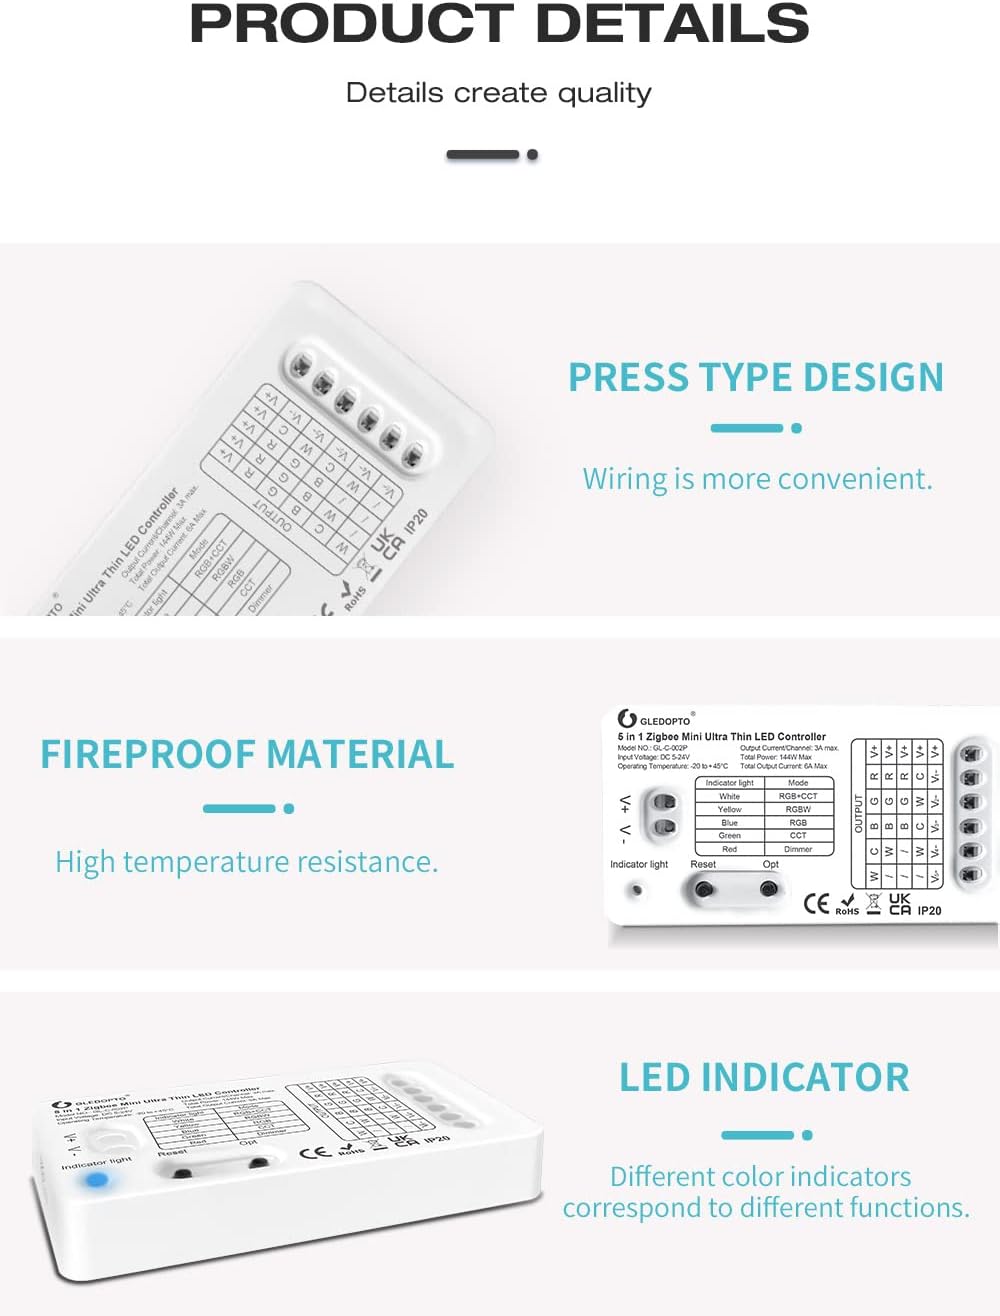
Image: Close-up of the controller highlighting the "Opt" button and the indicator light, with a table explaining indicator colors for different modes.
Frequency Settings for Noise Reduction
To reduce potential power supply noise, the controller allows adjustment of the output frequency. Press and hold the "Reset" button for five seconds to cycle through frequency options (600Hz, 800Hz, 1000Hz, 2000Hz, 4000Hz, 8000Hz). The LED strip will flash a specific number of times to indicate the selected frequency:
- 1 вспышка: 600 Гц
- 2 вспышки: 800 Гц
- 3 вспышки: 1000 Гц
- 4 вспышки: 2000 Гц
- 5 вспышки: 4000 Гц
- 6 вспышки: 8000 Гц

Image: Diagram explaining the frequency setting options and their corresponding flashing times for noise reduction.
Power-On Status Memory
The device remembers its last on/off status. To set the default power-on status (on or off), press and hold the "Opt" button for five seconds. The light will flash to indicate successful setting. When power is restored, the device will revert to the saved status.
Обслуживание
- Уборка: Для очистки контроллера используйте сухую мягкую ткань. Не используйте жидкие чистящие средства или аэрозоли.
- Среда: Ensure the controller is installed in a dry, indoor environment within the specified operating temperature range (-20°C to +45°C). Avoid exposure to direct sunlight, high humidity, or extreme temperatures.
- Соединения: Периодически проверяйте надежность всех соединений проводки.
Поиск неисправностей
- Issue: LED strip does not light up.
- Проверьте, правильно ли подключен адаптер питания и получает ли он питание.
- Убедитесь, что светодиодная лента правильно подключена к выходным клеммам контроллера.
- Обеспечьте входной объемtage (DC 5-24V) matches the requirements of both the controller and the LED strip.
- Убедитесь, что светодиодная лента исправна.
- Issue: Controller not found by Zigbee gateway/app.
- Ensure the Zigbee gateway is powered on and connected to your network.
- Place the controller within range of the Zigbee gateway.
- Try power cycling the controller (unplug and replug power).
- Perform a factory reset on the controller (long press the "Reset" button for 5 seconds until the indicator light flashes).
- Ensure your gateway app is up to date.
- Issue: Power supply noise (e.g., coil whine).
- Adjust the output frequency of the controller by pressing and holding the "Reset" button for five seconds to cycle through frequency options (600Hz, 800Hz, 1000Hz, 2000Hz, 4000Hz, 8000Hz). Select the frequency that minimizes noise.
- Ensure your power supply is of good quality and compatible with the controller's requirements.
- Issue: Wire connections are loose or difficult.
- The controller uses a press-type terminal design. Ensure wires are fully inserted and secured. Use the provided wiring tool if necessary.
- For very thin wires, consider tinning the ends slightly with solder to provide more rigidity, but be careful not to make them too thick for the terminals.
Гарантия и поддержка
For warranty information or technical support, please contact MJJC customer service through your retailer or the official MJJC webсайт. Сохраните чек о покупке на случай гарантийных претензий.
Ask a question about this manual
Ask about setup, troubleshooting, compatibility, parts, safety, or missing instructions. Manuals+ will review the question and use this page’s manual context to help answer it.