
1. Введение
Thank you for choosing the Hikvision AE-DN2016-F3 1080p HD In-Car IP Camera. This device is designed to provide reliable video recording of your journeys, enhancing driving safety and providing evidence in case of incidents. Featuring a 135° wide-angle lens, Full HD resolution, built-in Wi-Fi, and a G-sensor, this dashcam offers comprehensive surveillance for your vehicle.
Please read this manual carefully before operating the device to ensure proper use and optimal performance. Keep this manual for future reference.
2. Информация по технике безопасности
To prevent injury to yourself or others, and to avoid damage to your device, please observe the following safety precautions:
- Не подвергайте устройство воздействию экстремальных температур, прямых солнечных лучей в течение длительного времени или высокой влажности.
- Убедитесь, что видеорегистратор надежно установлен и не загораживает обзор водителю. view или препятствовать работе систем безопасности автомобиля (например, подушек безопасности).
- Используйте только прилагаемый адаптер питания и кабели. Использование несанкционированных аксессуаров может повредить устройство и аннулировать гарантию.
- Do not attempt to disassemble, repair, or modify the device yourself. Contact authorized service personnel for any repairs.
- Comply with all local laws and regulations regarding in-car camera usage and privacy.
- Держите устройство в недоступном для детей месте.
3. Содержимое упаковки
Пожалуйста, проверьте упаковку на наличие следующих товаров. Если какой-либо товар отсутствует или поврежден, свяжитесь с продавцом.
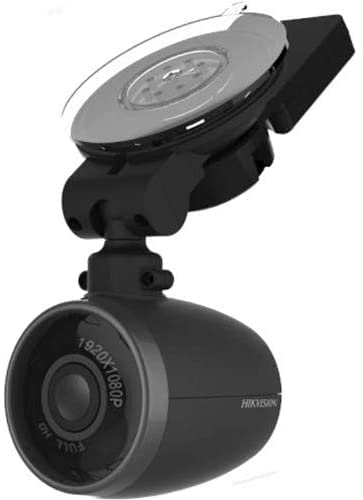
Image: Contents of the Hikvision AE-DN2016-F3 Dashcam package, showing the dashcam, power adapter, micro remote, power cable, quick connect window mount, and user manual.
- Видеорегистратор: The main recording unit.
- Адаптер питания: For connecting the dashcam to your vehicle's power outlet.
- Micro Remote: A small remote control for specific functions.
- Силовой кабель: USB cable for connecting the dashcam to the power adapter.
- Quick Connect Window Mount: For attaching the dashcam to the windshield.
- Руководство пользователя: Данное руководство по эксплуатации.
4. Установка
4.1 Установка видеорегистратора
- Выберите местоположение: Select a position on your front windshield that does not obstruct your view or interfere with the driver's side airbag. Typically, this is behind the rearview зеркало.
- Очистите лобовое стекло: Ensure the chosen area on the windshield is clean and dry for optimal adhesion of the mount.
- Прикрепите крепление: Secure the quick connect window mount to the cleaned area of the windshield. Press firmly to ensure it is properly adhered.
- Attach the Dashcam: Connect the dashcam to the quick connect window mount. The magnetic connection allows for easy attachment and detachment. Adjust the camera angle to ensure it captures the road ahead effectively (135° viewугол наклона).
4.2 Подключение питания
- Connect one end of the power cable to the dashcam's power input port.
- Connect the other end of the power cable to the provided power adapter.
- Plug the power adapter into your vehicle's 12V power outlet (cigarette lighter socket).
- Route the power cable neatly along the windshield and dashboard edges to avoid obstruction and ensure safety.
4.3 Установка SD-карты
The device supports up to a 128GB SD card for video recording. An SD card is required for recording functionality.
- Locate the SD card slot on the dashcam.
- Insert the SD card into the slot with the contacts facing the correct direction until it clicks into place.
- To remove, gently push the SD card until it pops out.
5. Операция
5.1 Включение/выключение питания
The dashcam is designed for plug-and-play operation. Once connected to the vehicle's power supply and the engine is started, the dashcam will automatically power on and begin recording. When the engine is turned off, the dashcam will automatically save the current recording and power off.
5.2 Режимы записи
- Непрерывная запись: The dashcam continuously records video in a loop. When the SD card is full, the oldest fileЭти записи будут перезаписаны новыми записями.
- Аварийная запись (G-сенсор): The built-in G-sensor detects sudden impacts or strong vibrations (e.g., during a collision). When triggered, the current video segment is automatically locked and saved to a protected folder, preventing it from being overwritten by continuous recording.
5.3 Подключение по Wi-Fi
The dashcam features a built-in Wi-Fi module, allowing you to connect it to your smartphone via a dedicated app. This enables live view, video playback, downloading recordings, and adjusting settings.
- Download the official Hikvision dashcam app from your smartphone's app store (iOS/Android).
- Включите видеорегистратор.
- On your smartphone, go to Wi-Fi settings and connect to the dashcam's Wi-Fi network (SSID and password can usually be found on the device or in the app's initial setup).
- Open the app to manage your dashcam.
5.4 Using the Micro Remote
The micro remote can be used to manually trigger an emergency recording or take a snapshot, depending on its configuration within the app. Refer to the app's instructions for specific remote functions.
6. Settings and App Usage
The Hikvision dashcam app provides a user-friendly interface to customize your dashcam's settings:
- Разрешение видео: Adjust recording quality (e.g., 1080p, 720p).
- Продолжительность циклической записи: Set the length of video segments (e.g., 1, 3, 5 minutes).
- Чувствительность G-сенсора: Adjust the sensitivity of the G-sensor to prevent false triggers or ensure proper detection.
- Аудиозапись: Enable or disable the built-in microphone.
- Дата/Время Св.amp: Ensure accurate date and time are displayed on recordings.
- Настройки Wi-Fi: Change Wi-Fi SSID and password if desired.
- Обновления прошивки: Check for and install the latest firmware for improved performance and features.
For detailed instructions on each setting, please refer to the in-app help section.
7. Техническое обслуживание
- Уборка: Use a soft, dry cloth to clean the camera lens and body. Do not use chemical cleaners or abrasive materials.
- Форматирование SD-карты: It is recommended to format the SD card regularly (e.g., once a month) using the dashcam's app to maintain optimal recording performance and prevent data corruption. Back up any important files перед форматированием.
- Хранилище: If storing the dashcam for an extended period, remove it from the vehicle and store it in a cool, dry place away from direct sunlight.
8. Поиск Неисправностей
| Проблема | Возможное решение |
|---|---|
| Видеорегистратор не включается. |
|
| Запись останавливается или дает сбой. |
|
| Проблемы с подключением к Wi-Fi. |
|
| Качество видео плохое. |
|
9. Технические характеристики
| Особенность | Деталь |
|---|---|
| Модель | AE-DN2016-F3 |
| Разрешение видео | 1080p Full HD |
| Viewугол наклона | До 135° |
| Аудио | Встроенный микрофон и динамик |
| Связность | Built-in Wi-Fi Module, Wi-Fi AP Function |
| Датчик | Built-in G-Sensor Module |
| Хранилище | Supports up to 128GB SD Card (for video recording) |
| Монтаж | Magnetic Connection between Camera and Bracket |
| Метод контроля | Сенсорное управление (через приложение) |
| Номер детали | 3353 |
| ASIN | B09PC5RJT1 |
10. Гарантия и поддержка
Hikvision products are designed for reliability and performance. This product comes with a standard manufacturer's warranty. For specific warranty terms and conditions, please refer to the warranty card included in your package or visit the official Hikvision webсайт.
If you encounter any issues or require technical assistance, please contact Hikvision customer support or your authorized dealer. Provide your product model number (AE-DN2016-F3) and purchase details when seeking support.
Интернет-ресурсы: For the latest information, FAQs, and software updates, please visit the official Hikvision support webсайт.


