1. Введение
This manual provides essential information for the safe and efficient operation, setup, and maintenance of your CREWORKS 220x750mm 1100W Metal Lathe. Please read this manual thoroughly before operating the machine to ensure proper use and to prevent injury or damage.
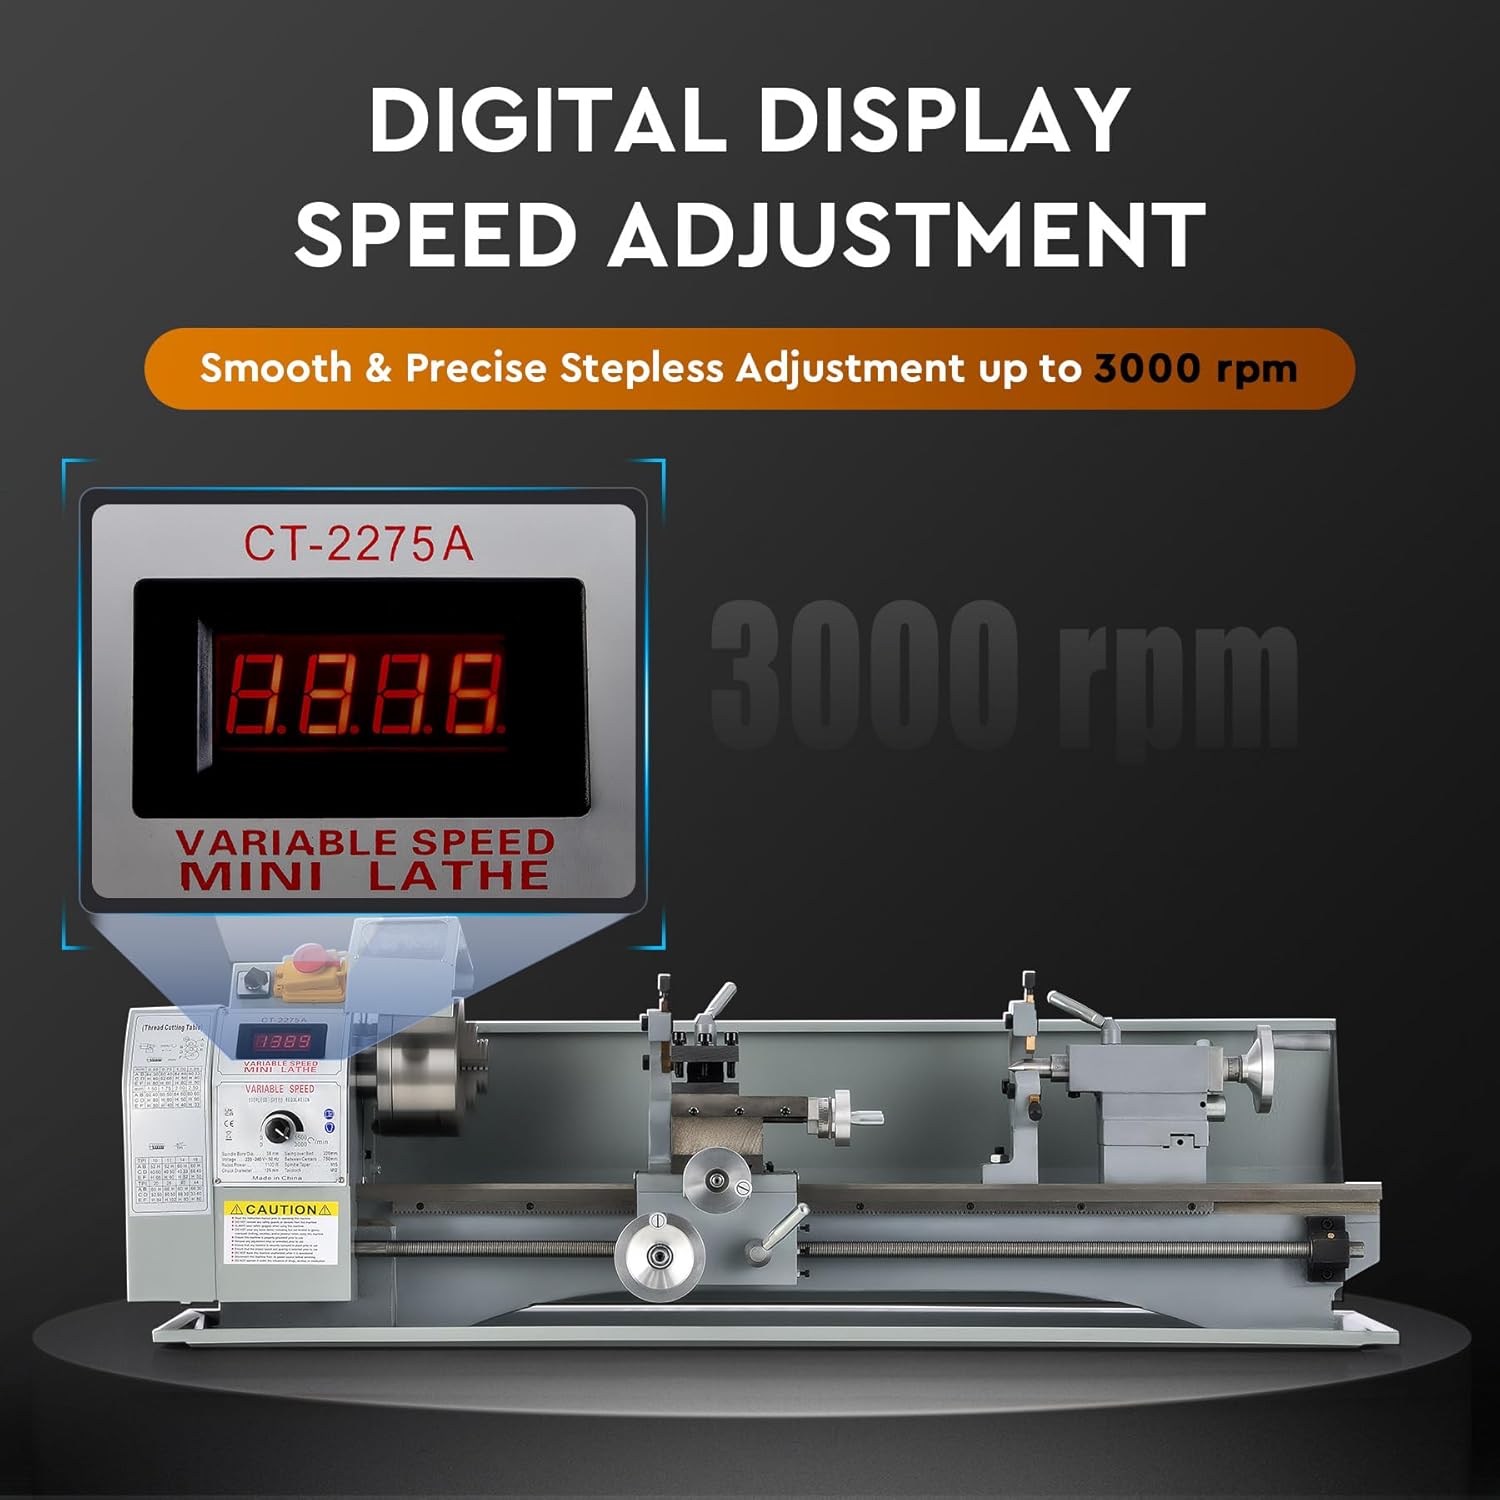
The CREWORKS Metal Lathe is designed for precision metalworking tasks, including turning, drilling, threading, and cutting. Its robust construction and digital display for speed adjustment offer enhanced control and accuracy for various applications.
2. Инструкции по технике безопасности
ВНИМАНИЕ: Несоблюдение этих инструкций по технике безопасности может привести к серьезным травмам или смерти.
- Always wear appropriate personal protective equipment (PPE), including safety glasses, hearing protection, and suitable clothing. Avoid loose clothing, jewelry, and long hair.
- Убедитесь, что рабочее место чистое, хорошо освещенное и свободное от препятствий.
- Never operate the lathe under the influence of drugs, alcohol, or medication that impairs judgment.
- Before making any adjustments or maintenance, always disconnect the machine from the power supply.
- Надежно клamp Перед запуском станка закрепите все заготовки в патроне или цанге.
- Не оставляйте работающую машину без присмотра.
- Держите руки и пальцы подальше от движущихся частей, особенно от патрона и режущих инструментов.
- Use only sharp, correctly ground cutting tools. Dull tools can cause kickback and damage.
- Перед началом эксплуатации убедитесь, что все защитные ограждения и устройства безопасности установлены и исправно функционируют.
- Ознакомьтесь с расположением и принципом работы кнопки аварийной остановки.
3. Продукт закончилсяview
The CREWORKS Metal Lathe is engineered for precision and durability. Key components and features are detailed below.
3.1 Основные компоненты

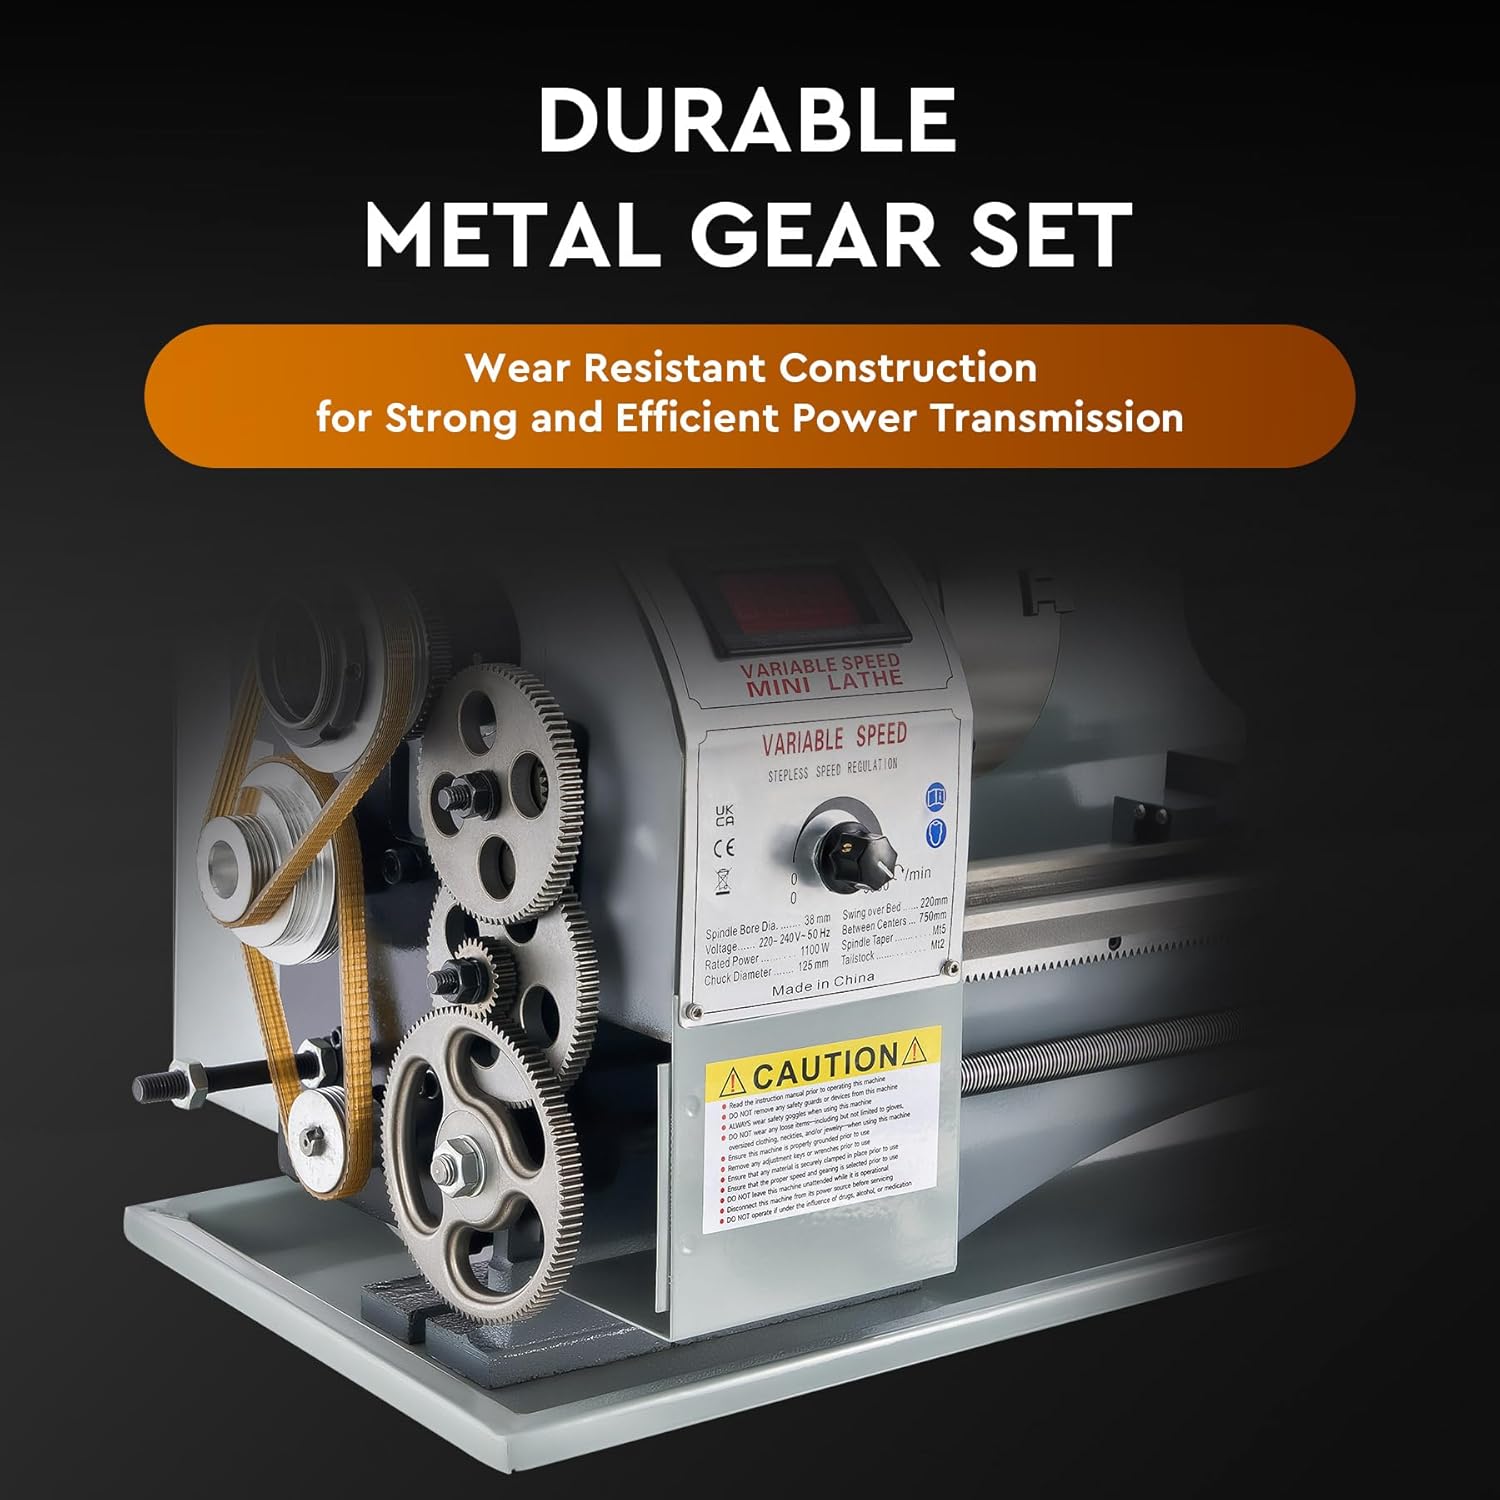
- Головная бабка: Houses the main spindle, chuck, and gear train for speed control.
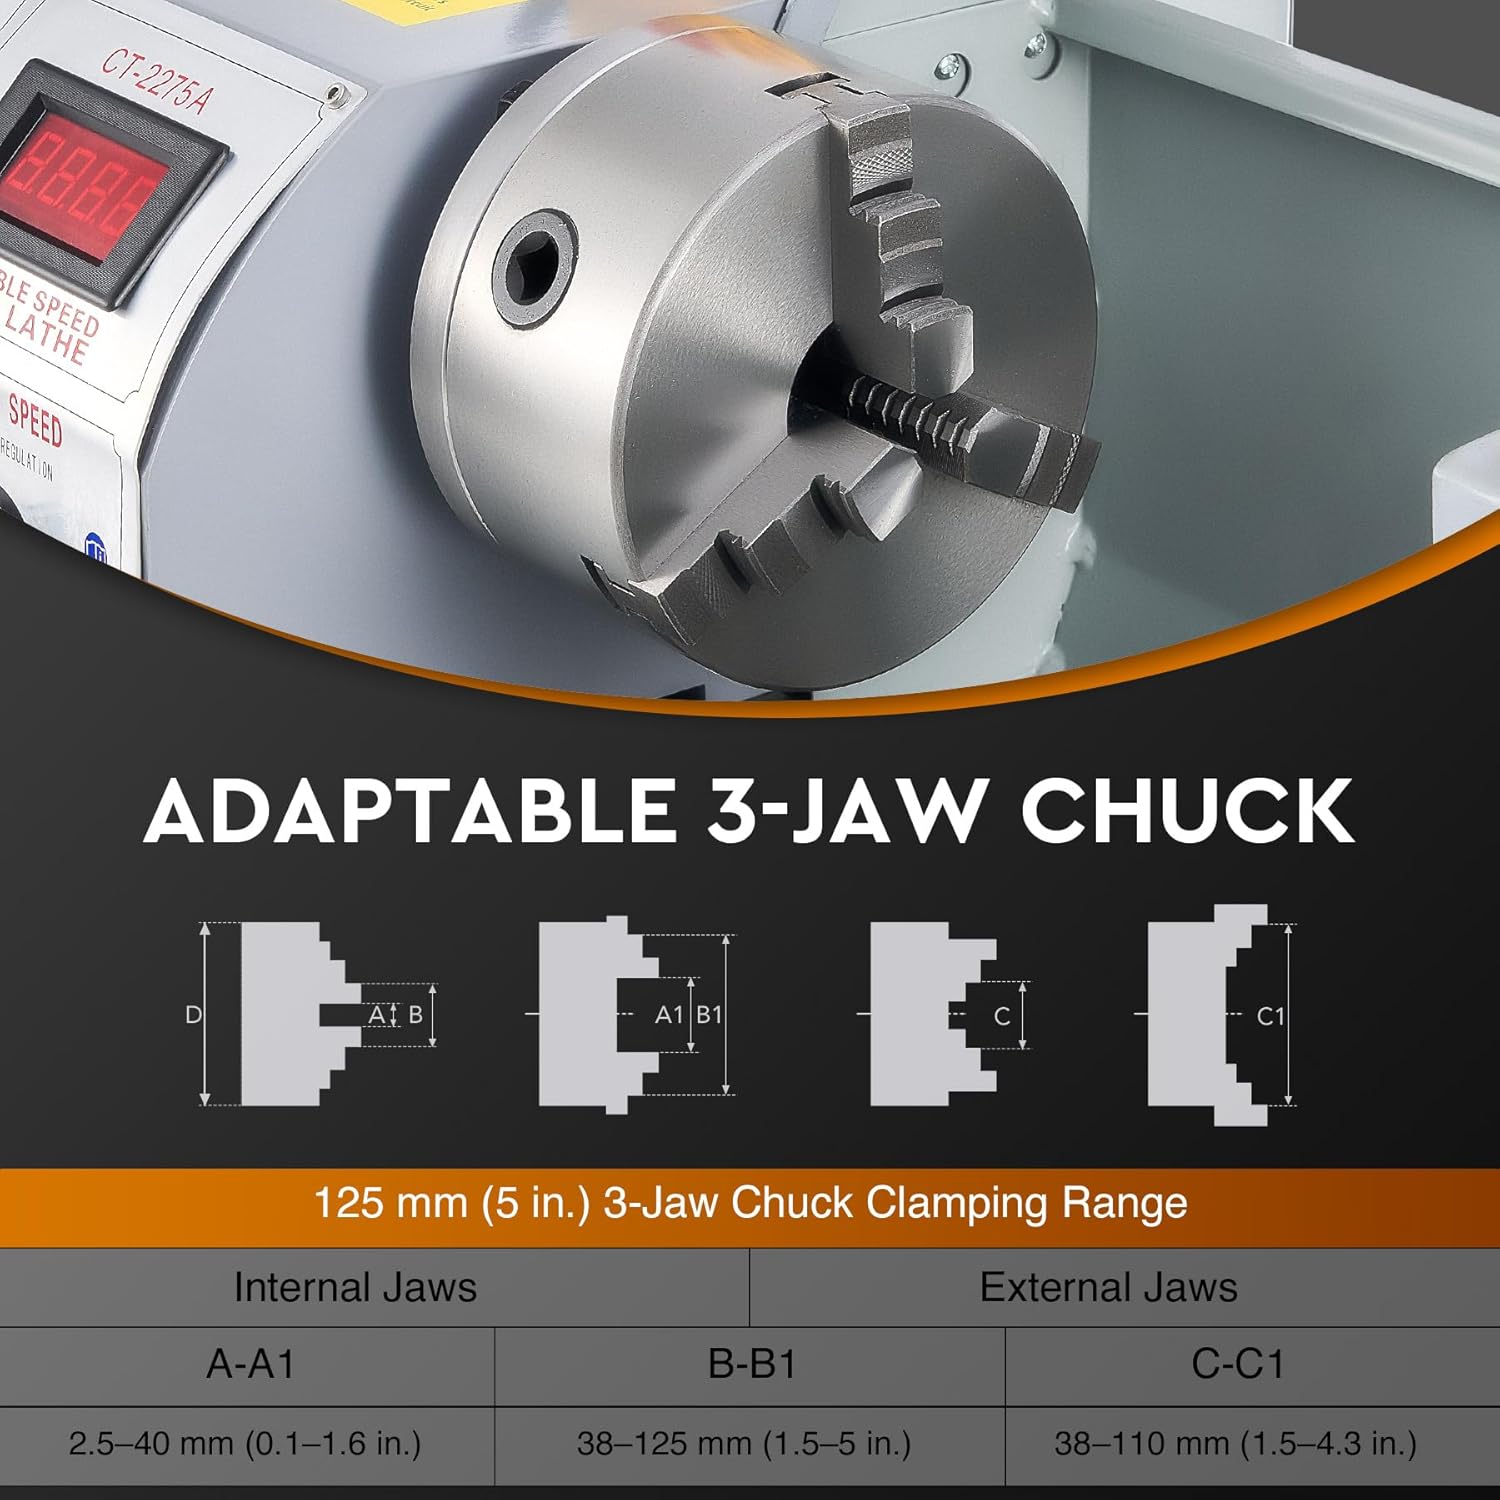
- Чак: A 3-jaw self-centering chuck for holding workpieces.
- Инструмент для создания сообщений: Holds the cutting tools. Adjustable for various operations.
- Перевозка: Moves along the bed, carrying the cross slide and tool post.
- Перекрестный слайд: Allows the tool to move perpendicular to the workpiece.
- Compound Rest: Provides angular adjustment for the cutting tool.
- Задняя бабка: Supports the end of long workpieces or holds drilling/reaming tools.
- Кровать: The main frame of the lathe, providing precision guide rails for the carriage and tailstock.
- Ведущий винт: Used for automatic feeding and thread cutting.
- Панель управления: Features power switches, speed adjustment, and digital display.
3.2 Основные характеристики
- Digital Display Speed Adjustment: Provides precise and stepless speed control up to 2250 RPM (or 3000 RPM as per some images/specs). The digital readout ensures accurate speed settings.
- Прочная конструкция: The metal bed is made of high-quality iron, ensuring stability and durability. Equipped with wear-resistant nylon gears for precise rotation.
- 3-Jaw Self-Centering Chuck: Securely holds cylindrical workpieces. Includes a splash guard for safety.
- Adjustable 4-Way Tool Post: Allows for easy changing of cutting tools and angles for various operations like chamfering.
- Dual V-Shaped Guide Rails: Ensures smooth and precise movement of the carriage and tailstock.
- Широкое применение: Suitable for turning, drilling, threading, and cutting operations on various materials.

4. Настройка
4.1 Распаковка и осмотр
- Carefully remove the lathe from its packaging. Retain all packaging materials for future transport or return.
- Inspect the machine for any signs of damage during transit. Report any damage to the carrier and supplier immediately.
- Verify that all components and accessories listed in the packing list are present.
4.2 Размещение и выравнивание
- Place the lathe on a sturdy, level workbench or stand capable of supporting its weight (approximately 75 kg).
- Ensure adequate clearance around the machine for safe operation and chip removal.
- Use a spirit level to check the machine's level. Adjust the feet or shims as necessary to ensure the bed is perfectly level. Proper leveling is crucial for accurate machining.
4.3 Подключение питания
- Убедитесь, что источник питания соответствует мощностиtage and frequency requirements specified on the machine's nameplate (e.g., 220V).
- Connect the machine to a grounded electrical outlet. Do not use extension cords unless absolutely necessary, and ensure they are rated for the machine's power requirements.
- Before plugging in, ensure the power switch is in the "OFF" position.
4.4 Первичная очистка и смазка
- Clean all protective grease and oil from the machine's surfaces, especially the bedways, lead screw, and chuck, using a suitable degreaser.
- Apply a thin coat of machine oil to all moving parts, including the bedways, lead screw, and gears, as specified in the maintenance section.
5. Инструкция по эксплуатации
This section covers basic operational procedures. Always refer to the safety instructions before starting any operation.
5.1 Включение/выключение питания и аварийная остановка

- Включение питания: Press the green "ON" button. The digital display will illuminate.
- Выключение: Press the red "OFF" button.
- Экстренная остановка: In case of an emergency, press the large red mushroom-head button. This will immediately cut power to the motor. To reset, twist the button clockwise and then press the green "ON" button.
5.2 Регулировка скорости вращения шпинделя
- The lathe features variable speed control. Use the speed adjustment knob on the control panel to set the desired RPM.
- The digital display will show the current spindle speed. Adjust speed according to the material and operation being performed.
5.3 Заготовка Клamping (3-Jaw Chuck)
- Вставьте заготовку в трехкулачковый патрон.
- Use the chuck key to tighten the jaws evenly until the workpiece is securely clamped. Remove the chuck key immediately after tightening to prevent it from being ejected during operation.
- Перед началом любой операции резки убедитесь, что заготовка отцентрирована и расположена ровно.
5.4 Tool Post and Tool Bit Setup

- Select the appropriate cutting tool for the task.
- Insert the tool bit into the tool post and secure it firmly with the locking screws.
- Adjust the height of the tool bit so that its cutting edge is exactly on the centerline of the workpiece. Use shims if necessary.
- The 4-way tool post allows for quick changes and angular adjustments.
5.5 Работа задней бабки

- The tailstock can be moved along the bed and locked in position using its clampрычаг.
- The tailstock quill can be extended or retracted using the handwheel and locked with the quill lock.
- Use a live center in the tailstock to support long workpieces during turning operations.
- Drill bits can be mounted in the tailstock for drilling operations.
5.6 Feed and Threading Operations
- The lead screw enables automatic feeding of the carriage for smooth cuts and precise thread cutting.
- Refer to the gear chart (if provided with the machine) for setting up the correct gears for specific thread pitches.
- Engage the half-nut lever for threading operations.
6. Техническое обслуживание
Regular maintenance is crucial for the longevity and performance of your lathe. Always disconnect power before performing maintenance.
- Ежедневная уборка: After each use, clean chips and debris from the machine, especially from the bedways, lead screw, and chuck. Use a brush or air gun (with caution and eye protection).
- Смазка: Regularly lubricate all moving parts, including the bedways, lead screw, cross slide, compound rest, and tailstock quill. Use high-quality machine oil. Check the gear train for proper lubrication.
- Проверка передач: Periodically inspect the gears for wear or damage. Replace worn gears to maintain precision.
- Техническое обслуживание патрона: Clean and lightly lubricate the chuck jaws and scroll plate to ensure smooth operation and proper gripping.
- Натяжение ремня: Check the drive belt tension periodically. Adjust if too loose or too tight.
- Электрическая проверка: Периодически проверяйте шнур питания и соединения на предмет наличия повреждений.
7. Поиск Неисправностей
В этом разделе рассматриваются распространённые проблемы, с которыми вы можете столкнуться. Если у вас есть проблемы, не перечисленные здесь, обратитесь в службу поддержки.
| Проблема | Возможная причина | Решение |
|---|---|---|
| Машина не включается. | Отсутствие электропитания; Сработала аварийная остановка; Неисправен переключатель. | Check power connection; Reset emergency stop button; Inspect power switch. |
| Spindle does not rotate or rotates slowly. | Incorrect speed setting; Drive belt loose or broken; Motor issue. | Adjust speed knob; Check and adjust/replace drive belt; Contact support if motor issue suspected. |
| Плохое качество обработки поверхности заготовки. | Dull cutting tool; Incorrect cutting speed or feed rate; Workpiece not securely clamped; Machine vibration. | Sharpen or replace tool; Adjust speed/feed; Re-clamp workpiece; Check machine leveling and stability. |
| Чрезмерный шум или вибрация. | Loose components; Worn bearings or gears; Unbalanced workpiece. | Tighten all fasteners; Inspect bearings/gears for wear; Ensure workpiece is balanced; Re-level machine. |
| Цифровой дисплей не работает. | Loose connection; Faulty display unit. | Check connections; Contact support for replacement. |
8. Технические характеристики
Technical specifications for the CREWORKS 220x750mm 1100W Metal Lathe.

| Особенность | Деталь |
|---|---|
| Модель | MLM-SERIES (220x750mm) |
| Материал | Сталь |
| Номинальная мощность | 1.5 л.с. (1100 Вт) |
| Качели над кроватью | 220 мм (8.7 дюйма) |
| Отверстие шпинделя | 38 мм (1.5 дюйма) |
| Конус задней бабки | МТ#2 |
| Конус шпинделя | МТ#5 |
| Диапазон метрической резьбы | 0.5–3 мм |
| Диапазон резьбы в дюймах | 8–44 tpi |
| Расстояние до центра | 750 мм (29.5 дюйма) |
| Диаметр патрона | 125 мм (5 дюйма) |
| Максимальная скорость вращения шпинделя | 3000 об/мин |
| Вес нетто | 75 кг (165.3 фунта) |
| Размеры (упаковка) | 122 х 51 х 48.5 см |
9. Гарантия и поддержка
For warranty information, please refer to the terms and conditions provided at the time of purchase or contact your retailer. This product typically comes with a standard return policy (e.g., 30 days from purchase).
For technical support, spare parts, or any operational queries, please contact CREWORKS customer service or your authorized dealer. Have your model number (MLM-SERIES) and purchase date ready when contacting support.
Контактная информация: Refer to your purchase documentation or the CREWORKS official webсайт для получения самых актуальных контактных данных.
10. Видеоролики о продуктах
No official product videos from the seller were available in the provided data for embedding. Please refer to the manufacturer's webСтраница на сайте или странице продукта с любыми доступными видеоресурсами.