
1. Введение
Thank you for choosing the American Volt 14-15 Inch Electric Radiator Cooling Fan Kit. This kit provides an efficient cooling solution for your vehicle's radiator, engine, or transmission cooler. It includes a high-performance electric fan, a comprehensive wiring kit, and a temperature-activated thermostat switch. Please read this manual thoroughly before installation and operation to ensure proper function and safety.
2. Информация по технике безопасности
- Перед выполнением любых электромонтажных работ всегда отключайте аккумулятор автомобиля, чтобы предотвратить поражение электрическим током или короткое замыкание.
- При выполнении монтажных работ необходимо использовать соответствующие средства индивидуальной защиты, включая защитные очки и перчатки.
- Убедитесь, что все проводные соединения надежно закреплены и должным образом изолированы, чтобы предотвратить пожарную опасность или сбои в работе системы.
- Не используйте вентилятор с поврежденными лопастями или корпусом.
- Keep hands and loose clothing away from moving fan blades.
- Consult a qualified automotive technician if you are unsure about any part of the installation process.
3. Содержимое упаковки
Убедитесь, что в вашей упаковке присутствуют все перечисленные ниже компоненты:
- 14-15 Inch Electric Radiator Cooling Fan
- Universal 5-pin 40A Relay Switch Harness Kit
- Dual Pin Electric Cooling Fan Thermostat Switch with Push-in Fin Probe
- Mounting Bracket Feet
- Cooler Fin Tie Strap Kit (Mounting Rods, Foam Pads, Springs, Clips)
- Installation Instructions and Wiring Diagram (included with wiring kit)

Image 1: The 14-15 inch electric radiator cooling fan, showing its multi-blade design and housing.
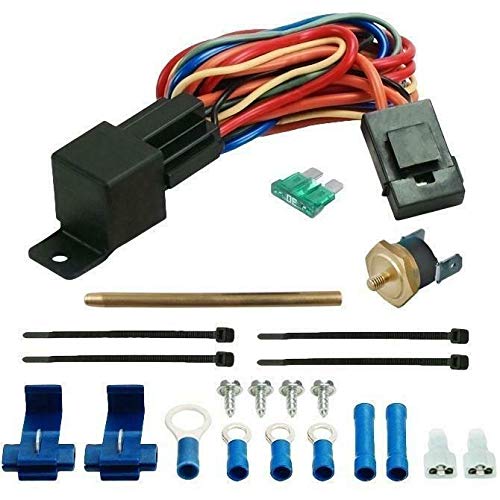
Image 2: Components of the universal wiring kit, including the relay, fuse, and various wires.
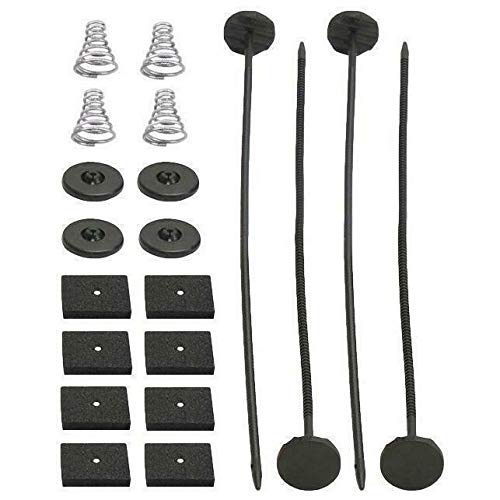
Image 3: The complete set of mounting hardware, including springs, foam pads, and mounting rods.
4. Особенности продукта
- Универсальная совместимость: Designed for various automotive applications, suitable for 14-15 inch radiator sizes.
- High Performance Fan: Features an upgraded 130-watt motor, drawing 11 amps and producing over 2723 CFM for effective cooling.
- Реверсивный поток воздуха: Configured as an air puller by default, but can be reversed to an air pusher configuration.
- Тонкий дизайн: Measures 15" x 14" x 3.2" thickness at the center and a slim 1.8" at the edge for versatile mounting.
- Complete Wiring Kit: Includes a 5-pin 40A relay switch harness kit with 14AWG wire, suitable for 1-2 cooling fans or 12-volt accessories.
- Комплексная защита: Features a 30A in-line fuse for circuit protection.
- Управление термостатом: Dual pin electric cooling fan thermostat switch with a solid brass push-in fin probe.
- Предустановленная температура: Activates the fan at 180°F (82°C) and deactivates at 165°F (74°C).
- Универсальный зонд: The probe can be cut to size and pins to radiator, engine, or transmission cooler fins to measure liquid temperatures (oil, water, coolant).
5. Установка
5.1. Крепление вентилятора
The fan can be mounted as an air puller (behind the radiator, pulling air through) or an air pusher (in front of the radiator, pushing air through). The fan is configured as an air puller by default. To reverse airflow, simply reverse the polarity of the fan motor wires (swap positive and negative connections).
- Position the fan against the radiator core.
- Insert the mounting rods through the fan's mounting feet and then through the radiator fins.
- Place the foam pads on the rods against the radiator to protect the fins.
- Slide the springs onto the rods from the opposite side of the radiator.
- Secure the rods with the plastic clips, ensuring a snug fit without overtightening, which could damage the radiator fins.
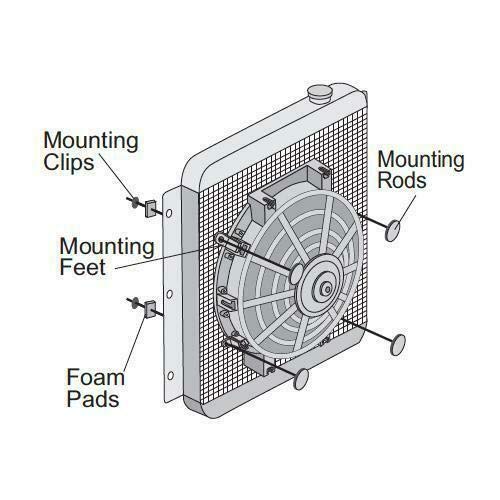
Image 4: Diagram illustrating the fan mounting process on a radiator, showing the placement of mounting feet, rods, and clips.
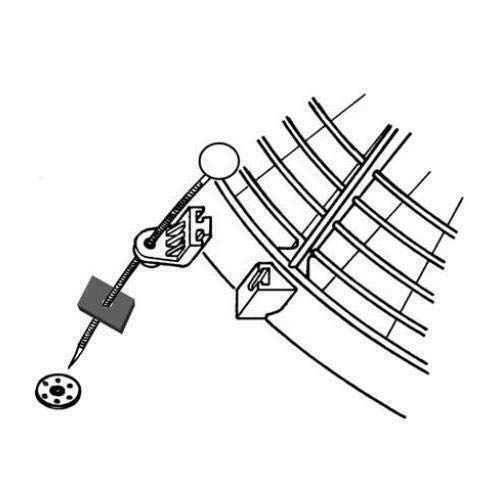
Изображение 5: Крупный план view of how the mounting clip, spring, foam pad, and rod secure the fan to the radiator fins.
5.2. Установка термостата
The thermostat uses a push-in fin probe to sense temperature.
- Locate a suitable area on the radiator fins, engine, or transmission cooler where the probe can be securely inserted and accurately measure liquid temperature.
- Carefully push the brass probe between the fins until it is firmly seated. The probe can be cut to a shorter length if necessary for specific applications.
- Ensure the probe makes good contact with the fins for accurate temperature readings.
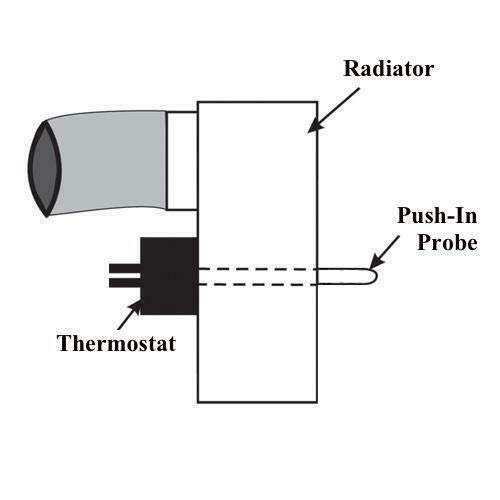
Image 6: Diagram showing the push-in probe of the thermostat inserted into the radiator fins.
5.3. Wiring Kit Installation
The wiring kit includes a 5-pin 40A relay and is designed for 12-volt systems. Refer to the wiring diagram included with your kit for detailed connections. A general overview приведен ниже:
- Источник питания: Connect the main power wire (typically red, 14AWG) with the in-line 30A fuse to a constant 12V power source from the battery.
- Земля: Connect the ground wire (typically black) to a reliable chassis ground point.
- Подключение вентилятора: Connect the fan motor wires to the relay output wires. Ensure correct polarity for desired airflow (reverse for pusher configuration).
- Подключение термостата: Connect the thermostat switch to the relay trigger wire. When the thermostat reaches its turn-on temperature, it will complete the circuit to activate the relay.
- Питание зажигания/дополнительных устройств: Connect the ignition/accessory wire (if present) to a switched 12V source that is active when the ignition is on.
- A/C Override/Manual Switch: The harness may include a wire for A/C override or a manual toggle switch. Connect this as per the included wiring diagram if desired. This allows the fan to be activated when the A/C is on or manually.
Secure all wiring to prevent chafing, heat damage, or interference with moving parts. Use appropriate connectors and heat shrink tubing for durable connections.
6. Операция
Once properly installed, the electric cooling fan system operates automatically based on the thermostat's temperature readings.
- When the temperature sensed by the probe reaches 180°F (82°C), the thermostat will activate the relay, turning on the electric fan.
- The fan will continue to run until the temperature drops to 165°F (74°C), at which point the thermostat will deactivate the relay, turning off the fan.
- If an A/C override or manual switch is connected, the fan can also be activated independently of the thermostat's temperature setting.
Monitor your vehicle's temperature gauge after installation to ensure the system is functioning correctly and maintaining optimal operating temperatures.
7. Техническое обслуживание
Regular maintenance helps ensure the longevity and efficient operation of your cooling fan kit.
- Осмотрите лопасти вентилятора: Periodically check the fan blades for any cracks, damage, or debris accumulation. Clean blades gently if necessary.
- Проверьте проводку: Inspect all wiring connections for corrosion, fraying, or loose terminals. Ensure all insulation is intact.
- Проверьте крепление: Confirm that the fan and thermostat probe remain securely mounted and have not loosened due to vehicle vibrations.
- Очистка ребер радиатора: Ensure the radiator fins are free from dirt, leaves, and other obstructions that could impede airflow.
- Проверить термостат: Occasionally verify the thermostat's function by observing the fan's activation and deactivation at the specified temperatures.
8. Поиск Неисправностей
| Проблема | Возможная причина | Решение |
|---|---|---|
| Вентилятор не включается | Перегорел предохранитель Ненадежное соединение проводки Неисправный термостат Неисправное реле Неправильная проводка | Check and replace 30A in-line fuse Inspect all connections, ensure they are secure Test thermostat for continuity Test relay function Review wiring diagram and correct connections |
| Вентилятор работает постоянно | Stuck thermostat (closed circuit) Faulty relay (stuck closed) Incorrect wiring (constant power to fan) | Test thermostat, replace if faulty Test relay, replace if faulty Review wiring diagram and correct connections |
| Fan is noisy or vibrates excessively | Поврежденные лопасти вентилятора Свободное крепление Мусор в корпусе вентилятора | Inspect blades for damage, replace fan if necessary Tighten mounting rods and clips Clear any obstructions from fan housing |
| Engine overheats despite fan operation | Insufficient airflow (fan direction) Radiator blockage Низкий уровень охлаждающей жидкости Other cooling system issues | Verify fan is pulling/pushing air in the correct direction Clean radiator fins thoroughly Проверьте уровень охлаждающей жидкости и долейте её. Consult a mechanic for further diagnosis of the cooling system |
9. Технические характеристики
- Бренд: American Volt
- Рабочий объемtage: 12 Вольт
- Ватtage: 130 Вт
- Текущий розыгрыш: 11 Amps (Fan Motor)
- Расход воздуха: Over 2723 CFM
- Размеры вентилятора: 15" x 14" x 3.2" (center thickness), 1.8" (edge thickness)
- Thermostat Turn-On Temperature: 180°F (82°C)
- Thermostat Turn-Off Temperature: 165°F (74°C)
- Wiring Kit Relay: 5-pin, 40A
- Wiring Kit Fuse: 30A In-line
- Wiring Gauge: 14 AWG
- Материал: Plastic (Fan Housing), Brass (Thermostat Probe)
10. Гарантия и поддержка
For warranty information, technical support, or assistance with your American Volt Electric Radiator Cooling Fan Kit, please refer to the documentation provided at the time of purchase or contact American Volt customer service directly. Keep your proof of purchase for warranty claims.