Sorand AC 230V Floor Heating Thermostat
Sorand AC 230V Digital Programmable Floor Heating Thermostat User Manual
Model: AC 230V Floor Heating Thermostat
Введение
This manual provides comprehensive instructions for the installation, operation, and maintenance of your Sorand AC 230V Digital Programmable Floor Heating Thermostat. Please read this manual carefully before installation and use to ensure proper function and safety.
The thermostat is designed for electronic floor heating systems and other electrical heating elements. It features a large LCD with backlight, programmable temperature settings, and internal/external temperature sensing capabilities.
Информация по безопасности
- Установка должна выполняться квалифицированным электриком.
- Перед установкой или обслуживанием убедитесь, что питание отключено.
- Не подвергайте термостат воздействию воды или чрезмерной влажности.
- Работать в пределах указанного объемаtage и текущие ограничения.
Содержимое упаковки
Проверьте наличие всех предметов в упаковке:
- 1 x Sorand AC 230V Digital Programmable Floor Heating Thermostat
- 1 x External Temperature Sensor Cable (approx. 3 meters)
- 2 x крепежных винтов
- 1 x Руководство пользователя (этот документ)

Image: Contents of the Sorand thermostat package, showing the main unit, external sensor cable, mounting screws, and the instruction manual.
Настройка и установка
Важный: Installation should only be carried out by a qualified electrician. Ensure the main power supply is turned off before commencing any wiring work.
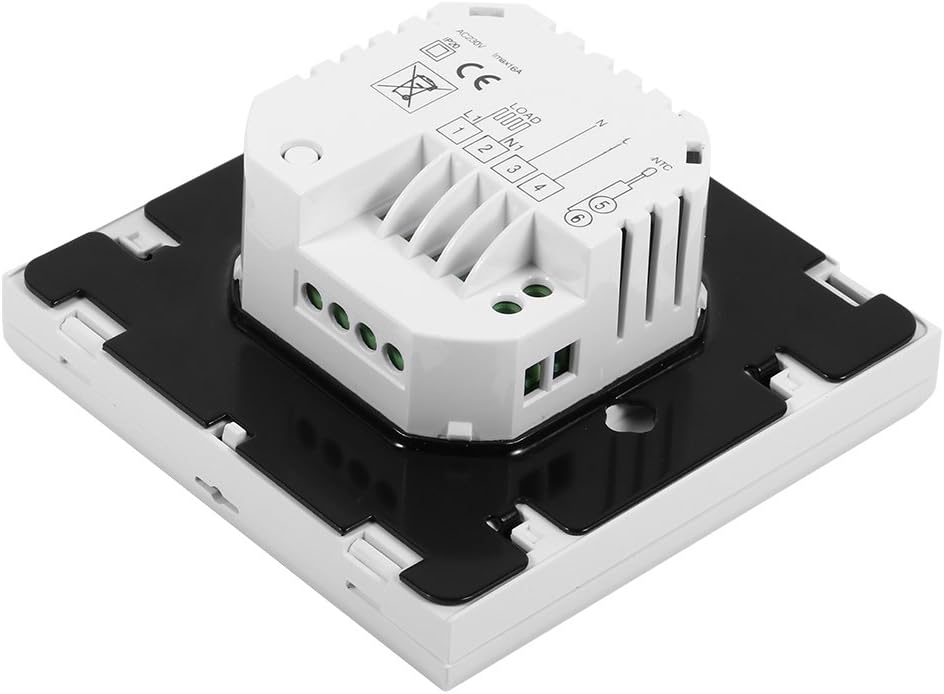
Схема электропроводки
Refer to the wiring diagram on the back of the thermostat unit for correct connections. The terminals are typically labeled as follows:
- L1, N1: Power input (AC 230V)
- LOAD (1, 2): Connection to the heating element
- NTC (5, 6): Connection for the external floor temperature sensor

Изображение: сзади view of the Sorand thermostat, displaying the wiring terminals and a simplified diagram for electrical connections.
Изображение: сбоку view of the Sorand thermostat, illustrating the internal components and ports for wiring connections.
Монтаж
- Prepare a standard electrical wall box (86x86mm recommended).
- Connect the power supply, heating load, and external sensor wires according to the wiring diagram.
- Аккуратно вставьте проводной термостат в монтажную коробку.
- Закрепите термостат на настенной коробке с помощью прилагаемых винтов.
- Прикрепите переднюю панель термостата.
Инструкция по эксплуатации
The thermostat features a large LCD and touch-sensitive buttons for easy operation.
Функции кнопок
- ⏻ (Мощность): Включает/выключает термостат.
- ↻ (Mode/Cycle): Switches between manual mode and programmable mode.
- ⏱ (Clock/Time): Sets the time and enters programming mode.
- ▲ (Стрелка вверх): Increases temperature setting or adjusts values.
- ▼ (Стрелка вниз): Decreases temperature setting or adjusts values.

Изображение: Спереди view of the Sorand thermostat, highlighting the LCD screen and the five touch-sensitive control buttons below it.
Установка времени и дня
- Нажмите и удерживайте ⏱ кнопку и удерживайте ее в течение 3 секунд, чтобы войти в режим установки времени.
- Используйте ▲ и ▼ кнопки, чтобы настроить час, затем нажмите ⏱ to confirm and move to minutes, then day of the week.
- Нажимать ⏱ again to exit, or wait for 10 seconds for automatic exit.
Работа в ручном режиме
In manual mode, the thermostat maintains a constant temperature set by the user.
- Нажмите ↻ button to switch to manual mode (indicated by a hand icon or similar on the display).
- Используйте ▲ и ▼ кнопки, чтобы установить желаемую температуру.
- Теперь термостат будет поддерживать эту температуру.
Programmable Mode Operation (6 Periods)
The thermostat allows for 6 programmable periods per day, enabling different temperature settings at different times.
- Нажмите ↻ button to switch to programmable mode (indicated by a clock icon or similar).
- Нажмите и удерживайте ⏱ Нажмите и удерживайте кнопку в течение 3 секунд, чтобы войти в режим программирования.
- The display will show the first period (e.g., "Period 1"). Use ▲ и ▼ to set the start time and desired temperature for this period.
- Нажимать ⏱ to move to the next period and repeat the process for all 6 periods.
- После установки всех точек нажмите ⏱ again or wait for automatic exit to save settings.
The thermostat will automatically follow the programmed schedule.
Sensor Selection (Internal/External)
The thermostat can use its internal sensor or the external floor sensor. The selection method is typically found in advanced settings or by a specific button combination. Refer to the on-screen indicators for the active sensor.
Обслуживание
- Очистите дисплей термостата и сasinПротрите мягкой сухой тканью. Не используйте абразивные чистящие средства или растворители.
- Для обеспечения оптимальной работы термостата необходимо убедиться в его чистоте, отсутствии пыли и мусора.
- No user-serviceable parts inside. Do not attempt to open or repair the unit.
Поиск неисправностей
| Проблема | Возможная причина | Решение |
|---|---|---|
| Термостат не включается. | Нет питания; неправильная проводка. | Check circuit breaker. Verify wiring connections (consult a qualified electrician). |
| Отопление не включается/выключается. | Incorrect temperature setting; thermostat in OFF mode; wiring issue. | Adjust set temperature. Ensure thermostat is ON. Check heating element wiring. |
| Неточные показания температуры. | Sensor malfunction; incorrect sensor selected. | Verify sensor connection. Check if internal or external sensor is active. |
| Дисплей пустой или мерцает. | Колебания напряжения; внутренняя неисправность. | Reset power to the thermostat. If issue persists, contact support. |
Технические характеристики
| Особенность | Деталь |
|---|---|
| Бренд | Sorand |
| Модель | AC 230V Floor Heating Thermostat |
| Рабочий объемtage | Переменный ток 230 В, 50/60 Гц |
| Ток нагрузки | 12/16A (Electric Heating) |
| Точность | ±0.5℃ |
| Диапазон заданной температуры | 5℃ - 35℃ |
| Предельный диапазон температур | 5℃ - 99℃ |
| Потребляемая мощность | <0.3 Вт |
| Датчик температуры | NTC (Internal and External) |
| Surface Size | Приблизительные размеры: 86 x 86 x 40 мм (3.4 x 3.4 x 1.6 дюйма) |
| External Sensor Cable Length | Примерно 3 метров (9.8 футов) |
| Материал | ПК+АБС |
| Тип дисплея | Цифровой ЖК-дисплей с подсветкой |
| Метод контроля | Сенсорная панель управления |
Гарантия и поддержка
This product is covered by the manufacturer's standard warranty. Please refer to the product packaging or your point of purchase for specific warranty terms and conditions.
Для получения технической поддержки, помощи в устранении неполадок или обращения по гарантии, пожалуйста, свяжитесь напрямую с продавцом или производителем. Сохраните чек о покупке в качестве подтверждения приобретения.