1. Продукт закончилсяview
Thank you for choosing the Lepro 10W LED Outdoor Floodlight. This manual provides essential information for the safe installation, operation, and maintenance of your new floodlight. Please read it thoroughly before use and retain it for future reference.
This product is a high-efficiency, IP65 waterproof LED floodlight designed for outdoor and indoor lighting applications such as gardens, yards, garages, and security lighting.
2. Информация по технике безопасности
- Всегда отключайте питание перед установкой или обслуживанием.
- Если вы не уверены, установку должен выполнять квалифицированный электрик.
- Убедитесь, что источник питания vol.tage соответствует требованиям продукта (220 Вольт).
- Не смотрите прямо на светодиодный источник света, когда он включен.
- Держите изделие вдали от легковоспламеняющихся материалов.
- Не вносите никаких изменений в изделие.
- Ensure all connections are secure and properly insulated to maintain IP65 rating.
3. Содержимое упаковки
В комплект обычно входит:
- 2 x Lepro 10W LED Outdoor Floodlights
- Монтажное оборудование (винты, дюбели)
- Руководство по эксплуатации
4. Особенности продукта
- Высокая яркость: 10W LED chip provides 850 lumens of 5000K cool white light, equivalent to a 70W incandescent bulb.
- Прочная конструкция: Constructed from die-cast aluminum and ultra-thin tempered glass, offering rust-proof and high-quality electrostatic adsorption surface treatment.
- Простая установка: Features a bracket that can be easily mounted to ceilings, walls, or floors using two self-locking screws. Includes a 1-meter cable for connection.
- Эффективное рассеивание тепла: Ultra-thin body design with an integrated heat sink ensures optimal thermal performance and extends product lifespan.
- IP65 Waterproof & Wide Application: Rated IP65 for protection against dust and water jets, suitable for various indoor and outdoor lighting projects including gardens, squares, billboards, factories, docks, stadiums, patios, warehouses, courtyards, garages, driveways, and entrances.
5. Технические характеристики
| Спецификация | Ценить |
|---|---|
| Номер модели | PR340010-DW-EU-2 |
| Потребляемая мощность | 10 Вт |
| Световой поток | 850 люмен |
| Цветовая температура | 5000 К (холодный белый) |
| Томtage | 220 В переменного тока |
| Рейтинг IP | IP65 (водонепроницаемый) |
| Материал | Алюминий, закаленное стекло |
| Размеры продукта (Д x Ш x В) | 9 х 2.4 х 7.8 см |
| Масса | 200 грамм |
| Угол луча | 110 градусов |
| Длина кабеля | 1 метр |
| Тип крепления | Wall-mounted, Ceiling-mounted, Ground-mounted |
Подробную информацию об энергоэффективности можно найти в базе данных EPREL:
6. Настройка и установка
Для безопасной и правильной установки выполните следующие действия:
- Подготовьтесь к установке:
- Перед началом любых электромонтажных работ отключите основное электропитание с помощью автоматического выключателя.
- Gather necessary tools: drill, screwdriver, wire strippers, electrical tape, and a pencil.
- Выберите место установки:
Select a suitable location on a wall, ceiling, or ground that provides the desired illumination area. The floodlight can be adjusted to direct light as needed.
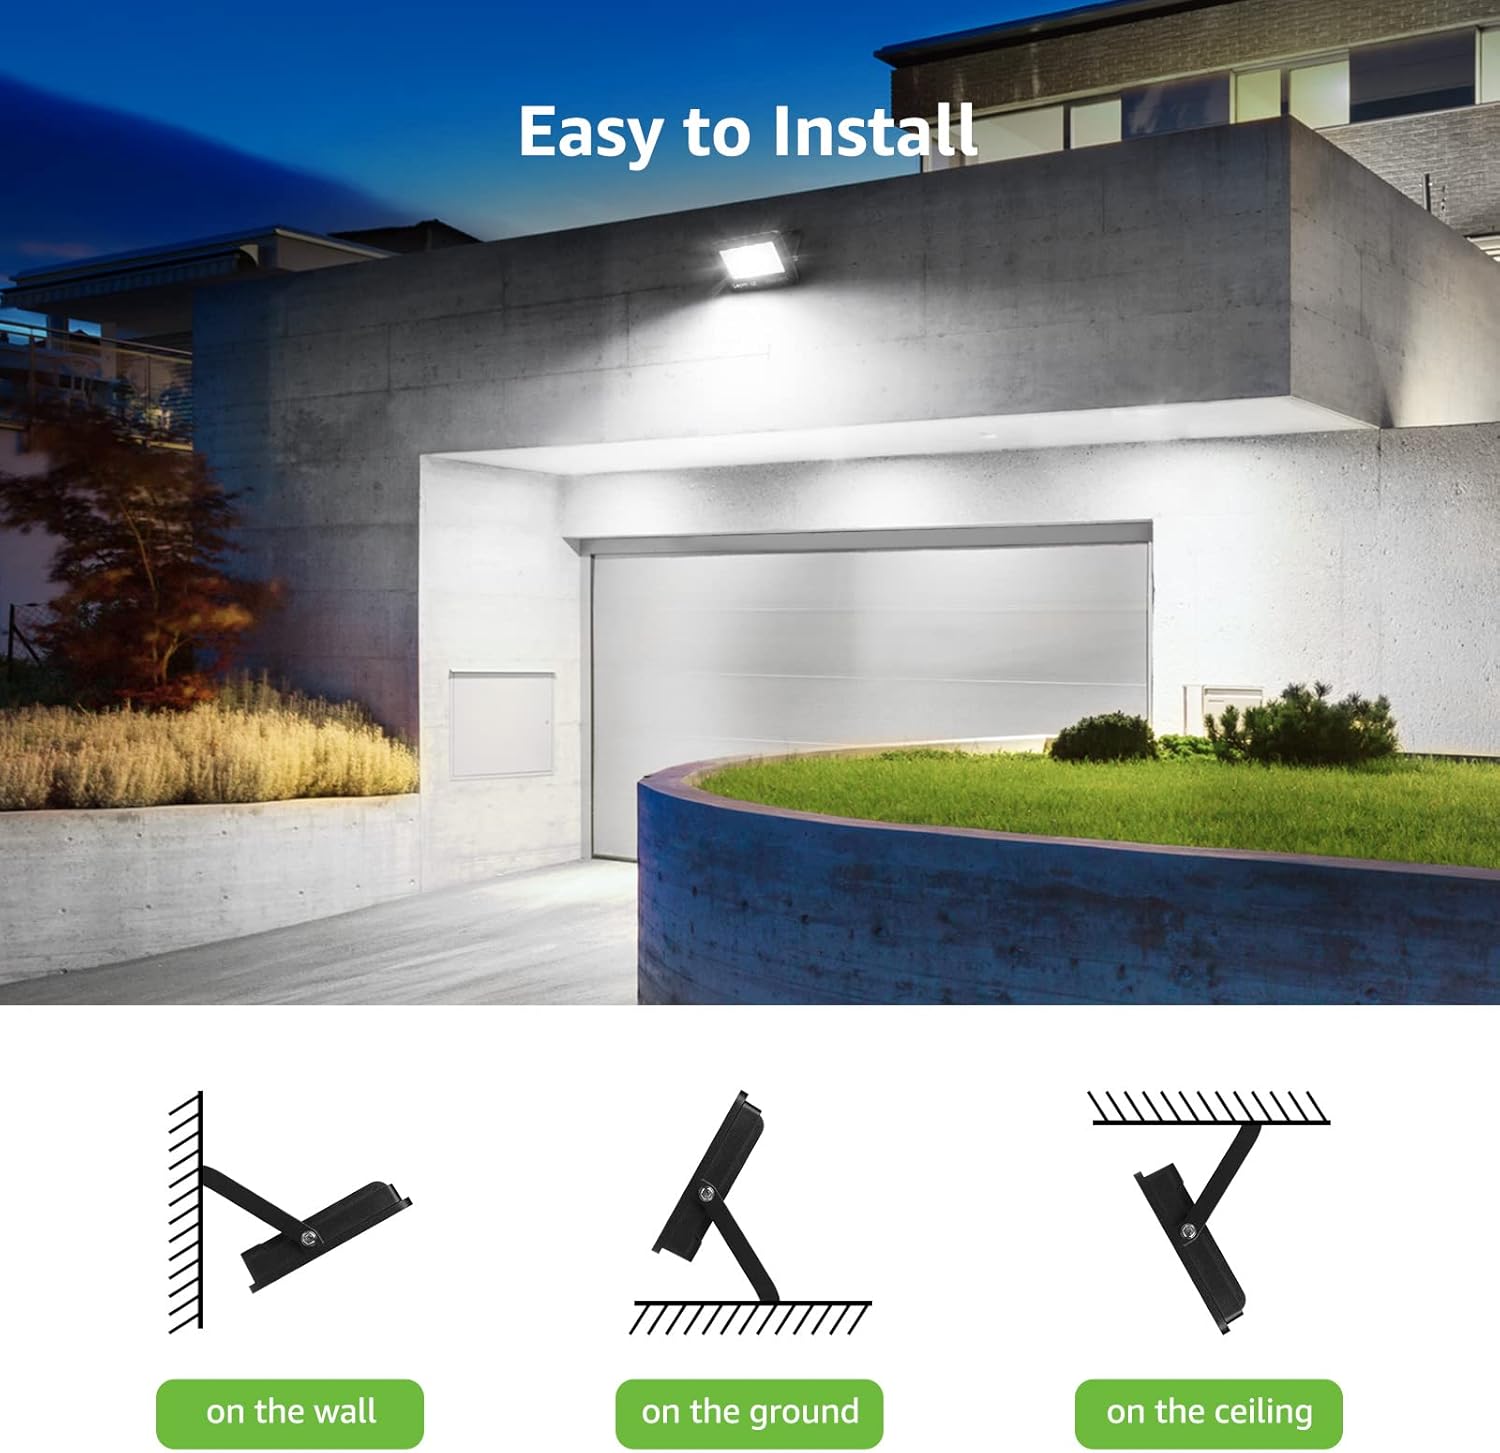
Image: Illustration of various mounting positions for the floodlight (wall, ground, ceiling).
- Разметьте и просверлите отверстия:
Use the floodlight's mounting bracket as a template to mark the drilling points on the chosen surface. Drill appropriate holes for the included mounting hardware.
- Закрепите кронштейн:
Attach the mounting bracket securely to the surface using the provided screws and anchors. Ensure it is firm and stable.
- Подключение проводки:
Connect the floodlight's cable to your main power supply. Observe the standard wiring color codes:
- Коричневый провод: Провод под напряжением
- Желтый и зеленый провод: Линия заземления
- Синий провод: Нейтральный провод

Изображение: подробное view of the floodlight's heat sink and wiring color codes for electrical connection.
Ensure all connections are tight and insulated with appropriate waterproof connectors or electrical tape to maintain the IP65 rating, especially for outdoor installations.
- Attach the Floodlight:
Mount the floodlight unit onto the secured bracket using the self-locking screws. Adjust the angle of the floodlight to your desired position.
- Восстановить мощность:
После завершения установки и проверки надежности всех соединений восстановите подачу питания на автоматический выключатель.

Image: The floodlight installed above a garage, demonstrating its wide beam angle and bright illumination.

Image: An outdoor floodlight illuminating a garden area from a height, showing its coverage.
7. Инструкция по эксплуатации
The Lepro 10W LED Outdoor Floodlight operates by direct electrical connection. Once properly installed and connected to a power source, it can be controlled via a standard wall switch or an external timer/sensor system (not included).
- Включить: Activate the connected wall switch or power source.
- Выключить: Deactivate the connected wall switch or power source.
The floodlight provides instant full brightness upon activation.
8. Техническое обслуживание
Regular maintenance ensures optimal performance and longevity of your floodlight:
- Уборка: Periodically clean the glass surface with a soft, damp cloth to remove dust and debris. Do not use abrasive cleaners or solvents. Ensure power is off before cleaning.
- Инспекция: Regularly check the mounting bracket and wiring for any signs of damage, corrosion, or loose connections. Tighten screws if necessary.
- Экологическая устойчивость: The IP65 rating ensures resistance to water and dust. The floodlight is designed to withstand various weather conditions, including heat and frost.

Image: Visual representation of the floodlight's IP65 waterproof, heat resistance, and frost resistance features.
9. Поиск Неисправностей
Если у вас возникли проблемы с прожектором, ознакомьтесь со следующими распространенными проблемами и способами их решения:
| Проблема | Возможная причина | Решение |
|---|---|---|
| Свет не включается. | Нет электропитания. Неплотное соединение проводки. Неисправный переключатель. | Проверьте, включено ли питание на автоматическом выключателе. Проверьте надежность всех соединений проводки. Проверьте работу выключателя с помощью другого устройства или замените его. |
| Свет мерцает. | Нестабильное электропитание. Ослабленное соединение. | Ensure stable power. Check for loose wiring and tighten connections. |
| Уменьшенная яркость. | Грязный объектив. Aging LED components. | Clean the glass surface of the floodlight. If the product is old, reduced brightness may indicate end of lifespan. |
If the problem persists after trying these solutions, please contact Lepro customer support.
10. Гарантия и поддержка
Lepro products are designed for quality and durability. This product is covered by a standard return policy of 30 days from the date of purchase. For specific warranty terms and conditions, please refer to your purchase documentation or contact Lepro customer support.
For technical assistance, troubleshooting, or warranty claims, please visit the official Lepro website or contact their customer service department. You can often find support information on the product packaging or the retailer's webсайт.
Интернет-ресурсы: