Введение
This manual provides instructions for the proper setup, operation, and maintenance of your ELECOM EX-G Left Handed Trackball Mouse, model M-XT4DRBK-G. This wireless trackball mouse is designed for left-handed users, featuring ergonomic design, thumb control, and programmable buttons for enhanced productivity and comfort.

Image: The ELECOM EX-G Left Handed Trackball Mouse, showcasing его эргономичный дизайн и красный трекбол.
Настраивать
1. Содержимое упаковки
Проверьте наличие всех предметов в упаковке:
- ELECOM EX-G Left Handed Trackball Mouse
- Беспроводной USB-приемник
- Батарейка АА (1)
- Руководство по эксплуатации (данный документ)

Image: The trackball mouse, a single AA battery, and the USB receiver, representing the items included in the box.
2. Установка аккумулятора
- Найдите батарейный отсек на нижней стороне мыши.
- Откройте крышку батарейного отсека.
- Вставьте прилагаемую батарейку типа АА, соблюдая полярность (+/-).
- Плотно закройте крышку батарейного отсека.

Image: A diagram showing the battery installation process for the trackball mouse.
3. Подключение USB-приемника
- Извлеките USB-приемник из слота для хранения на нижней стороне мыши.
- Подключите USB-приемник к свободному USB-порту на вашем компьютере.
- Your computer should automatically detect the device.

Image: A diagram illustrating how to insert the USB receiver into a computer's USB port.
4. Включите питание.
Locate the power switch on the underside of the mouse and slide it to the "ON" position. The mouse is now ready for use.

Image: A diagram showing the power switch on the underside of the trackball mouse in the "ON" position.
5. Software Installation (ELECOM Mouse Assistant)
To customize the 6 programmable buttons and other settings, download and install the "ELECOM Mouse Assistant" software from the official ELECOM website. This software allows you to assign various functions to each button.

Image: Screenshot of the ELECOM website showing the download links for the Mouse Assistant software for Windows and Mac.

Image: Screenshot of the ELECOM Mouse Assistant software interface, showing button customization options and DPI settings.
Инструкция по эксплуатации
1. Basic Trackball Operation
Control the cursor by rolling the red trackball with your thumb. The optical tracking technology provides precise movement.

Image: A left hand operating the trackball mouse, demonstrating thumb control of the red trackball.
Video: Official product video demonstrating the ELECOM Left-Handed Wireless Thumb-Operated Trackball Mouse (M-XT4DRBK-G) in use, highlighting its features and ergonomic design.
2. Регулировка DPI
The DPI button allows you to switch between two cursor speeds: 750 DPI (Low) and 1500 DPI (High). Press the DPI button located near the scroll wheel to toggle between these settings.

Image: Close-up of the trackball mouse showing the DPI switch button, labeled "HIGH", located above the trackball.
3 Функции кнопок
The mouse features 6 physical buttons, which can be customized using the ELECOM Mouse Assistant software. Default functions include:
- Щелчок левой кнопкой мыши: Первичный отбор.
- Щелкните правой кнопкой мыши: Контекстное меню.
- Щелчок колеса прокрутки: Middle click or auto-scrolling.
- Кнопка «Назад»: Возврат назад web браузеры или file исследователи.
- Кнопка вперед: Перемещается вперед в web браузеры или file исследователи.
- Функциональная кнопка: Настраивается с помощью программного обеспечения.
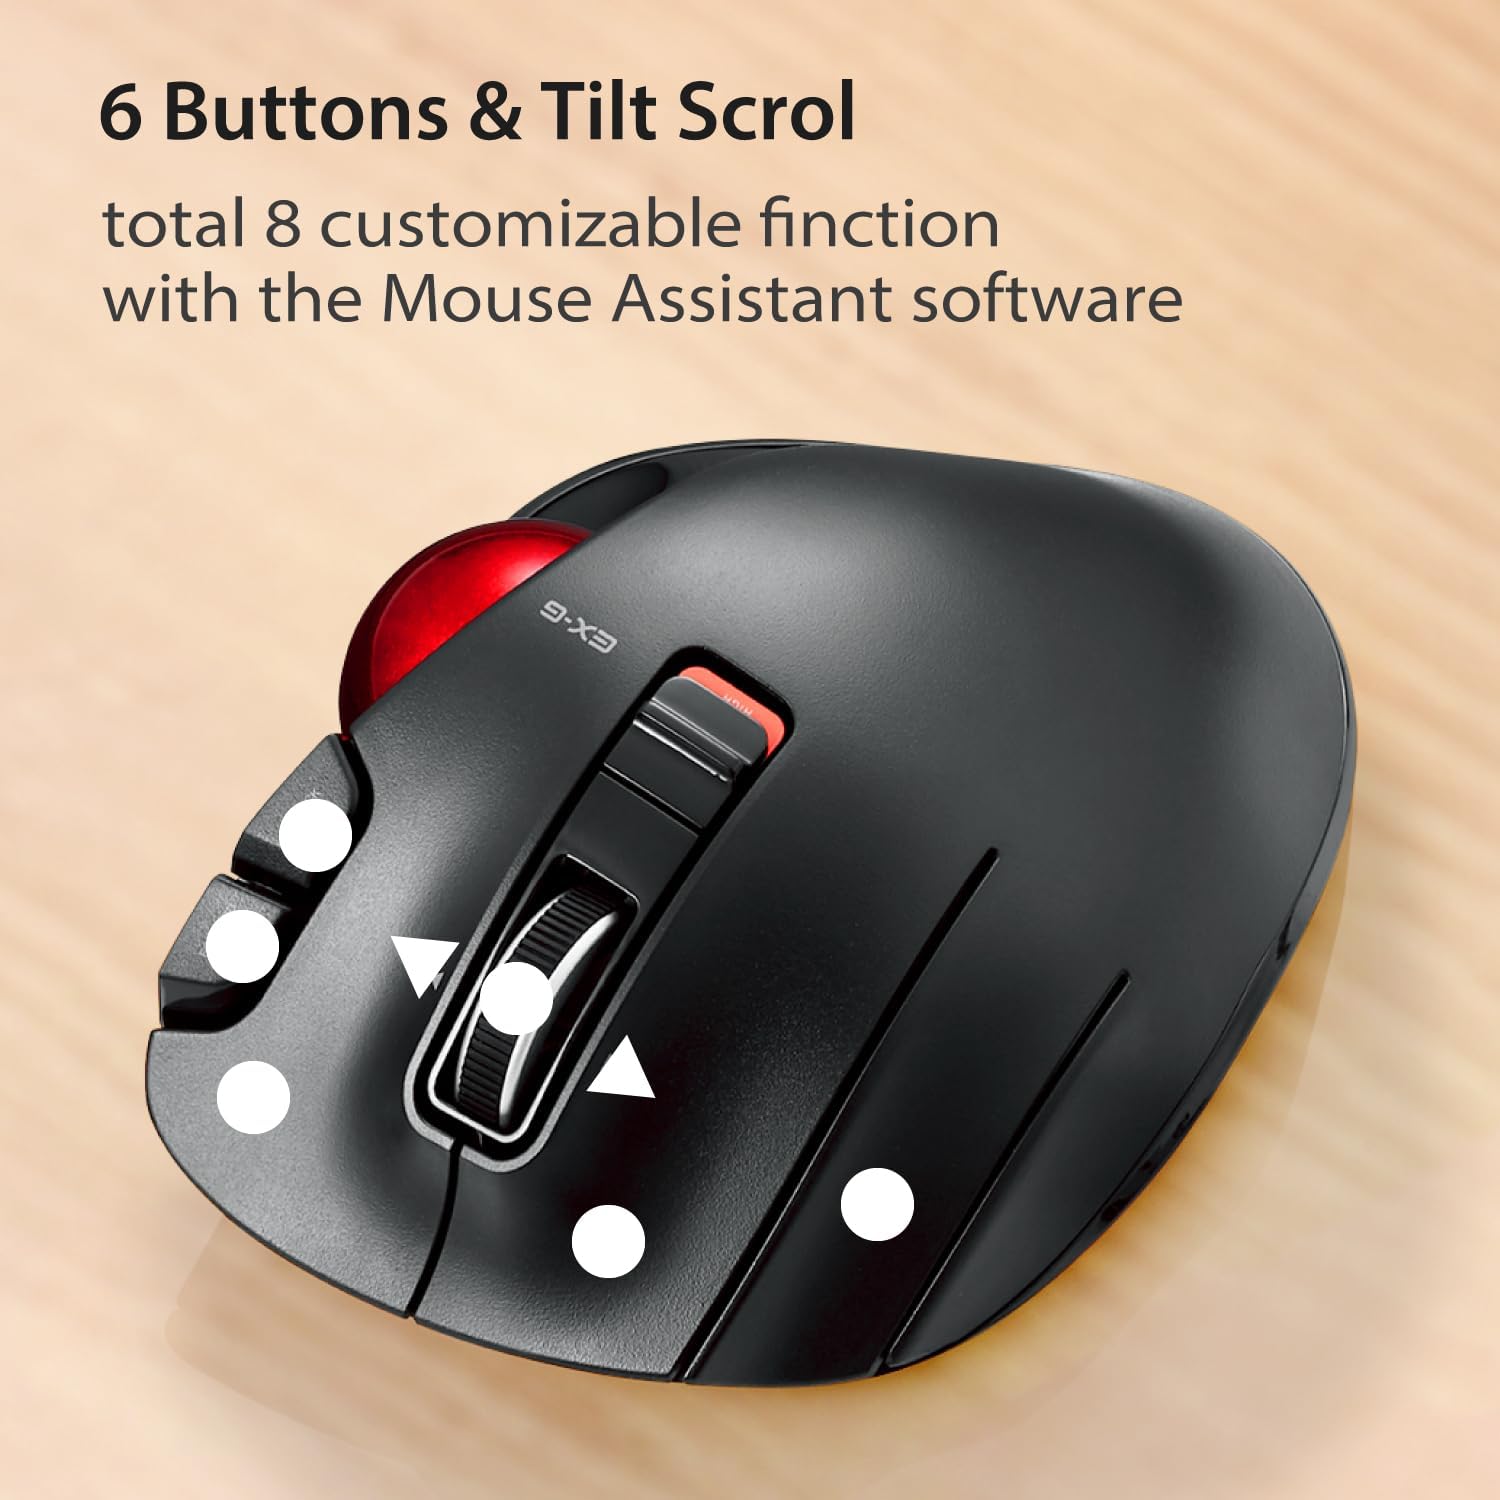
Изображение: сверху вниз view of the trackball mouse highlighting the positions of its 6 buttons and tilt scroll wheel.

Image: Detailed diagram labeling the tilt wheel, function button, back/forward buttons, DPI switch, 34mm ball, ball removal hole, power switch, low power indicator, high speed indicator, and USB receiver storage.
4. Tilt Scroll
The scroll wheel can be tilted left or right to enable horizontal scrolling, useful for navigating wide documents or spreadsheets. This function may not be supported on all operating systems (e.g., Windows RT8.1).
5. Эргономичный дизайн
The mouse is designed to support the left hand in a natural, angled position, promoting comfort during extended use and reducing strain.

Image: A left hand resting comfortably on the trackball mouse, illustrating its ergonomic shape.
Обслуживание
1. Чистка трекбола
Over time, dust and debris may accumulate around the trackball, affecting its smooth operation. To clean:
- Выключите мышь.
- Locate the trackball removal hole on the underside of the mouse.
- Используйте ручку или подобный тупой предмет, чтобы вытолкнуть трекбол снизу.
- Clean the trackball and the inside of the trackball housing with a soft, lint-free cloth.
- Reinsert the trackball until it clicks into place.
Image: Diagram showing the location of the trackball removal hole on the underside of the mouse, indicating where to push to remove the trackball for cleaning.
2. Замена батареи
When the battery remaining light lamp indicates low power, replace the AA battery following the installation steps in the Setup section.
Поиск неисправностей
| Проблема | Возможная причина | Решение |
|---|---|---|
| Курсор либо не двигается, либо движется хаотично. |
|
|
| Buttons are not responding as expected. |
|
|
| Horizontal scrolling not working. |
|
|
Технические характеристики
| Особенность | Деталь |
|---|---|
| Номер модели | M-XT4DRBK-G |
| Размеры (Д x Ш x В) | 4.9 x 3.73 x 1.89 дюйма (124.4 x 94.7 x 47.9 мм) |
| Вес (без батареи) | 4.5 унций (приблизительно 127.6 г) |
| Связность | Беспроводная связь 2.4 ГГц (USB-приемник) |
| Уровни DPI | 750 / 1500 count (switchable) |
| Кнопки | 6 (Programmable) + Tilt Scroll |
| Технология отслеживания | Optical (Red Ball) |
| Источник питания | 1 х АА Батарея (в комплекте) |
| Системные требования | Windows Vista, 7, 8, 10 or later; macOS 10.10 or later |

Image: Diagram showing the length, width, and height dimensions of the trackball mouse.
Информация о гарантии
ELECOM products are typically covered by a limited manufacturer's warranty. For specific details regarding the warranty period and terms for your M-XT4DRBK-G trackball mouse, please refer to the warranty card included with your product or visit the official ELECOM webсайт.
Поддерживать
For further assistance, technical support, or to download the latest version of the ELECOM Mouse Assistant software, please visit the official ELECOM-USA webсайт:
You can also find additional product information and FAQs on the ELECOM brand store on Amazon.