1. Введение
Thank you for choosing the Petlibro Automatic Pet Feeder. This device is designed to provide consistent and timely meals for your pet, ensuring they are fed according to a set schedule, even when you are away. Please read this manual thoroughly before use to ensure proper operation and maintenance of your feeder.
2 Важная информация по безопасности
Пожалуйста, соблюдайте следующие меры предосторожности, чтобы предотвратить травмы или повреждение изделия:
- Внимательно прочтите все инструкции перед использованием кормушки.
- Храните кормушку в недоступном для детей и домашних животных месте, когда она не используется или во время сборки.
- Не погружайте основной блок в воду или другие жидкости.
- Use only dry pet food with a diameter between 5-15mm. Do not use wet, canned, or moist food.
- Убедитесь, что кормушка установлена на устойчивой, ровной поверхности.
- Unplug the feeder before cleaning or performing any maintenance.
- Не пытайтесь ремонтировать или модифицировать кормушку самостоятельно. Обратитесь за помощью в службу поддержки клиентов.
- Утилизируйте батареи ответственно, в соответствии с местными правилами.
3. Содержимое упаковки
Пожалуйста, проверьте содержимое упаковки, чтобы убедиться в наличии всех предметов:
- Petlibro Automatic Pet Feeder Main Unit
- Миска для еды
- USB-C Power Adapter and Cable
- Мешок с осушителем (предварительно установленный или отдельный)
- Руководство пользователя
4. Продукт закончилсяview
Familiarize yourself with the different parts of your Petlibro Automatic Pet Feeder:
- Пищевой бак: Stores dry pet food.
- Крышка: Covers the food tank to keep food fresh.
- Панель управления: Buttons and display for setting schedules and manual feeding.
- Продуктовый магазин: Where food dispenses into the bowl.
- Миска для еды: Detachable bowl for your pet to eat from.
- Порт питания (USB-C): Подключается к адаптеру питания.
- Отсек для батареи: Holds backup batteries (not included).
5. Настройка
Follow these steps to set up your Petlibro Automatic Pet Feeder:
5.1 Сборка
- Распаковать: Аккуратно извлеките все компоненты из упаковки.
- Установите Food Bowl: Place the food bowl securely at the base of the feeder.
- Install Food Tank: Align the food tank with the base and twist to lock it into place.
- Вставьте пакет с осушителем: If not pre-installed, open the desiccant compartment (usually under the lid) and insert the desiccant bag to keep food fresh. Replace every 15-30 days.

Image: Step-by-step assembly guide for the Petlibro Automatic Pet Feeder. It shows how to twist open the lid, take out the food bowl, put the desiccant bag into its compartment, install the food tank, put the lid back on, and finally install the food bowl.
5.2 Источник питания
The feeder can be powered by a USB-C adapter or backup batteries.
- Первичная мощность: Connect the USB-C power adapter to the feeder's power port and plug it into a wall outlet.
- Резервный аккумулятор (опционально): Для властиtages, install 3 D-cell batteries (not included) into the battery compartment at the bottom of the feeder. This ensures continuous operation.
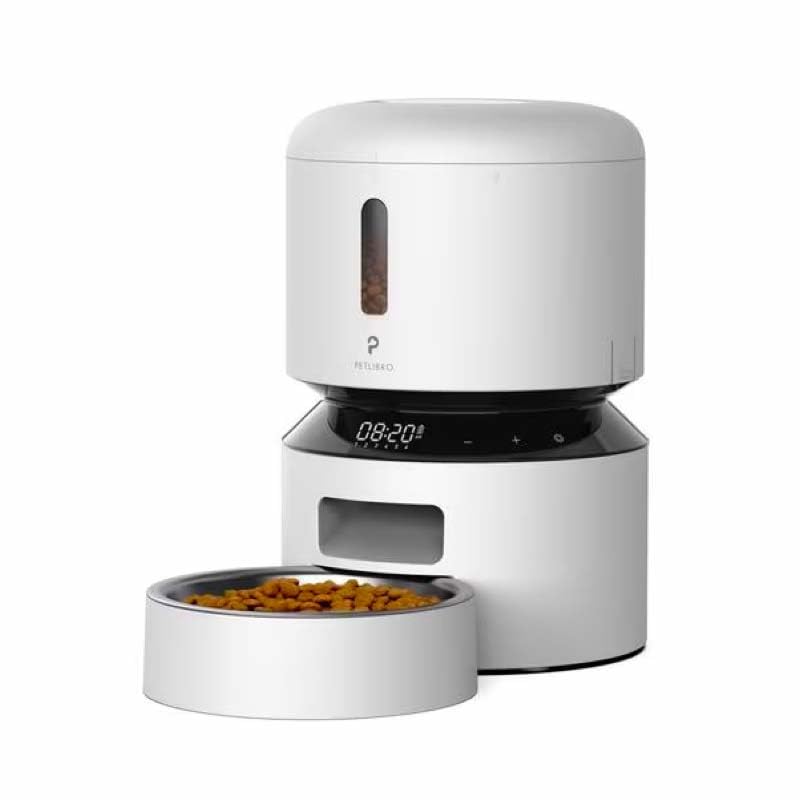
Image: Diagram illustrating the dual power supply system of the Petlibro Automatic Pet Feeder. It shows the USB-C adapter connected for primary power and the battery compartment for backup power. A note indicates that batteries are not included.
6. Инструкция по эксплуатации
Once assembled and powered, you can begin programming your feeder.
6.1 Заполнение бака для корма
- Откройте крышку контейнера для корма.
- Pour dry pet food into the tank. Ensure the food is within the recommended size (5-15mm diameter).
- Для сохранения свежести плотно закройте крышку.
6.2 Setting Meal Schedules and Portions
The feeder allows you to schedule up to 6 meals per day, with 1 to 50 portions per meal.

Image: A cat eating from the Petlibro Automatic Pet Feeder, illustrating the feeder's function. Text overlays indicate "Portion: 1-50" and "Meals: 1-6", highlighting the customizable feeding schedule.
- Установить текущее время: Use the control panel buttons (e.g., "SET", "UP", "DOWN") to set the current time.
- Время приема пищи в рамках программы: Press the "MEAL" button to enter meal programming mode. Select the desired meal number (e.g., Meal 1) and set the feeding time.
- Set Portions: For each programmed meal, set the number of portions (1-50) using the "PORTION" or "UP/DOWN" buttons.
- Repeat for all meals: Program up to 6 meals as needed.
- Сохранить настройки: Ensure all settings are saved according to the feeder's specific interface (usually by pressing "SET" or waiting for auto-save).
6.3 Ручная подача
To dispense food instantly, press the manual feed button (often labeled "FEED" or a paw icon) on the control panel. Each press typically dispenses one portion.
7. Техническое обслуживание и чистка
Регулярная чистка обеспечивает гигиену и продлевает срок службы вашей кормушки.
- Отключить: Always unplug the feeder from the power outlet before cleaning.
- Разобрать: Remove the food bowl and food tank.
- Чистые компоненты: Wash the food bowl and food tank with mild soap and water. Rinse thoroughly and dry completely before reassembling.
- Протрите основной блок: Протрите основной блок мягкой, damp ткань. Не погружайте основной блок в воду.
- Замените осушитель: Replace the desiccant bag every 15-30 days to maintain food freshness.
- Собрать заново: Перед сборкой кормушки убедитесь, что все детали сухие.
8. Поиск Неисправностей
Если у вас возникли проблемы с кормушкой, ознакомьтесь со следующими распространенными проблемами и решениями:
| Проблема | Возможная причина | Решение |
|---|---|---|
| Подающее устройство не включается. | No power connection; batteries depleted or incorrectly installed. | Check power adapter connection; replace batteries or ensure correct polarity. |
| Еда не выдается. | Food tank empty; food jammed; dispenser blocked; incorrect schedule settings. | Refill food tank; clear any food jams; check dispenser for blockages; verify meal schedule and portion settings. |
| Food dispenses too much/too little. | Incorrect portion settings. | Adjust portion settings for each meal. |
| Дисплей не работает. | Проблема с питанием; неисправность дисплея. | Проверьте блок питания; если проблема не исчезнет, обратитесь в службу поддержки клиентов. |
9. Технические характеристики
| Особенность | Деталь |
|---|---|
| Название продукта | Petlibro Automatic Pet Feeder |
| Модель | Автоматическая кормушка для домашних животных 3 л |
| Емкость | 3 литра |
| Материал | Food-grade ABS plastic |
| Источник питания | USB-C adapter (5V/1A); 3 x D-cell batteries (backup, not included) |
| Количество приемов пищи в день | До 6 приемов пищи |
| Порции на прием пищи | 1-50 portions (approx. 5-10g per portion, depending on food density) |
| Рекомендуемый размер порции еды | 5-15mm dry kibble |
| Цвет | Белый |
10. Гарантия и поддержка
Your Petlibro Automatic Pet Feeder comes with a standard manufacturer's warranty. For detailed warranty information, please refer to the warranty card included in your package or visit the official Petlibro webсайт.
If you have any questions, require technical support, or need assistance with your product, please contact Petlibro customer service. Contact details can typically be found on the product packaging, the official website, or by searching for "Petlibro customer support" online.