1. Введение
The EPEVER 20A MPPT Solar Charge Controller, model Tracer2210AN, is an advanced Maximum Power Point Tracking (MPPT) device designed for 12V/24V automatic work solar systems. It efficiently manages power flow from solar panels to batteries, ensuring optimal charging and extending battery life. This controller features high conversion efficiency, supports various battery types, and offers comprehensive protection functions. This manual provides essential information for the safe installation, operation, and maintenance of your solar charge controller.

Image 1.1: EPEVER 20A MPPT Solar Charge Controller (Tracer2210AN). This image shows the front view of the solar charge controller with its LCD display and control buttons.
2. Инструкции по технике безопасности
- Всегда подключайте аккумулятор к контроллеру заряда. первый, then the solar panel, and finally the load. Disconnect in the reverse order: load, then solar panel, then battery.
- Обеспечьте надлежащую вентиляцию вокруг контроллера, чтобы предотвратить перегрев.
- Use appropriate wire gauges for all connections to prevent voltage drop and overheating. Refer to the specifications section for recommended cable sizes.
- Избегайте коротких замыканий на всех клеммах.
- Install the controller in a dry, well-ventilated area, away from direct sunlight and moisture.
- Не пытайтесь ремонтировать или модифицировать контроллер самостоятельно. Обратитесь к квалифицированному специалисту для обслуживания.
- Во время установки используйте соответствующие средства индивидуальной защиты (СИЗ), включая защитные очки и изоляционные перчатки.
3. Продукт закончилсяview
The Tracer2210AN controller incorporates advanced features for efficient solar power management:
- Усовершенствованная технология MPPT: Ensures maximum power extraction from solar panels with tracking efficiency not less than 99.5% and a maximum conversion efficiency of 98%.
- Высококачественные компоненты: Utilizes international famous brands of ST and IR components for reliability and durability.
- Совместимость с аккумулятором: Supports various battery types including lead-acid (sealed, gel, flooded) and lithium-ion (LiFePO4, Li(NiCoMn)O2), with user-defined settings.
- Температурная компенсация: Includes battery temperature compensation function for lead-acid batteries.
- Мониторинг в реальном времени: Provides real-time energy statistics and supports communication via RS-485 bus with Modbus protocol for monitoring and parameter setting via mobile APP or PC software (requires optional accessories like MT50, WiFi, or BLE adapters).
- Функции защиты: Features multiple safety protections including overheating power reduction.
3.1 Компоненты контроллера

Изображение 3.1: Спереди view of the EPEVER Tracer2210AN controller with labeled components. Key components include the LCD display, SELECT and ENTER buttons, remote temperature sensor port, solar panel terminals, battery terminals, load terminals, and an RJ45 communication port.

Изображение 3.2: Сверху и снизу views of the EPEVER Tracer2210AN controller. The top view shows the model information and certifications, while the bottom view displays the terminal connections and communication port.
4. Настройка
4.1 Монтаж контроллера
Mount the controller vertically on a wall or a stable surface. Ensure there is sufficient space around the controller for proper air circulation to dissipate heat. The dimensions of the controller are 220mm x 154mm x 52mm.

Image 4.1: EPEVER MPPT 20A Solar Charge Controller with its physical dimensions indicated. The controller measures 220mm in length, 154mm in width, and 52mm in height.
4.2 Подключение проводки
Follow the connection order carefully to avoid damage to the controller or other components. Always connect the battery first, then the solar panel, and finally the load. Disconnect in the reverse order.
- Подключите аккумулятор: Подключите положительный и отрицательный полюса батареи к соответствующим клеммам батареи на контроллере. Соблюдайте правильную полярность.
- Подключите солнечную панель: Connect the positive and negative terminals of the solar panel to the corresponding PV terminals on the controller. Ensure correct polarity.
- Подключите нагрузку: Connect the positive and negative terminals of the DC load to the corresponding load terminals on the controller. Ensure correct polarity.
- Подключите выносной датчик температуры (опционально): If using, connect the RTS300R47K3.81A temperature sensor to the designated port on the controller and attach the sensor to the battery for accurate temperature compensation.

Image 4.2: Connection diagram illustrating the proper wiring sequence for the EPEVER solar charge controller. It shows connections from the solar panel, battery (with fuse), and DC load, as well as an optional inverter for AC loads.
5. Инструкция по эксплуатации
5.1 ЖК-дисплей и кнопки
The controller features an LCD display that shows system status, charging parameters, and error codes. The 'SELECT' and 'ENTER' buttons are used to navigate through menus and adjust settings.
5.2 Настройки типа батареи
The controller supports various battery types. It is crucial to select the correct battery type for optimal charging and battery longevity. The default setting is 'Sealed' for lead-acid batteries.
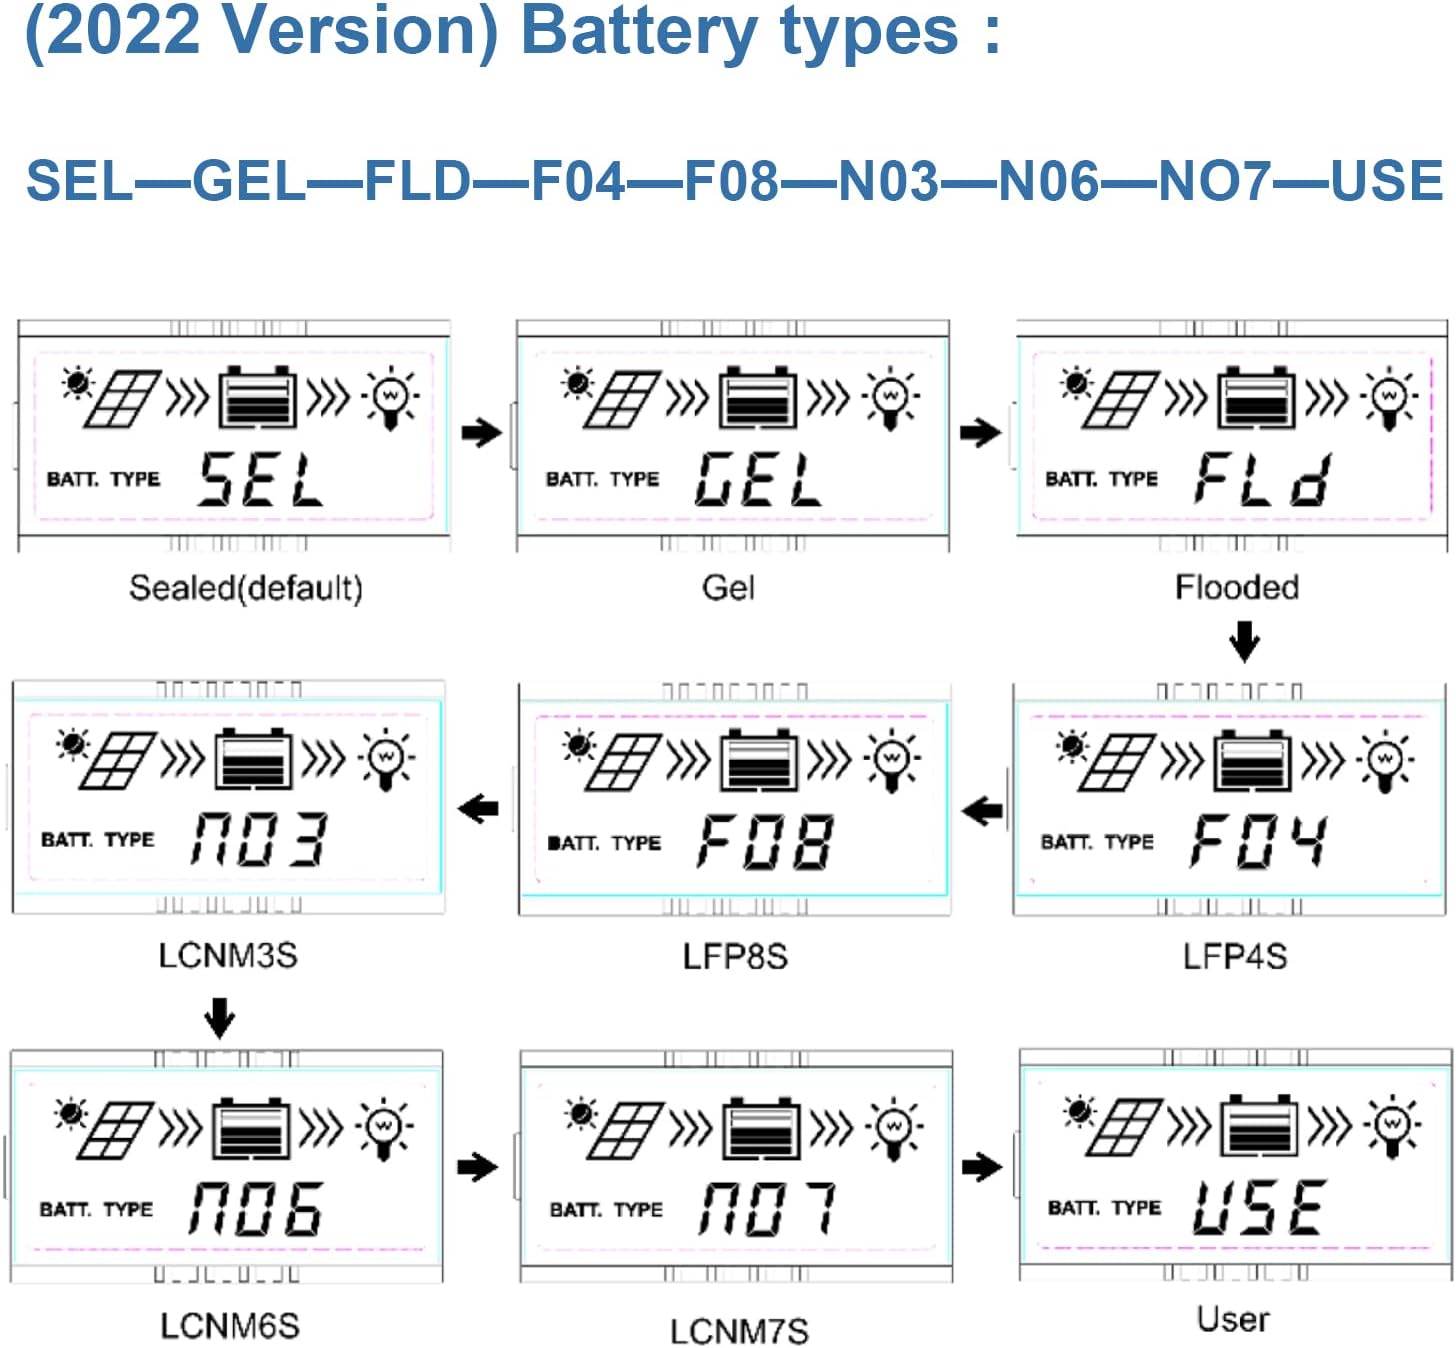
Image 5.1: LCD display showing various battery type selections. Options include Sealed (SEL), Gel (GEL), Flooded (FLD), LiFePO4 (LFP4S, LFP8S), Li(NiCoMn)O2 (LCNM3S, LCNM6S, LCNM7S), and User-defined (USE).
Чтобы изменить тип батареи:
- Press the 'SELECT' button to cycle through the main display screens until you reach the battery type setting.
- Press and hold the 'ENTER' button to enter the setting modification mode.
- Use the 'SELECT' button to choose the desired battery type (e.g., GEL, FLD, LFP4S, USE).
- Press 'ENTER' again to confirm and save the selection.
5.3 Мониторинг и связь
The Tracer2210AN controller can be monitored and configured remotely using optional accessories:
- Дистанционный счетчик MT50: Connects via RJ45 cable to display real-time data and modify parameters.
- WiFi/BLE Adapters (eBox-WIFI-01, eBox-BLE-01): Connects to the RS-485 port to enable wireless monitoring and control via a mobile application.
- PC Communication Cable (CC-RS485-USB-150U): Connects to a PC for monitoring and parameter setting using EPEVER PC software.
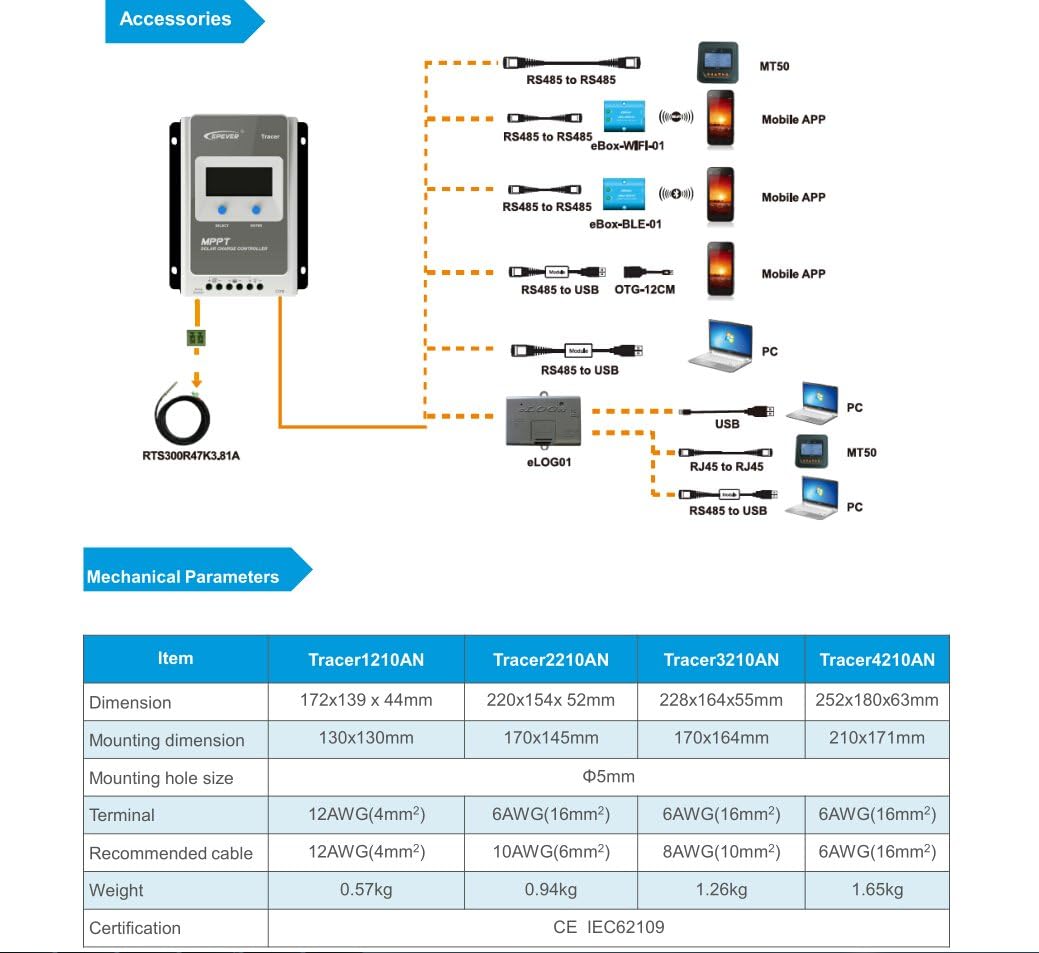
Image 5.2: Diagram showing the EPEVER solar charge controller and its compatible accessories. These include the RTS300R47K3.81A temperature sensor, MT50 remote meter, eBox-WIFI-01, eBox-BLE-01, OTG-12CM, and eLOG01 for various monitoring and communication options.

Image 5.3: The EPEVER Tracer2210AN solar charge controller connected to an MT50 remote meter, displaying system information. This setup allows for convenient monitoring and control.
6. Техническое обслуживание
Regular maintenance ensures the longevity and optimal performance of your EPEVER solar charge controller:
- Проверьте соединения: Периодически проверяйте все электрические соединения на надежность крепления и наличие коррозии. Ненадежные соединения могут вызывать перегрузки.tagе падения и перегрева.
- Очистите контроллер: Keep the controller clean and free from dust and debris. Use a dry cloth to wipe the surface. Ensure ventilation openings are not blocked.
- Осмотр на предмет повреждений: Проверьте контроллер, кабели и клеммы на наличие физических повреждений.
- Проверка батареи: For lead-acid batteries, check electrolyte levels (if applicable) and terminal condition. Ensure lithium batteries are within their recommended operating parameters.
- Условия окружающей среды: Убедитесь, что среда установки соответствует заданным диапазонам рабочей температуры и влажности.
7. Поиск Неисправностей
Если у вас возникли проблемы с контроллером заряда солнечных батарей, воспользуйтесь следующими распространенными шагами по устранению неполадок:
- Нет дисплея/питания:
- Проверьте соединения аккумулятора и убедитесь, что уровень заряда аккумулятораtage находится в пределах рабочего диапазона контроллера.
- Убедитесь, что предохранитель аккумулятора (если он установлен) цел.
- Нет зарядки от солнечной панели:
- Ensure solar panel connections are secure and correct polarity is observed.
- Check the solar panel's open-circuit voltage (Voc) and short-circuit current (Isc) to ensure it is producing power.
- Убедитесь, что напряжение солнечной панели соответствует норме.tage находится в пределах входного напряжения контроллера.tagе диапазон.
- Check for shading on the solar panels.
- Загрузка не работает:
- Проверьте соединения нагрузки и убедитесь в правильности полярности.
- Verify that the battery has sufficient charge. The controller may disconnect the load if the battery voltagе слишком мало.
- Check load settings on the controller to ensure the load output is enabled.
- Перегрев:
- Ensure the controller is installed in a well-ventilated area and its heat sinks are not obstructed.
- Reduce the load or solar input if operating in extreme temperatures.
For more detailed troubleshooting or specific error codes, please refer to the comprehensive manual provided by EPEVER or contact their customer support.
8. Технические характеристики
The following table outlines the key electrical and mechanical parameters for the Tracer2210AN MPPT Solar Charge Controller:

Image 8.1: Table detailing the electrical parameters for Tracer series controllers, including the Tracer2210AN. This table provides specific values for system voltage, currents, power, and environmental conditions.
| Параметр | Value (Tracer2210AN) |
|---|---|
| Номинальный объем системыtage | 12В/24В Автоматическая работа |
| Номинальный ток заряда | 20А |
| Номинальный ток разряда | 20А |
| Макс. входная мощность фотоэлектрических модулей | 260W (12V Battery System) 520W (24V Battery System) |
| Максимум. Объем разомкнутой цепи PVtage | 100V (at min. operating temp) 92V (at 25℃ ambient temp) |
| Батарея Voltage Диапазон | 8-32В |
| МПП Томtage Диапазон | V(BAT+2V) ~ 72V |
| Заземление | Общий отрицательный |
| Эффективность отслеживания | ≥99.5% |
| Макс. Эффективность преобразования | 98% |
| Температура рабочей среды | -25℃ ~ +50℃ |
| Диапазон температур хранения | -20℃ ~ +70℃ |
| Относительная влажность | ≤95%, НЗ |
| Корпус | IP30 |
| Размеры (Д x Ш x В) | 220 х 154 х 52 мм |
| Масса | 0.94 кг |
| Размер терминала | #6 AWG (16 мм²) |
| Рекомендуемый кабель | #10 AWG (6 мм²) |
9. Гарантия и поддержка
For warranty information, please refer to the documentation provided with your purchase or contact your authorized EPEVER dealer. EPEVER products typically come with a manufacturer's warranty covering defects in materials and workmanship.
For technical support, product inquiries, or service, please visit the official EPEVER website or contact an authorized EPEVER service center. Ensure you have your product model (Tracer2210AN) and serial number available when seeking support.