АПА 16623
Руководство пользователя цифрового зарядного устройства для аккумуляторов APA 16623
Model: 16623 | Brand: APA
Введение
This user manual provides essential information for the safe and effective operation of your APA 16623 Digital Workshop Battery Charger. This microprocessor-controlled battery charger is designed for various types of lead-acid batteries, including AGM, Gel, Wet, and Maintenance-Free batteries, and aims to extend battery life. It features advanced automatic protection mechanisms against overheating, short circuits, and reverse polarity. The integrated multi-function indicator provides real-time feedback on charging progress and overall battery health. Please read this manual thoroughly before first use and keep it for future reference.
Инструкции по технике безопасности
Всегда соблюдайте следующие меры предосторожности, чтобы предотвратить травмы или повреждение устройства:
- Перед использованием зарядного устройства ознакомьтесь со всеми инструкциями.
- Не подвергайте зарядное устройство воздействию дождя или влаги.
- Использовать только в хорошо проветриваемых помещениях.
- Перед подключением или отключением аккумулятора убедитесь, что зарядное устройство отключено от источника питания.
- Во время зарядки не допускайте появления искр и пламени вблизи аккумулятора, так как аккумуляторы могут выделять взрывоопасные газы.
- При работе с аккумуляторами надевайте защитные очки и защитную одежду.
- Хранить в недоступном для детей месте.
- Не заряжайте замороженные батареи.
- Если шнур питания поврежден, он должен быть заменен производителем, его сервисным агентом или лицом с аналогичной квалификацией, чтобы избежать опасности.
Продукт болееview
The APA 16623 charger features a robust design with intuitive controls and a clear digital display.

Рисунок 1: Передний view of the APA 16623 Digital Workshop Battery Charger with its red and black housing and attached battery clamps.

Рисунок 2: Крупный план view of the charger's control panel, showing the digital display, various indicator lights for charging status, battery type selection, and current settings.

Рисунок 3: Задний view of the charger demonstrating the integrated storage for the power cable and battery clamps, ensuring neat and compact storage.
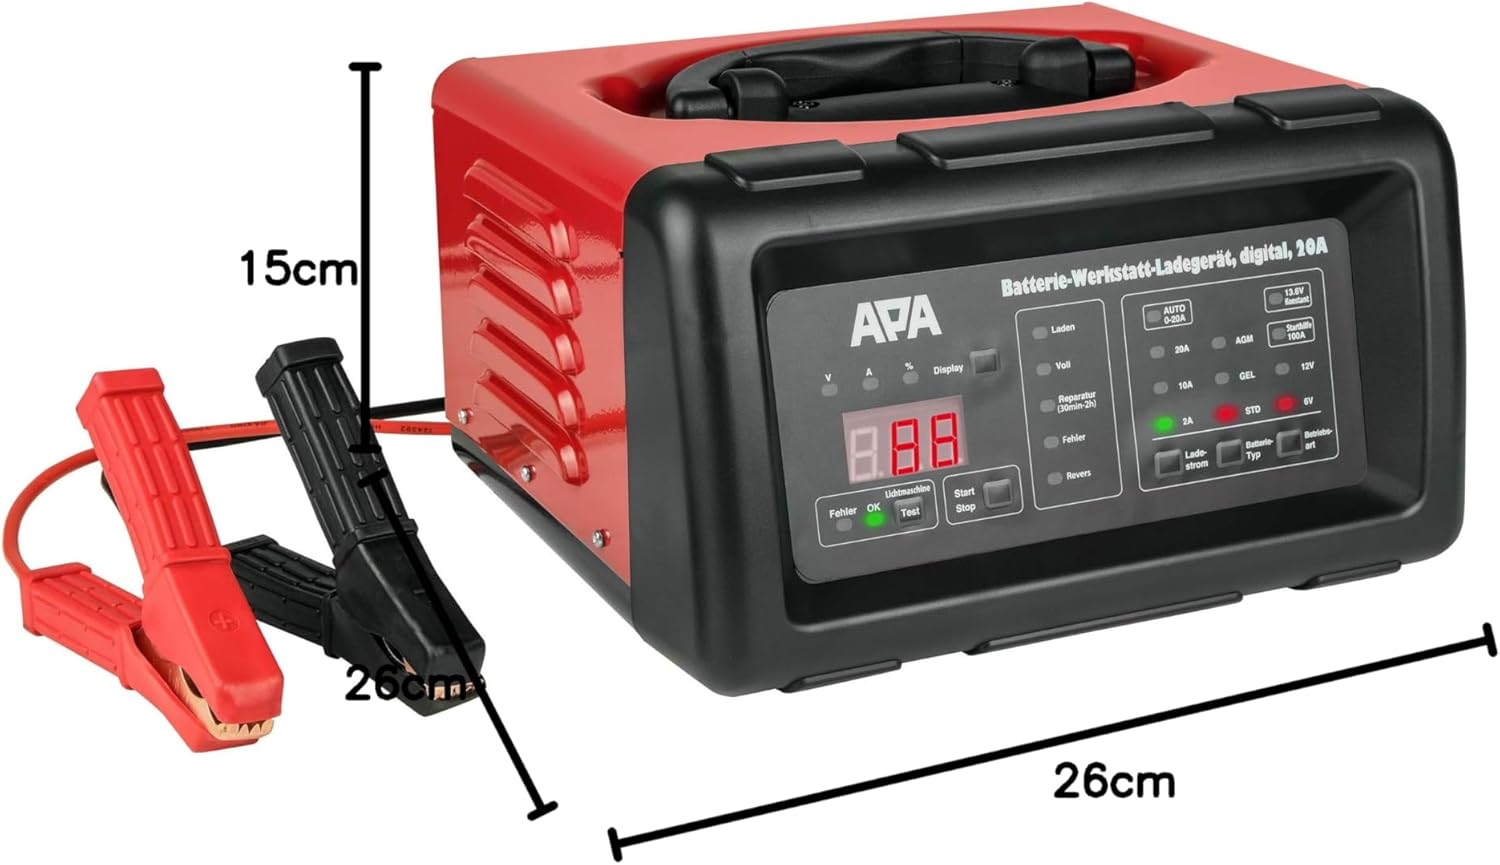
Рисунок 4: The battery charger shown with its approximate dimensions: 26 cm width, 26 cm depth, and 15 cm height, providing a clear idea of its compact size.
Настраивать
- Распаковать: Осторожно извлеките зарядное устройство и все аксессуары из упаковки.
- Осмотреть: Проверьте зарядное устройство и кабели на наличие повреждений. Не используйте устройство, если оно повреждено.
- Размещение: Разместите зарядное устройство на устойчивой, ровной поверхности в хорошо проветриваемом месте, вдали от прямых солнечных лучей, источников тепла и влаги.
- Подготовка батареи: Убедитесь, что клеммы аккумулятора чистые и без следов коррозии. При необходимости очистите их металлической щёткой.
Инструкция по эксплуатации
1. Подключение зарядного устройства к аккумулятору
- Убедитесь, что зарядное устройство отключено от розетки переменного тока.
- Подключите КРАСНЫЙ (+) положительный проводamp к положительной (+) клемме аккумулятора.
- Подключите ЧЕРНЫЙ (-) отрицательный проводamp to the negative (-) battery terminal. For vehicles, connect the black clamp к шасси транспортного средства вдали от аккумуляторной батареи и топливопровода, если аккумуляторная батарея все еще находится в транспортном средстве.
- Убедитесь, что соединения безопасны.
2. Connecting to Power and Selecting Mode
- Plug the charger's power cord into a standard 240V AC power outlet.
- Загорится цифровой дисплей.
- Use the "Battery Type" button to select the appropriate battery type (AGM, GEL, STD) and voltage (6V or 12V). The charger automatically detects the voltage for 12V batteries.
- Use the "Charge Current" button to select the desired charging current (2A, 10A, or 20A). For most applications, the "AUTO 0-20A" mode is recommended, which automatically adjusts the current.
- Press the "Start/Stop" button to begin charging. The display will show charging progress and battery status.
3. Процесс зарядки
The charger features a multi-stagПроцесс зарядки:
- Десульфатация: If a deeply discharged or sulfated battery is detected, the charger may enter a desulfation phase (indicated by "Reparatur" on the display, lasting 30min-2h).
- Мягкий старт: Gradually increases current to protect the battery.
- Массовая оплата: Заряжает аккумулятор с использованием максимально выбранного тока до тех пор, пока он не достигнет приблизительно 80% своей емкости.
- Заряд абсорбции: Сборы по сниженной ставкеasing current until the battery is fully charged.
- Плата за пополнение баланса/техническое обслуживание: Once fully charged ("Voll" indicated), the charger switches to a maintenance mode, providing a small current to keep the battery at optimal charge.
4. Jump Start Function (100A)
The charger can provide a temporary boost for starting a vehicle with a discharged battery.
- Ensure the charger is connected to the battery and power as described above.
- Select the "Starthilfe 100A" (Jump Start 100A) mode.
- Attempt to start the vehicle. Do not crank for more than 5 seconds. Wait at least 1 minute between attempts.
- Once the vehicle starts, disconnect the charger from the AC outlet first, then disconnect the clamps from the battery/chassis.
5. Отключение зарядного устройства
- Press the "Start/Stop" button to stop charging.
- Отключите зарядное устройство от розетки переменного тока.
- Disconnect the BLACK (-) negative clamp from the battery/chassis.
- Отсоедините КРАСНЫЙ (+) положительный кл.amp от клеммы аккумулятора.
Обслуживание
- Уборка: Протрите внешнюю поверхность зарядного устройства мягкой сухой тканью. Не используйте абразивные чистящие средства или растворители.
- Проверка кабеля: Регулярно проверяйте зарядные кабели и клampПроверьте на наличие повреждений, износа или коррозии. При необходимости замените.
- Хранилище: Store the charger in a cool, dry place when not in use. Utilize the integrated cable storage to keep cables tidy.
- Вентиляция: Убедитесь, что вентиляционные отверстия очищены от пыли и мусора, чтобы предотвратить перегрев.
Поиск неисправностей
| Проблема | Возможная причина | Решение |
|---|---|---|
| Зарядное устройство не включается. | No power supply; faulty outlet; damaged power cord. | Check power connection; try a different outlet; inspect power cord for damage. |
| "Fehler" (Error) indicator lights up. | Обратная полярность подключения; короткое замыкание; неисправность батареи. | Проверить clamp connections (red to +ve, black to -ve); inspect cables for shorts; test battery condition. |
| Аккумулятор не заряжается. | Incorrect mode selected; poor connection; deeply discharged battery. | Verify battery type and voltage selection; ensure clamps are securely connected; allow time for desulfation mode if applicable. |
| Зарядное устройство перегревается. | Плохая вентиляция; чрезмерная нагрузка. | Ensure adequate ventilation around the charger; reduce charging current if possible. |
Технические характеристики
| Особенность | Спецификация |
|---|---|
| Бренд | АПА |
| Модель | 16623 |
| Vol входtage | 240 В переменного тока |
| Выход Voltage | 6 В / 12 В постоянного тока |
| Ток зарядки | 2A, 10A, 20A (Automatic 0-20A) |
| Пусковой ток | 100А |
| Типы аккумуляторов | AGM, Gel, Wet, Maintenance-Free Lead-Acid Batteries |
| Время зарядки | Approx. 2 hours (depending on battery size and discharge level) |
| Материал | Пластиковый корпус |
| Размеры (Д x Ш x В) | 26 см x 26 см x 15 см (приблизительно) |
| Масса | 5783 грамм (приблизительно 5.78 кг) |
| Соблюдение техники безопасности | UL (as per specification) |
Гарантия и поддержка
For warranty information and technical support, please refer to the documentation provided with your purchase or contact APA customer service. Keep your proof of purchase for any warranty claims.
Производитель: EAL GmbH
Ask a question about this manual
Ask about setup, troubleshooting, compatibility, parts, safety, or missing instructions. Manuals+ will review the question and use this page’s manual context to help answer it.