Dinuy terminal micro 5
Руководство пользователя цифрового таймера Dinuy Terminal Micro 5
Модель: Terminal Micro 5
Бренд: Динуй
1. Введение
This manual provides comprehensive instructions for the installation, operation, and maintenance of your Dinuy Terminal Micro 5 Digital Time Switch. Please read this manual carefully before using the device to ensure safe and efficient operation. This device is designed to control electrical circuits based on programmed time schedules.
2 Важная информация по безопасности
- Опасность поражения электрическим током: Installation and maintenance should only be performed by a qualified electrician in accordance with all local and national electrical codes.
- Перед установкой или обслуживанием устройства отключите питание от главного автоматического выключателя.
- Не подвергайте устройство воздействию влаги, экстремальных температур или агрессивных сред.
- Убедитесь, что все соединения надежны и надлежащим образом изолированы, чтобы предотвратить короткое замыкание.
- Do not exceed the maximum load capacity specified for the device.
3. Продукт закончилсяview
The Dinuy Terminal Micro 5 is a compact digital time switch designed for DIN rail mounting. It features a clear LCD display for time and program status, along with intuitive buttons for easy programming.
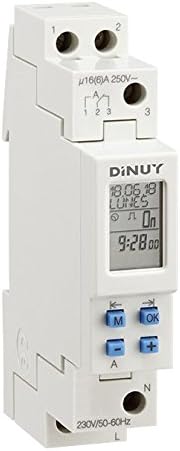
Figure 1: Dinuy Terminal Micro 5 Digital Time Switch
This image displays the Dinuy Terminal Micro 5 digital time switch. The device is white, designed for DIN rail mounting. The top section shows terminals labeled '1' and '2' for power input. Below this, there are terminals '1', '2', '3' for the switched output, with a rating of 'μ16(6)A 250V~'. The central part features a digital LCD screen displaying 'DINUY', '18.06.18', 'LUNES' (Monday), 'On', and '9:28.00'. Below the screen are four blue buttons: 'M' (Mode), 'OK', '-' (Minus/Left arrow), and '+' (Plus/Right arrow). The bottom section shows terminals 'N' (Neutral) and 'L' (Live) for the main power supply, with '230V/50-60Hz' indicated.
3.1. Компоненты
- ЖК-дисплей: Shows current time, day, program status, and programming menus.
- Кнопка «M» (режим): Used to navigate through different modes (e.g., time setting, program setting).
- Кнопка «ОК»: Подтверждает выбор и настройки.
- '-' Button (Minus/Left Arrow): Decreases values or moves left in menus.
- '+' Button (Plus/Right Arrow): Increases values or moves right in menus.
- Terminals L & N: Main power supply input (230V/50-60Hz).
- Терминалы 1, 2, 3: Switched output contacts (μ16(6)A 250V~).
4. Установка и настройка
4.1 Монтаж
The Dinuy Terminal Micro 5 is designed for DIN rail mounting. Snap the device onto a standard 35mm DIN rail in your electrical panel.
4.2. Схема подключения
ВНИМАНИЕ: Перед подключением проводов убедитесь, что питание отключено.
- Connect the main Live (L) wire to the 'L' terminal at the bottom of the device.
- Connect the main Neutral (N) wire to the 'N' terminal at the bottom of the device.
- For the switched output, connect the load's Live wire to terminal '1' or '3' (depending on desired contact type, typically '1' for normally open).
- Connect the incoming Live wire for the load to terminal '2'.
- Refer to the markings on the device for precise terminal identification: Input power (L, N) and Switched output (1, 2, 3).
4.3. Первоначальное включение
After wiring, restore power. The display should illuminate. If the display is blank, check power connections. The device may require initial time and date setting.
5. Инструкция по эксплуатации
5.1 Установка текущего времени и дня
- Press the 'M' button repeatedly until the time setting mode is displayed (e.g., flashing hours).
- Use the '+' and '-' buttons to adjust the hour. Press 'OK' to confirm.
- Repeat for minutes, then for the current day of the week.
- Press 'OK' to save and exit the time setting mode.
5.2. Программирование расписаний включения/выключения
The device allows setting multiple ON/OFF programs for different days or groups of days.
- Press the 'M' button until 'PROG' or a similar indicator appears.
- Use '+' or '-' to select a program number (e.g., '1 ON'). Press 'OK'.
- Set the desired ON time (hour and minute) using '+' and '-' and confirming with 'OK'.
- Select the days for this program (e.g., Mon-Fri, daily, specific days) using '+' and '-' and confirming with 'OK'.
- Repeat for the corresponding OFF time ('1 OFF').
- Continue for additional programs as needed.
- Press 'M' to exit programming mode and return to normal operation.
5.3. Ручное управление
To temporarily override the programmed schedule, press the 'M' button briefly during normal operation. This will cycle through 'ON', 'OFF', and 'AUTO' modes. Select 'AUTO' to resume programmed operation.
6. Техническое обслуживание
The Dinuy Terminal Micro 5 requires minimal maintenance. Ensure the device is kept clean and free from dust. Use a soft, dry cloth for cleaning. Do not use abrasive cleaners or solvents.
7. Поиск Неисправностей
- Устройство не включается: Check main power supply and wiring connections (L and N terminals). Ensure the circuit breaker is on.
- Load not switching: Verify that the program is correctly set and the device is in 'AUTO' mode. Check the load's wiring and functionality. Ensure the load does not exceed the device's maximum switching capacity.
- Некорректное отображение времени: Reset the current time and day as per section 5.1.
- Программы не выполняются: Ensure the device is in 'AUTO' mode. Recheck program settings for correct ON/OFF times and selected days.
8. Технические характеристики
| Особенность | Спецификация |
|---|---|
| Производитель | Динуй |
| Идентификатор продукта производителя | IH TER MC5 |
| Номер модели | terminal micro 5 |
| Vol входtage | 230 В переменного тока, 50-60 Гц |
| Коммутационная способность | μ16(6)A 250V~ |
| Тип крепления | DIN-рейка |
| Размеры упаковки | 11.2 х 6.8 х 5 см |
| Вес продукта | 100 г |
9. Информация о гарантии
This product is covered by the manufacturer's standard warranty. Please refer to the warranty card included with your purchase or contact Dinuy customer support for detailed warranty terms and conditions. Keep your proof of purchase for warranty claims.
10. Поддержка клиентов
For technical assistance, troubleshooting not covered in this manual, or warranty inquiries, please contact your local Dinuy distributor or visit the official Dinuy webсайт для контактной информации.