
1. Введение
Thank you for choosing the Everbilt 1/2 in. x 8 in. Brass MPT x MHT Anti-Siphon Sillcock. This manual provides essential information for the safe installation, operation, and maintenance of your new sillcock. Please read these instructions thoroughly before installation and retain them for future reference.
This sillcock is designed for outdoor water access, featuring a durable brass construction and an anti-siphon mechanism to prevent backflow contamination of your potable water supply. It is suitable for deck mount, single-hole installations.
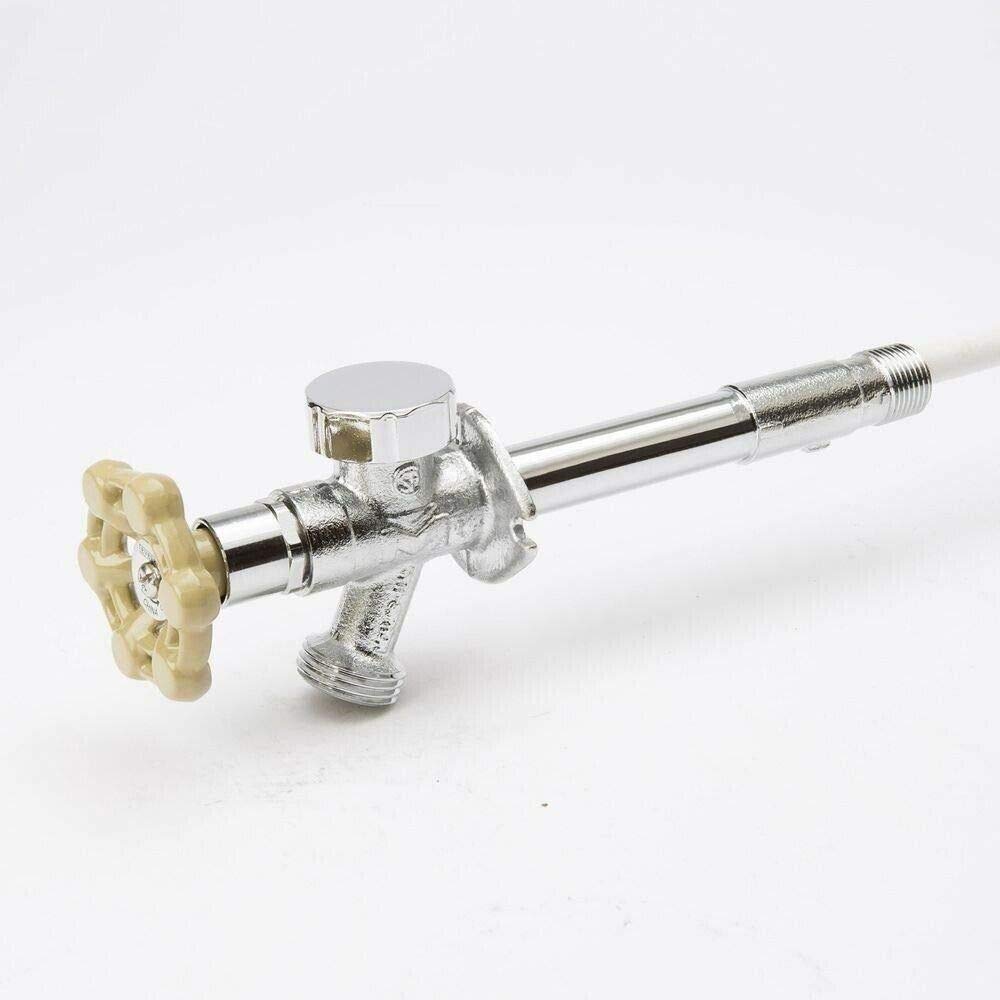
Рисунок 1: Everbilt 1/2 in. x 8 in. Brass Anti-Siphon Sillcock. This image displays the complete sillcock unit, including the main brass body, the lever handle, and the threaded connections for installation.
2. Информация по технике безопасности
Always observe basic safety precautions when installing or servicing plumbing fixtures. Failure to follow these instructions could result in property damage, personal injury, or death.
- Отключить подачу воды: Before beginning any installation or repair, ensure the main water supply to the area is completely shut off.
- Используйте защитную одежду: Всегда используйте соответствующие средства индивидуальной защиты, включая защитные очки и перчатки.
- Профессиональная установка: Если вы не уверены в какой-либо части процесса установки, проконсультируйтесь с квалифицированным сантехником.
- Местные коды: Убедитесь, что все процедуры монтажа соответствуют местным нормам и правилам сантехники и строительства.
- Anti-siphon feature: The anti-siphon mechanism is crucial for preventing backflow. Do not tamper with or remove this component.
- Подготовка к зиме: In freezing climates, proper winterization is essential to prevent damage to the sillcock and plumbing system.
3. Список деталей
Перед началом установки убедитесь в наличии всех компонентов.
- Everbilt 1/2 in. x 8 in. Brass Anti-Siphon Sillcock (Main Unit)
- Lever Handle (Pre-attached or separate)
- Deck Plate (Included for aesthetic finish)
- Mounting Hardware (Screws, nuts, washers - typically included for securing the sillcock)
4. Настройка и установка
4.1 Необходимые инструменты
- Разводной ключ или трубный ключ
- Pipe Thread Sealant (Teflon tape or pipe dope)
- Drill (if creating a new mounting hole)
- Appropriate Drill Bit (for mounting screws)
- Screwdriver (Phillips or flathead, depending on mounting hardware)
- Bucket or Towel (for catching residual water)
4.2 Проверки перед установкой
- Осмотрите продукт: Ensure there are no visible defects or missing parts.
- Проверьте соединения: Confirm that your existing plumbing connections are compatible with the 1/2 inch MPT (Male Pipe Thread) inlet and MHT (Male Hose Thread) outlet.
- Выберите местоположение: Select a suitable deck mount location that allows for easy access and proper drainage. Ensure there is sufficient space behind the mounting surface for the sillcock's length (8 inches).
- Shut off water: Locate and turn off the main water supply valve to your home or the specific branch line feeding the installation area. Open nearby faucets to relieve pressure and drain lines.
4.3 Этапы установки
- Prepare mounting hole: If replacing an old sillcock, remove it. Clean the mounting surface. If installing new, drill a hole of appropriate size for the sillcock body and mounting screws.
- Apply sealant: Apply pipe thread sealant (Teflon tape or pipe dope) to the 1/2 inch MPT inlet threads of the sillcock. Wrap tape clockwise 3-4 times.
- Insert sillcock: Insert the sillcock through the mounting hole from the exterior. Ensure the deck plate is positioned correctly against the exterior surface.
- Secure the sillcock: From the interior, secure the sillcock using the provided mounting hardware. Tighten screws evenly to ensure a snug fit without over-tightening, which could damage the mounting surface or sillcock.
- Подключите водоснабжение: Connect your 1/2 inch FPT (Female Pipe Thread) water supply line to the 1/2 inch MPT inlet of the sillcock. Use an adjustable wrench to tighten the connection. Do not overtighten.
- Проверьте на наличие утечек: Slowly turn the main water supply back on. Inspect all connections for leaks. If leaks are present, turn off the water, tighten the connection slightly, and recheck.
- Тестовая эксплуатация: Open and close the sillcock handle to ensure smooth operation and proper water flow.
5. Операция
The Everbilt Anti-Siphon Sillcock features a simple lever handle for water control.
- Чтобы открыть: Rotate the lever handle counter-clockwise to open the valve and allow water to flow.
- Чтобы закрыть: Rotate the lever handle clockwise to close the valve and stop water flow. Ensure the handle is fully closed to prevent drips.
- Anti-Siphon Feature: The integrated anti-siphon device automatically prevents backflow of contaminated water into your potable water supply. Do not obstruct or remove this device.
6. Техническое обслуживание
6.1 Очистка
To maintain the polished brass finish, clean the sillcock regularly with a soft cloth and mild soap. Avoid abrasive cleaners, scouring pads, or harsh chemicals, as these can damage the finish.
6.2 Winterization (for Freezing Climates)
Proper winterization is critical to prevent freezing and potential damage to the sillcock and your home's plumbing system. This sillcock is designed to drain when closed, but additional steps are recommended:
- Disconnect hoses: Before the first freeze, disconnect all hoses from the sillcock.
- Shut off interior valve: Locate the interior shut-off valve for the sillcock's water supply (if available) and turn it off.
- Drain the line: Open the sillcock handle to allow any remaining water in the line to drain out. Leave the handle open until spring.
- Утеплите: Consider insulating the exterior portion of the sillcock with a faucet cover for added protection in extremely cold conditions.
7. Поиск Неисправностей
| Проблема | Возможная причина | Решение |
|---|---|---|
| Утечки воды из соединений | Loose connection; insufficient pipe thread sealant. | Turn off water supply. Tighten connection slightly. If leak persists, disassemble, reapply pipe thread sealant, and reassemble. |
| Water drips from spout when closed | Handle not fully closed; worn washer or internal component. | Ensure handle is fully closed. If dripping continues, internal components may need inspection or replacement by a qualified plumber. |
| Низкий расход воды | Partially closed main water supply; obstruction in line; aerator (if present) clogged. | Check if main water supply is fully open. Inspect for kinks in hoses. Clean or replace aerator if applicable. |
| Sillcock frozen (in cold weather) | Improper winterization. | Do not attempt to thaw with open flame. Use a hairdryer or warm towels. In the future, ensure proper winterization steps are followed. If damage occurs, replacement may be necessary. |
8. Технические характеристики
| Бренд | Эвербилт |
| Номер модели | 104-515EB (Part Number: VFFASPC15EB) |
| Размер соединения | 1/2 дюйма |
| Тип впуска | MPT (Male Pipe Thread) |
| Тип розетки | MHT (Male Hose Thread) |
| Длина | 8 дюймов |
| Материал | Brass, Steel |
| Тип отделки | Полированная латунь |
| Тип крепления | Крепление на палубу, одно отверстие |
| Anti-Siphon Feature | Да |
| Вес товара | 9.6 унции |
| СКП | 032888187788 |
9. Гарантия
Everbilt products are manufactured to high-quality standards. For specific warranty information, please refer to the warranty card included with your purchase or visit the official Everbilt webСохраните чек о покупке для предъявления гарантийных претензий.
10. Поддержка клиентов
If you have any questions regarding the installation, operation, or maintenance of your Everbilt sillcock, please contact Everbilt customer support. Contact information can typically be found on the product packaging or the official Everbilt webсайт.
Please have your model number (104-515EB) and date of purchase ready when contacting support.