
1. Введение
This manual provides essential instructions for the installation, operation, and maintenance of your HP Compaq 6005 Pro Socket AM3 System Motherboard (P/N 531966-001). This motherboard is designed for use in personal computers and supports AMD Socket AM3 processors. Please read this manual thoroughly before proceeding with installation or operation.
2. Информация по технике безопасности
Observe the following safety precautions to prevent damage to the motherboard or personal injury:
- Перед установкой или снятием любых компонентов всегда отключайте источник питания от розетки.
- Для предотвращения повреждения чувствительных компонентов электростатическим разрядом (ESD) используйте антистатический браслет и работайте на антистатическом коврике.
- Держите материнскую плату за края, избегая контакта с компонентами и разъемами.
- Обеспечьте надлежащую вентиляцию внутри корпуса компьютера, чтобы предотвратить перегрев.
- Если вы не уверены в каком-либо этапе установки, проконсультируйтесь с квалифицированным специалистом.
3. Компоненты материнской платыview
Familiarize yourself with the key components and connectors on your HP Compaq 6005 Pro motherboard.

Рисунок 3.1: Нисходящий view of the HP Compaq 6005 Pro motherboard, showing the CPU socket, RAM slots, and various chipsets.
The motherboard features an AMD Socket AM3 for compatible processors, four DDR3 DIMM slots for memory, and various expansion slots for additional cards. The rear I/O panel provides connectivity for peripherals.
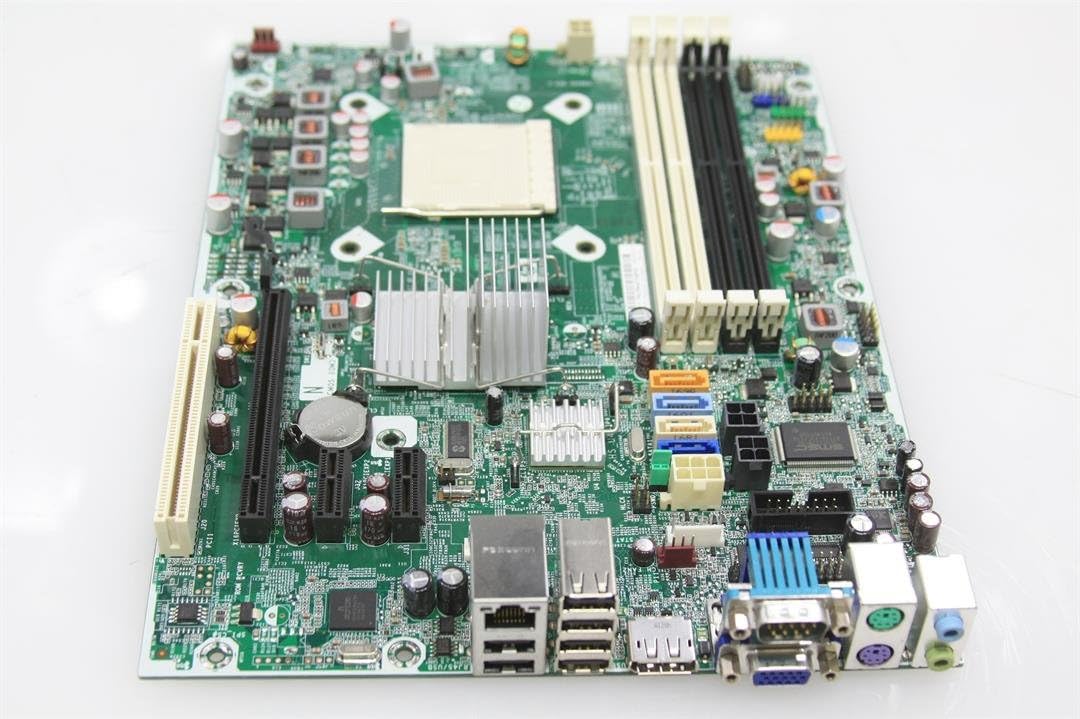
Рисунок 3.2: Rear I/O panel of the HP Compaq 6005 Pro motherboard, featuring VGA, DisplayPort, DVI, USB ports, Ethernet, and audio jacks.
Ключевые области включают:
- Разъем процессора (AM3): For installing the central processing unit.
- Слоты DIMM: For installing DDR3 memory modules.
- Слоты PCIe: Для видеокарт и других плат расширения.
- SATA-порты: For connecting storage devices like hard drives and SSDs.
- Разъемы питания: Main 24-pin ATX and 4-pin CPU power connectors.
- Разъемы на передней панели: For case buttons, LEDs, and front USB/audio ports.

Рисунок 3.3: Another perspective of the HP Compaq 6005 Pro motherboard, highlighting expansion slots and internal connectors.
4. Настройка и установка
Выполните следующие шаги для правильной установки материнской платы и ее компонентов.
4.1. Контрольный список перед установкой
- Корпус компьютера с соответствующими стойками.
- Compatible AMD Socket AM3 processor.
- DDR3 memory modules.
- CPU cooler with thermal paste.
- Блок питания (БП).
- Отвертка и антистатический браслет.
4.2. Установка материнской платы
- Install the I/O shield into the computer case's rear opening.
- Аккуратно установите материнскую плату в корпус, совместив отверстия для винтов с крепежными стойками.
- Закрепите материнскую плату винтами, убедившись, что она надежно зафиксирована, но не перетягивая их.
4.3. Установка процессора
- Поднимите рычаг разъема процессора.
- Совместите треугольную метку на процессоре с соответствующей меткой на сокете.
- Аккуратно, не прилагая усилий, вставьте процессор в разъем.
- Опустите рычаг разъема, чтобы зафиксировать процессор.
- Нанесите тонкий, ровный слой термопасты на поверхность процессора.
- Install the CPU cooler according to its manufacturer's instructions, ensuring good contact with the CPU.
4.4. Установка памяти (ОЗУ)
- Откройте зажимы на обоих концах слота DIMM.
- Совместите выемку на модуле памяти DDR3 с выступом в слоте DIMM.
- Плотно нажмите на оба конца модуля памяти, пока зажимы не защелкнутся.
4.5. Подключение питания
- Connect the 24-pin ATX power cable from the PSU to the main power connector on the motherboard.
- Connect the 4-pin CPU power cable from the PSU to the CPU power connector near the CPU socket.
4.6. Storage Devices and Expansion Cards
- Connect SATA data cables from your storage devices (HDD/SSD) to the SATA ports on the motherboard.
- Install any necessary expansion cards (e.g., graphics card) into the appropriate PCIe slots and secure them with screws.
4.7. Передняя панель и периферийные соединения
- Connect the front panel cables (power button, reset button, HDD LED, power LED, front USB, front audio) to their respective headers on the motherboard. Refer to your case manual for specific pin assignments.
- Connect external peripherals such as keyboard, mouse, monitor, and network cable to the rear I/O ports.
5. Инструкция по эксплуатации
5.1. Первая загрузка
- After all components are installed and connected, connect the power cord to the PSU and turn on the power switch.
- Нажмите кнопку питания на корпусе компьютера.
- Система должна включиться, и вы должны увидеть изображение на мониторе.
5.2. Настройка BIOS/UEFI
Для доступа к утилите настройки BIOS/UEFI нажмите соответствующую клавишу (обычно это Ф10 or Ф12 for HP systems) repeatedly during the initial boot sequence. In the BIOS/UEFI, you can configure system settings, boot order, and monitor hardware status.
5.3. Установка операционной системы
Once the system is booting correctly, you can proceed with installing your preferred operating system (e.g., Windows 10) from a bootable USB drive or DVD.
6. Техническое обслуживание
6.1. Уборка
Regularly clean dust from the motherboard, CPU cooler, and case fans using compressed air. Ensure the system is powered off and unplugged before cleaning. Avoid using liquid cleaners directly on components.
6.2. Обновления BIOS
Периодически проверяйте официальную поддержку HP. website for BIOS/firmware updates. BIOS updates can improve system stability, compatibility, and performance. Follow HP's instructions carefully when performing a BIOS update to avoid system damage.
7. Поиск Неисправностей
Если у вас возникли проблемы, воспользуйтесь следующими общими шагами по устранению неполадок:
- Нет питания: Ensure all power cables (24-pin ATX, 4-pin CPU) are securely connected. Check the PSU switch and wall outlet.
- Нет дисплея: Verify the monitor is connected to the correct video output (VGA, DVI, or DisplayPort) and is powered on. Reseat the graphics card (if applicable) and RAM modules.
- Звуковые сигналы системы: Listen for beep codes during startup. These codes often indicate specific hardware issues (e.g., memory failure, graphics card issue). Consult the HP support website for a list of beep codes for your model.
- Нестабильность системы/сбои: Check for overheating (monitor temperatures in BIOS). Ensure all drivers are up to date. Test memory modules individually.
- Компонент не обнаружен: Reseat the component (e.g., hard drive, expansion card). Check cable connections. Verify BIOS settings.
8. Технические характеристики
Detailed technical specifications for the HP Compaq 6005 Pro Motherboard (P/N 531966-001).
| Особенность | Спецификация |
|---|---|
| Бренд | HP |
| Название модели | HP Compaq 6005 Pro |
| Номер модели | 531966-001 |
| Сокет ЦП | AMD Разъем AM3 |
| Совместимые процессоры | AMD Phenom II, Athlon II, AMD FX |
| Тип чипсета | AMD 760MP |
| Технология оперативной памяти | DDR3 |
| Доступные слоты памяти | 4 слота DIMM |
| Максимальный размер оперативной памяти | 16 ГБ |
| Тактовая частота памяти | Up to 2133 MHz (depending on CPU/RAM) |
| Интерфейс графической карты | PCI Express x16 |
| Слоты расширения | 1x PCIe x16, 2x PCIe x1, 1x PCI |
| Общее количество портов SATA | 4 портов SATA 2.0 |
| Тип основного разъема питания | 24-контактный ATX |
| Задние порты ввода/вывода | 6x USB 2.0, 1x VGA, 1x DVI-D, 1x DisplayPort, 1x RJ-45 Ethernet, Audio In/Out/Mic, 2x PS/2 |
| Совместимые устройства | Персональный компьютер |
| Платформа | Windows 10 (и более ранние совместимые версии) |
| Форм-фактор | Micro-ATX |
9. Информация о гарантии
For specific warranty terms and conditions related to your HP Compaq 6005 Pro Motherboard, please refer to the original purchase documentation or contact HP customer support directly. Warranty coverage may vary based on region and point of purchase.
10 Поддержка
For additional assistance, driver downloads, updated documentation, or to contact technical support, please visit the official HP support webсайт:
When contacting support, please have your motherboard model number (531966-001) and any relevant system information ready.