Уайт-Роджерс 1E78-151
Руководство пользователя программируемого термостата White Rodgers 1E78-151 серии 70
Model: 1E78-151
Введение
This manual provides comprehensive instructions for the installation, operation, and maintenance of your White Rodgers 1E78-151 70 Series Programmable Thermostat. Please read this manual thoroughly before beginning installation or operation to ensure proper function and safety.
Информация по безопасности
Always turn off power to the heating/cooling system at the main fuse or circuit breaker panel before installing or servicing the thermostat. Failure to do so could result in electrical shock or equipment damage. This thermostat is designed for 24 Volt AC applications only. Do not use on line voltage systems (120/240 Volt AC). If you are unsure about any part of the installation process, consult a qualified HVAC technician.
Продукт болееview
The White Rodgers 1E78-151 is a single-stage, programmable thermostat designed for vertical mounting. It features an LCD display, push-button controls for time, program, run, and hold functions, and slide switches for fan and system mode selection.
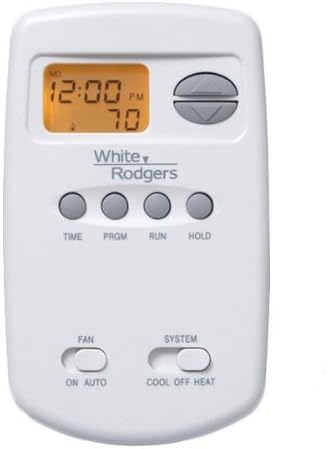
Рисунок 1: Передний view of the White Rodgers 1E78-151 Thermostat. It shows the LCD display at the top, followed by up/down arrow buttons. Below these are four circular buttons labeled TIME, PRGM, RUN, and HOLD. At the bottom are two horizontal slide switches, one for FAN (ON/AUTO) and one for SYSTEM (COOL/OFF/HEAT).
Ключевые компоненты:
- ЖК-дисплей: Shows current time, day, temperature, and system status.
- Кнопки вверх / вниз: Adjust temperature settings and program values.
- Кнопка ВРЕМЯ: Используется для установки текущего времени и дня.
- PRGM (Program) Button: Accesses and modifies programming schedules.
- Кнопка «ПУСК»: Activates the programmed schedule.
- Кнопка УДЕРЖАТЬ: Maintains a constant temperature, overriding the program.
- FAN Switch (ON/AUTO): Controls fan operation. ON runs the fan continuously; AUTO runs the fan only when heating or cooling is active.
- SYSTEM Switch (COOL/OFF/HEAT): Выбирает режим работы вашей системы отопления, вентиляции и кондиционирования воздуха.
Настройка и установка
Необходимые инструменты:
- Отвертка (крестовая и плоская)
- Drill with appropriate bit (if mounting new backplate)
- Инструмент для зачистки проводов/резак
- Уровень (необязательно)
Этапы установки:
- Выключите питание: Disconnect power to the heating and cooling system at the main fuse or circuit breaker.
- Снимите старый термостат:
- Снимите крышку старого термостата.
- Note the wire connections. Label each wire with the terminal designation it was connected to (e.g., R, W, Y, G, C).
- Отсоедините провода и снимите старое основание термостата.
- Установите новую базу термостата:
- Pull the thermostat wires through the opening in the new thermostat base.
- Position the base on the wall and mark mounting hole locations.
- Drill pilot holes if necessary and secure the base to the wall using the provided screws.
- Подключите термостат:
- Connect the labeled wires to the corresponding terminals on the new thermostat base. Refer to the wiring diagram provided with your specific HVAC system for detailed connections.
- Убедитесь, что все соединения надежны.
- Установите батареи: Вставьте две новые щелочные батарейки типа АА в батарейный отсек.
- Прикрепите корпус термостата: Align the thermostat body with the base and snap it into place.
- Восстановить мощность: Turn power back on to the heating and cooling system at the main fuse or circuit breaker.
Начальная настройка:
- Установите текущее время и день:
- Нажмите ВРЕМЯ кнопка.
- Используйте Up or Вниз кнопки, чтобы настроить час, затем нажмите ВРЕМЯ again to set minutes, and once more for the day of the week.
- Нажимать БЕГАТЬ для выхода.
Инструкция по эксплуатации
Выбор режима работы системы:
Используйте СИСТЕМА Передвиньте переключатель, чтобы выбрать желаемый режим работы:
- ПРОХЛАДНЫЙ: Термостат будет управлять вашей системой охлаждения.
- OFF: Системы отопления и кондиционирования отключены.
- НАГРЕВАТЬ: Термостат будет управлять вашей системой отопления.
Выбор режима работы вентилятора:
Используйте FAN slide switch to select the desired fan operation:
- АВТО: Вентилятор работает только тогда, когда система отопления или охлаждения активно функционирует. Это наиболее распространенный режим работы.
- НА: Вентилятор работает постоянно, независимо от того, активна ли система отопления или охлаждения.
Установка температуры:
In БЕГАТЬ режим, используйте Up or Вниз arrow buttons to adjust the desired temperature setpoint. The new setpoint will be displayed.
Составление расписания:
The thermostat allows for programmable schedules to automatically adjust temperatures throughout the day.
- Нажмите ПРГМ button. The display will show the first program period (e.g., "MORN") and its set temperature.
- Используйте Up or Вниз buttons to adjust the temperature for this period.
- Нажимать ПРГМ again to advance to the next program period (e.g., "DAY", "EVE", "NITE") and repeat step 2.
- Продолжайте нажимать ПРГМ to cycle through all program periods for each day of the week, adjusting temperatures as needed.
- После того, как все необходимые программы будут установлены, нажмите БЕГАТЬ для активации расписания.
Temporary Temperature Hold:
To temporarily override the program schedule:
- In БЕГАТЬ режим, используйте Up or Вниз arrow buttons to set a new desired temperature. This will temporarily hold the temperature until the next program period begins.
- To cancel the temporary hold and return to the program, press the БЕГАТЬ кнопка.
Permanent Temperature Hold:
To maintain a constant temperature indefinitely, overriding all programming:
- Нажмите ДЕРЖАТЬ button. The word "HOLD" will appear on the display.
- Используйте Up or Вниз arrow buttons to set the desired constant temperature.
- To cancel the permanent hold and return to the program, press the БЕГАТЬ кнопка.
Обслуживание
Замена батареи:
The thermostat requires two AA alkaline batteries. When the battery indicator appears on the display, replace the batteries immediately to avoid loss of programming.
- Осторожно отсоедините корпус термостата от настенной пластины.
- Извлеките старые батареи и утилизируйте их надлежащим образом.
- Вставьте две новые щелочные батарейки типа АА, соблюдая полярность (+/-).
- Установите корпус термостата обратно на настенную панель.
- The time and program settings may need to be re-entered if batteries were depleted for an extended period.
Уборка:
Протрите внешнюю поверхность термостата мягкой тряпкой.amp Ткань. Не используйте абразивные чистящие средства или растворители.
Поиск неисправностей
| Проблема | Возможная причина | Решение |
|---|---|---|
| Дисплей термостата пустой. | Разряженные аккумуляторы. | Замените батарейки на новые щелочные батарейки типа АА. |
| Heating/Cooling system does not turn on. |
|
|
| Temperature does not change. |
|
|
Технические характеристики
- Модель: 1Е78-151
- Бренд: Уайт-Роджерс
- Тип: Одиночный Stage, Programmable Thermostat
- Томtage: 24 В переменного тока
- Отображать: ЖК-дисплей с подсветкой
- Тип управления: Push Button / Button Control
- Протокол подключения: Z-Wave (Note: Basic Z-Wave functionality for integration, consult system documentation for details)
- Цвет: Белый
- Монтаж: Вертикальный
Гарантия и поддержка
For warranty information or technical support, please refer to the documentation included with your purchase or visit the official White-Rodgers webСохраните чек о покупке для предъявления гарантийных претензий.
Ask a question about this manual
Ask about setup, troubleshooting, compatibility, parts, safety, or missing instructions. Manuals+ will review the question and use this page’s manual context to help answer it.