
1. Введение и окончаниеview
This manual provides essential information for the safe and efficient operation, maintenance, and troubleshooting of your JET JSG-6DC Benchtop Belt and Disc Sander. Please read and understand all instructions before operating the machine.

Figure 1: JET JSG-6DC Benchtop Belt and Disc Sander
The image displays the complete JET JSG-6DC Benchtop Belt and Disc Sander, showcasing its primary components including the belt sanding arm on the left, the disc sanding plate on the right, and the motor housing in the center with the power switch.
Основные характеристики:
- Мощный мотор: Equipped with a 1-1/2 HP motor for demanding sanding tasks.
- Dual Sanding Surfaces: Features a 6" x 48" belt and a 12" disc for versatile applications.
- Регулируемый рычаг ремня: The belt can be used horizontally, vertically, or at any angle in between.
- Precision Tables: Cast iron tables with miter gauge slots and positive stops at 90 and 45 degrees.
- Эффективный сбор пыли: Single 4" dust port for effective dust extraction from both sanding surfaces.
- Graphite Platen: Graphite-covered steel platen for cooler operation and extended belt life.
- Простые настройки: Dual thumbscrew belt tracking adjustment and quick-release belt tension lever.
2. Инструкции по технике безопасности
При работе с электроинструментами всегда соблюдайте основные меры безопасности, чтобы снизить риск возгорания, поражения электрическим током и травм. Сохраните это руководство для дальнейшего использования.
Общие правила безопасности:
- Рабочая зона: Содержите рабочее место в чистоте и хорошем освещении. Загроможденные или темные места способствуют несчастным случаям.
- Электробезопасность: Не подвергайте электроинструменты воздействию дождя или влаги. Избегайте контакта тела с заземленными поверхностями.
- Личная безопасность: Always wear eye protection. Use hearing protection when operating the sander. Wear appropriate clothing; avoid loose clothing, jewelry, and long hair that can get caught in moving parts.
- Работа машины: Do not force the tool. Use the correct tool for your application. Ensure the power switch is in the OFF position before connecting to power.
- Обслуживание: Отсоедините вилку от источника питания перед выполнением каких-либо регулировок, заменой принадлежностей или хранением инструмента.
- Сбор пыли: Always connect the sander to a dust collection system to minimize airborne dust and maintain a clear workspace.
3. Компоненты и элементы управления
Familiarize yourself with the various parts of the sander before operation.
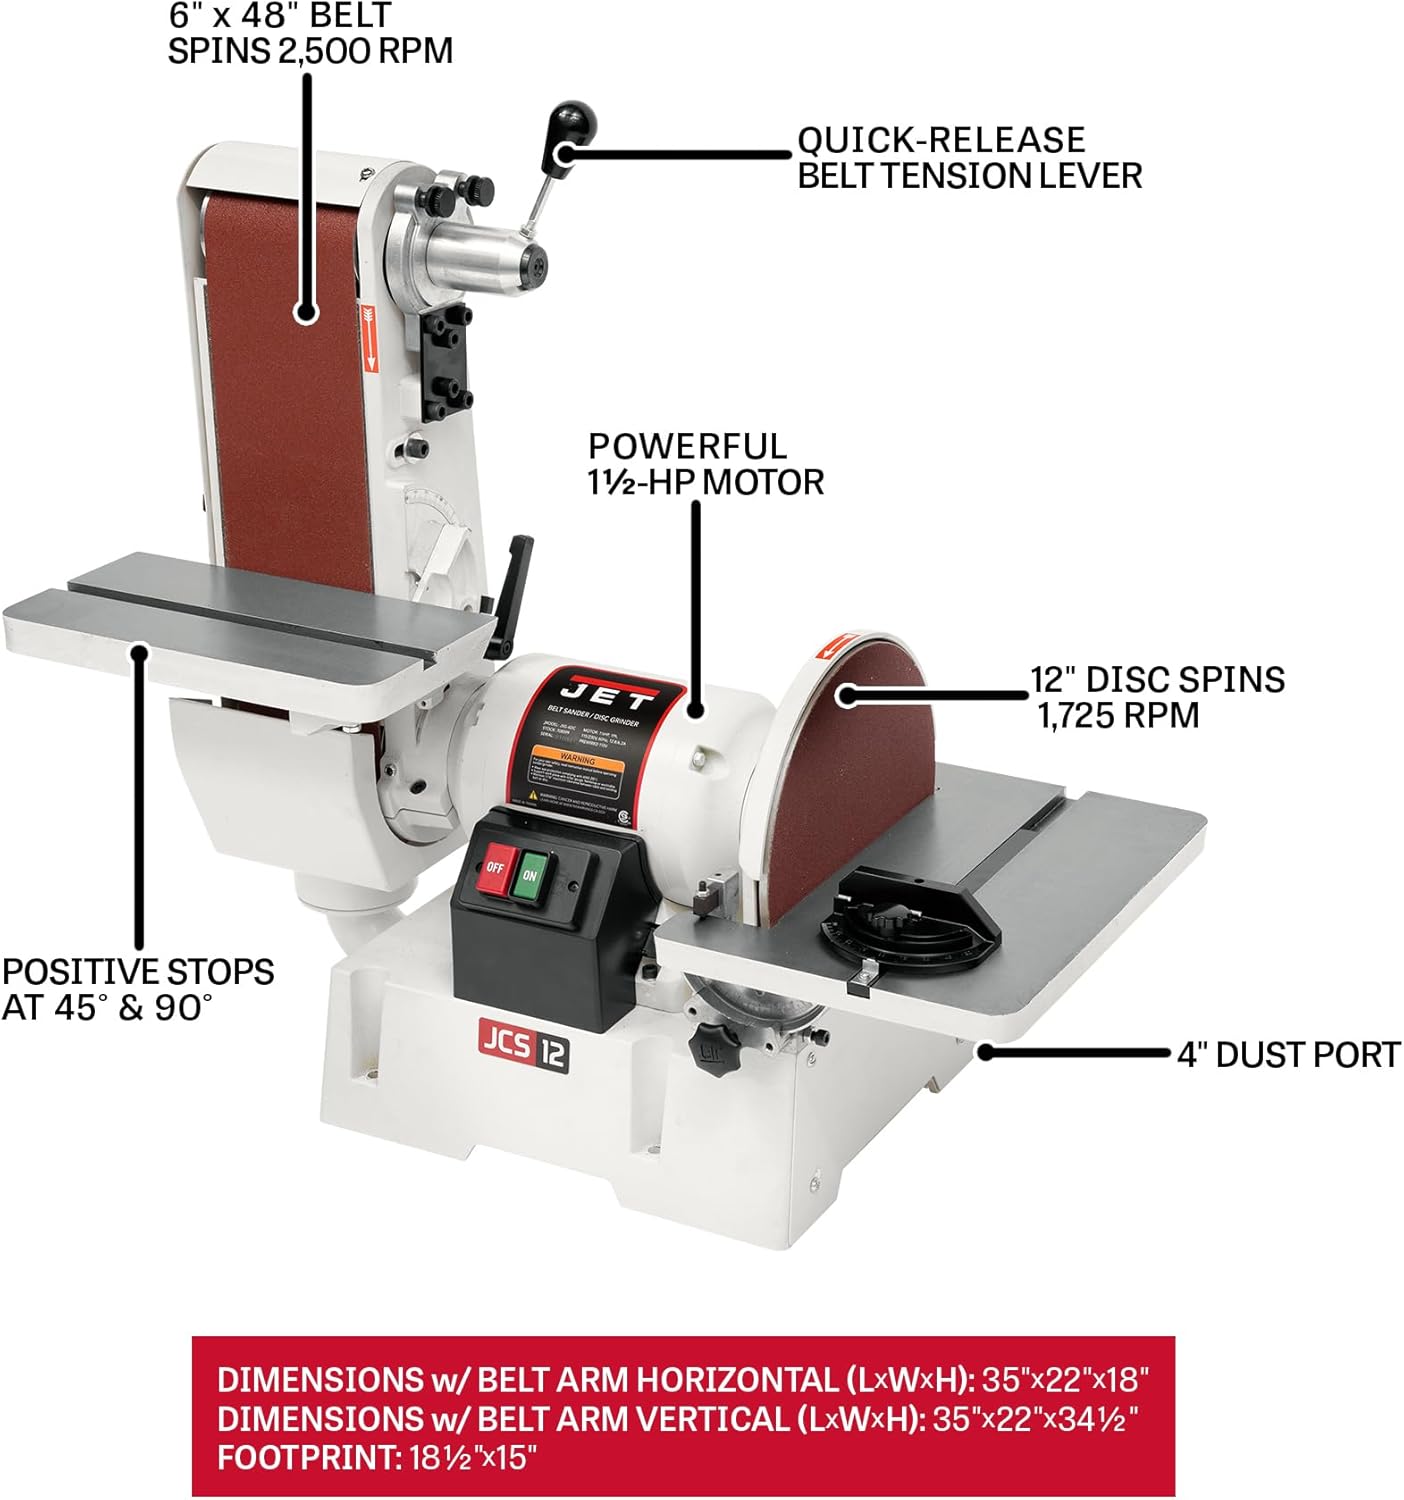
Figure 2: Key Components of the JSG-6DC Sander
This diagram illustrates the main components of the sander, including the 6" x 48" belt, 12" disc, 1-1/2 HP motor, quick-release belt tension lever, dual thumbscrew belt tracking adjustment, positive stops at 45° & 90°, and the 4" dust port.
- Belt Sanding Arm: Holds the 6" x 48" abrasive belt. Can be adjusted for horizontal, vertical, or angled sanding.
- Disc Sanding Plate: The 12" diameter disc for flat sanding operations.
- Рабочие столы: Two precision-ground cast iron tables, one for the belt and one for the disc, with miter gauge slots.
- Угловой датчик: Used with the work tables for accurate angle sanding.
- Выключатель: ON/OFF switch located on the motor housing.
- Пылесборник: 4-inch diameter port for connecting to a dust collection system.
- Регулировка отслеживания ремня: Dual thumbscrews for precise alignment of the sanding belt.
- Belt Tension Lever: Quick-release lever for easy belt changes.
4. Настройка и сборка
Распаковка и осмотр:
Carefully remove the sander and all components from the packaging. Inspect for any shipping damage. Report any damage immediately to your dealer.
Размещение:
Place the sander on a sturdy, level workbench or an optional stand. Ensure adequate space around the machine for safe operation and material handling.
Электрическое подключение:
- The JSG-6DC is prewired for 115V operation. It can be rewired for 230V by a qualified electrician if needed.
- Убедитесь, что источник питания соответствует мощностиtage requirements of the sander.
- Connect the sander to a grounded outlet.
Dust Collection System Connection:
Connect a 4-inch dust collection hose to the dust port located at the rear of the sander base. Proper dust collection is crucial for safety and machine longevity.

Figure 3: 4-Inch Dust Port
крупный план view of the 4-inch dust port, designed for connecting to an external dust collection system to manage sanding debris.
5. Операция
Запуск и остановка:
- To start the sander, press the green "ON" button.
- To stop the sander, press the red "OFF" button.
Using the Belt Sander:
- Belt Arm Adjustment: The belt arm can be positioned from horizontal to vertical. Loosen the locking knob, adjust the arm to the desired angle, and tighten the knob securely.
- Отслеживание ленты: Use the dual thumbscrew belt tracking adjustment to ensure the belt runs centrally on the rollers. Adjust while the sander is running (briefly) until the belt tracks correctly.
- Поддержка заготовки: Utilize the belt work table for supporting your workpiece. The table can be adjusted for angle sanding.
- Техника шлифования: Apply light, even pressure. Move the workpiece smoothly across the belt to prevent uneven sanding and overheating.

Figure 4: Dual Thumbscrew Belt Tracking Adjustment
A close-up of the dual thumbscrews used for precise adjustment of the sanding belt's tracking, ensuring it stays centered during operation.

Figure 5: Preset Stops for Work Tables
This image shows the mechanism for setting the work tables with positive stops at 90 and 45 degrees, facilitating accurate angle sanding.
Using the Disc Sander:
- Work Table Adjustment: The disc work table can be tilted and locked at various angles, with positive stops at 90 and 45 degrees.
- Угловой датчик: Insert the miter gauge into the table slot for precise angle sanding on the disc.
- Техника шлифования: Always sand on the downward-rotating side of the disc (left side when facing the disc) to prevent the workpiece from being thrown.

Figure 6: Precision-Ground Cast Iron Tables
A view of the robust cast iron work tables, highlighting their precision-ground surface for stable and accurate workpiece support during sanding.
6. Техническое обслуживание
Regular maintenance ensures optimal performance and extends the life of your sander. Always disconnect power before performing any maintenance.
Уборка:
- After each use, clean dust and debris from the machine, especially around the motor vents, belt, and disc areas.
- Use compressed air or a brush. Do not use solvents that may damage plastic parts.
Замена ремня:
- Отключите питание.
- Release the quick-release belt tension lever.
- Remove the old belt and install the new 6" x 48" belt, ensuring the directional arrow on the belt matches the arrow on the machine.
- Re-engage the tension lever and adjust belt tracking.
Замена диска:
- Отключите питание.
- Remove the quick-lock dust cover for access to the disc.
- Peel off the old adhesive-backed 12" sanding disc.
- Clean the disc plate thoroughly before applying a new disc.
- Align and firmly press the new disc onto the plate.

Figure 7: Graphite-Covered Steel Platen
крупный план view of the graphite-covered steel platen, which helps reduce friction and heat buildup, extending the life of the sanding belt.
7. Поиск Неисправностей
В этом разделе рассматриваются распространенные проблемы, с которыми вы можете столкнуться при работе со шлифовальной машиной.
| Проблема | Возможная причина | Решение |
|---|---|---|
| Сандер не выйдет в стартовом составе | Отсутствие питания, неисправный выключатель, сработал автоматический выключатель. | Check power connection, wall outlet, circuit breaker. Inspect switch for damage. |
| Belt tracks unevenly | Incorrect belt tracking adjustment, worn belt. | Adjust belt tracking using thumbscrews. Replace worn belt. |
| Чрезмерная вибрация | Loose components, unbalanced disc, worn bearings. | Check all fasteners. Ensure disc is properly seated. Contact service if bearings are suspected. |
| Плохой пылеудаление | Clogged dust port/hose, inadequate dust collector. | Clear obstructions from dust port and hose. Ensure dust collector is operating efficiently. |
| Sander bogs down under load | Overloading, dull abrasive, incorrect voltage. | Reduce pressure on workpiece. Replace abrasive belt/disc. Verify correct voltagэлектронная поставка. |
8. Технические характеристики
| Спецификация | Деталь |
|---|---|
| Номер модели | JSG-6DC |
| Номер детали | 708599 |
| Мотор | 1-1/2 HP, 115/230V, 1Ph (prewired 115V) |
| AmpНапряжение (115 В) | 12.8 Amps |
| Размер ремня | 6" x 48" |
| Скорость ленты | 2,500 SFPM (Surface Feet Per Minute) |
| Диаметр диска | 12 дюймов |
| Скорость диска | 1,725 об/мин |
| Габаритные размеры (Д x Ш x В) | 35" x 22" x 34.5" (with belt arm vertical) |
| Масса | 215 фунтов |
| Материал | Чугун, сталь |
| Included Abrasives | 60 Grit Belt, 60 Grit Disc |

Figure 8: Belt and Disc Speeds
This image highlights the operational speeds of the sander: the belt spins at 2,500 SFPM and the disc spins at 1,725 RPM.
9. Гарантия и поддержка
Информация о гарантии:
The JET JSG-6DC Benchtop Belt and Disc Sander is covered by a Гарантия 5 год. Данная гарантия распространяется на дефекты материалов и изготовления при нормальном использовании и обслуживании.

Figure 9: JET 5-Year Warranty
The image displays the official JET 5-Year Warranty logo, indicating the product's coverage period.
For full warranty details, terms, and conditions, please refer to the official JET webсайт или обратитесь в службу поддержки клиентов.
Служба поддержки клиентов:
For technical assistance, parts, or service inquiries, please contact JET customer support. Have your model number (JSG-6DC) and serial number ready when contacting support.
Посетите официальный сайт JET Store on Amazon для получения дополнительной информации и аксессуаров к продукту.